How to Publish Remarkable Content Every Week (Even if Your Time is Limited)

 Do you know why top bloggers like Neil Patel, Ramit Sethi, or Tim Ferriss are so successful?
It’s because they create remarkable content. Every single time. Focusing on creating high quality content will:
Do you know why top bloggers like Neil Patel, Ramit Sethi, or Tim Ferriss are so successful?
It’s because they create remarkable content. Every single time. Focusing on creating high quality content will:
- Turn you into a respected expert, like it did for Neil Patel or Ramit Sethi.
- Help you build a loyal fan base, like it did for CoSchedule and their 100k subscribers.
- Open up huge opportunities for your business.
How to Publish Remarkable Content Every Week (Even if Your Time is Limited)
Click To TweetCreate Great Content Faster With These Free Resources
Download these time-saving resources to create great content easily and efficiently, every time you write.- A Time Management Strategies checklist to make the most of your time.
- A Daily Task Planning template to plan your work each day.
- A How to Plan a Blog Post in 10 Minutes checklist to prep your posts fast.
- A Blog Post Writing Process Checklist to make sure your content is exceptional, every time.
Make the Best of Your Limited Time
Before jumping into the details of creating remarkable content, you need to make sure that you make the best of your limited time. This section is about setting yourself up for success for the system you will learn in the rest of the article. Think of it as the foundations: If you get this right, nothing can stop you.Pick a Consistent Time
Let’s face it: writing is hard. That’s something we tend to postpone time and time again just because we’d rather do easier stuff for our business. But at the end of the day, you need to write. And if you want to create good content on a consistent basis, you need to be serious about it and write every day. The best way to write every day is to pick a consistent time in your dayThe best way to write every day is to pick a consistent time.
Click To TweetPick a Consistent Place
To write every day, you need to build a writing habit.To write every day, you need to build a writing habit.
Click To TweetBuild Your Own Writing Routine
To help you stick to the habit, try to take a few steps before starting to make it more enjoyable. It could be:- A special music playlist for writing.
- Making yourself a cup of tea or coffee before starting.
- Any specific set of actions you will always do and enjoy before writing.
Set up a Robust Automated System
I don’t know many habits that are harder to stick to than writing daily. While the previous points will help you do it more consistently, you need to build a solid system around them to make sure they won’t fail you. What does it mean? First, it means writing it down. For example, since I’m working during the day for my day job, I schedule my writing time in the morning, with the other tasks of my business: This is non-negotiable time that I will NEVER give to anyone.
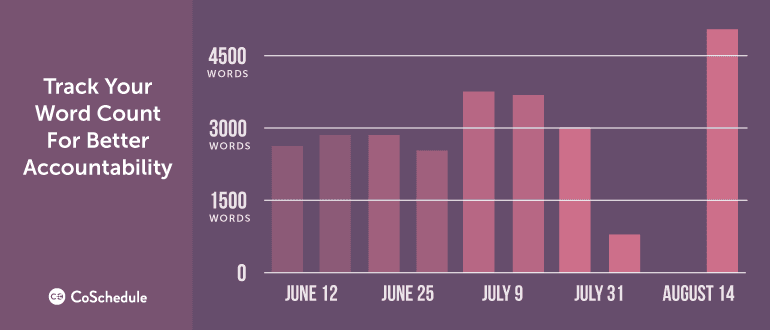
Second, I track my writing by writing every day how many words I wrote and about what. I do this in a Google Spreadsheet and then automatically create a simple chart to show how much I’m writing week after week.
This helps to quickly see when you’re falling off your habit. For example, you can notice two weeks near the end of the graph where I was busy doing other stuff. Fortunately, I caught myself up and fixed it.
This is non-negotiable time that I will NEVER give to anyone.
Second, I track my writing by writing every day how many words I wrote and about what. I do this in a Google Spreadsheet and then automatically create a simple chart to show how much I’m writing week after week.
This helps to quickly see when you’re falling off your habit. For example, you can notice two weeks near the end of the graph where I was busy doing other stuff. Fortunately, I caught myself up and fixed it.
 I find this is a good way to stay motivated and create even more content.
Get an Accountability Partner
You could try to do by yourself, but there is nothing better than someone else to kick your a** when you’re slacking off.Slacking off? Get an accountability partner to kick your a**.
Click To Tweet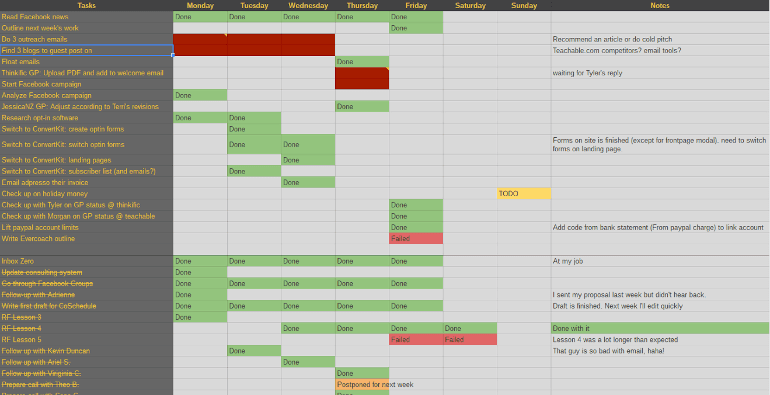 For each day, we write whether the task is “TODO”, already “Done”, or has been “Failed”. It’s a great way to not only focus on the right tasks, but also to have someone else look at what you’re doing and give you honest feedback on how you could do better.
Schedule Your Writing Tasks
You know that creating a blog post is not just about writing.Creating a blog post is not just about writing.
Click To Tweet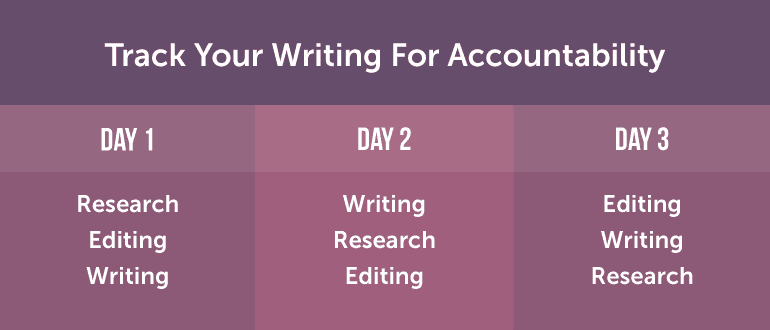 The second solution is to write other things than blog posts: newsletters, sales pages, email funnels, video scripts, etc.
This is a good way to not be overwhelmed by too many articles at the same time, and it breaks the routine of only writing blog posts.
The second solution is to write other things than blog posts: newsletters, sales pages, email funnels, video scripts, etc.
This is a good way to not be overwhelmed by too many articles at the same time, and it breaks the routine of only writing blog posts.
Make Sure You Never Run Out of Ideas
Let’s say you’ve been writing every day for a while and never missed a day. What if, for tomorrow’s writing session… You have nothing to write. No more blog post ideas. Not good ones, at least. Meeting such an issue could mess a lot with your writing habit and call it an end. You can anticipate this problem by generating enough ideas to never run out. There are two approaches.Generate enough ideas to never run out.
Click To TweetYour Step-by-Step System To Virtually Guarantee Top-Notch Content
Writing top-notch content can take dozens of hours if you don’t systematize your approach. The most common mistake beginners do is to write, iterate, iterate again, and keep iterating again until satisfied. This leads to perfectionism and makes you waste hours.Perfectionism wastes hours.
Click To Tweet- Make writing a lot easier for you.
- Make writing a lot faster for you.
- Make sure that at the end of the process you have an article that stands out from the competition.
- Decide on a topic.
- Explain your topic in simple words.
- Write a detailed outline for your topic.
- Make research.
- Write your first draft.
- Edit your first draft.
- Polish everything.
Decide on a Topic
Your first step is to decide on a broad topic. It might start with an idea of yours, a question from your readers, or an article you’ve read on another blog. You don’t know yet if this will be a really good article or not. It’s just a topic that popped in your mind, and you wonder whether it’ll be good or not. Here are some examples of topics I have in mind:- How to use guest blogging to grow your email list from 0 to 1,000 subscribers.
- What cold showers and writing have in common?
- Why you don’t need to be a creative person to be a good writer.
Explain Your Topic
Call a friend and explain to them what you want to write about. Explain it to them in plain English, with simple words. It should take about 5 to 10 minutes.Call a friend and explain to them what you want to write about.
Click To Tweet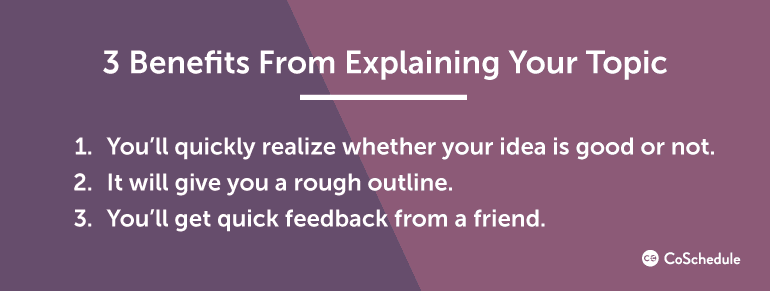 If you don’t have any friends, you can just create an imaginary friend and still record yourself. Try to imagine questions they might have and reply to them.
Write a Detailed Outline
This step is the most important one of the system. If you take the time to write a long and detailed outline, you will gain a ton of time down the line. Not only will you gain time, but you’ll also make your life a lot easier. A good detailed outline allows you to:- Write your first draft easily and quickly. No risk of writer’s block.
- Avoid wasting time iterating again and again on your article.
- Make sure your article is compelling before even starting to write it.
I would rather waste one hour rewriting a good outline than crafting a poor article, or waste five hours on a bad first draft.
Click To Tweet- Write down the structure.
- Explain what each subsection is about.
- Write down all the examples/stories/pictures you want to add.
Getting your outline right makes writing easier.
Click To TweetStep #1. Write Down the Structure.
The first step is basically what everyone else do when they draw an outline. They write bullet points that look like headlines, and that’s it. It’s important to get it right because the structure is what your reader will try to identify right when they discover your article by skimming through it.- Are there logical steps between the sections?
- What order are they in? Is this a step-by-step system, or are there chronological events?
- Are the sections balanced?
- Should you break them down into subsections?
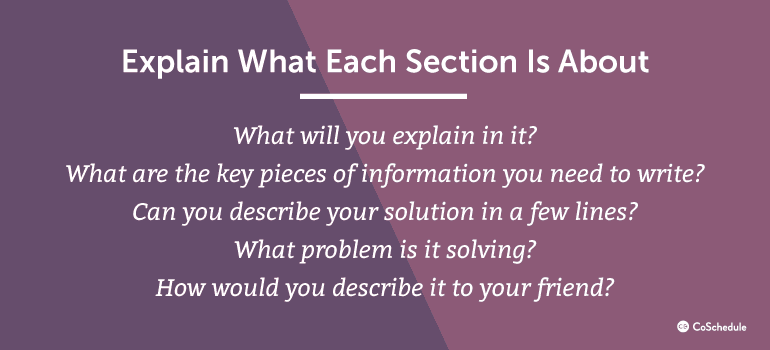
Step #2. Explain What Each Section Is About.
Now we do the extra work that will make you gain a ton of time down the line. For each section, describe in a few paragraphs what it is about.- What will you explain in it?
- What are the key pieces of information you need to write?
- Can you describe your solution in a few lines?
- What problem is it solving?
- How would you describe it to your friend?
 You’re basically putting on paper all the information that your article will contain. Someone reading your outline at this point should need precisely what you will talk about, and even what you will teach to your readers.
But information alone is useless if you can’t get people to take action. That’s why you also need to …
You’re basically putting on paper all the information that your article will contain. Someone reading your outline at this point should need precisely what you will talk about, and even what you will teach to your readers.
But information alone is useless if you can’t get people to take action. That’s why you also need to …
Step #3. Write Down All the Examples/Stories/Pictures You Can Think Of.
Each piece of information you give in your article needs to be illustrated by at least an example, a story, a picture, or at least an explanation in plain English. This will help you reader:- To understand better what you’re talking about.
- To relate to your writing thanks to the stories.
- To get inspired to take action.
Do Research
You may be surprised to see research appearing in step #4, after we draw the outline and already placed all the elements of our article. Here is the thing: Research is not supposed to help you know what to write in your article. It is only supposed to help you enrich what you have already written. When you draw your outline before doing any research, you make sure that what you write is from your unique perspective and that you bring something new to the internet. If you do the research before and start reading dozens of other related articles, chances are that your final article will be a mix of everything you just read. Say goodbye your personal experience and unique perspective, because it just got spoiled by everyone else’s wisdom. So, how to do your research without wasting hours browsing endlessly? To make research efficient, you need to have a specific question to answer. Before even starting the research, I will go through each section of my outline and ask naive questions out of curiosity. I put myself in the mind of my reader and try to imagine everything he could ask himself:- “How can I do that concretely?”
- “Why is this true? I don’t understand.“
- “How many are there?”
- “Are there any tool to do that?”
Save time researching by asking specific questions.
Click To TweetWrite Your First Draft
This is normally the hardest step of the process for any common content marketer. But if you’re here, you’re not that common, especially if you start using this system. Because you wrote such a detailed and complete outline, writing your first draft will be one of the easiest step. You already have the structure and all the information written. The only thing that’s left is expanding on the list of stories and examples you already provided. Explaining a single example or telling a story is easy. You do it all the time all day long with your friends. Replicate the process and you’ll be done in no time.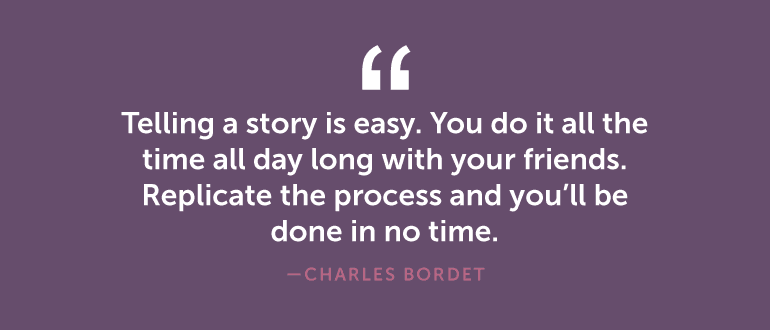 The only difficulty you might face is not succeeding in finding the right words to explain your point. It happens.
But don’t worry about this too much. When you write your first draft, don’t try to be perfect right away. Simply write, expand, explain as much as possible, ramble, and just put your own words on things. The end result is not supposed to be your final version.
The only difficulty you might face is not succeeding in finding the right words to explain your point. It happens.
But don’t worry about this too much. When you write your first draft, don’t try to be perfect right away. Simply write, expand, explain as much as possible, ramble, and just put your own words on things. The end result is not supposed to be your final version.
When you write your first draft, don’t try to be perfect right away.
Click To Tweet- Write as much as possible without ever stopping. Don’t stop. Don’t hold yourself.
- Never edit. Never come back. Here is a tip: Never use the backspace key.
Edit Your First Draft
After finishing your first draft, your article will not be beautiful to see. Anne Lamott, author of Bird by Bird, calls it the shitty first draft. That’s exactly what it is. You let your creativity shine and created everything you needed for the article. Maybe even a little bit too much. Here are the steps for editing:- Open a new blank document.
- Filter out each paragraph with a set of questions and rewrite it better.
- Pass the article in an editing tool.
- Print the article and read it out loud.
Step #1: Open a new blank document.
This step as rather self-explanatory. I noticed that when I don’t do it, I start to get bored in the middle of the task and skip entire paragraphs to finish as fast as possible. So, now, I open a new document and make sure I go through everything. This is a bit longer, of course, but it’s worth taking the time, as the step is what will make your article flawless.Step #2: Filter out each paragraph and rewrite it better.
The goal of the editing part is to remove any unessential part and to rewrite better what’s essential. You probably know that longer articles perform better in general, but it doesn’t mean you should look for writing the longest possible articles. In fact, it’s quite the opposite. Your final article should be shorter than your first draft, not longer. Try to cut your article as much as possible, to make it dense, comprehensive, without any rambling or unessential explanation. Make your point, illustrate it, and move on quickly. For each paragraph I ask myself the following questions:- Is this essential in my article?
- What would happen if I remove this paragraph?
- Am I just rambling too much on this story?
- How can I make myself clearer?
- Can I add a picture or an example to illustrate it?
- How could I tell this story in a shorter and more compelling way?
- Am I using simple words that normal people use?
Step #3. Pass the article into an editing tool.
In the previous step, you made the major work of editing. You rewrote everything and now the article is a lot better. If you want to go the extra mile, you can copy/paste your article into an editor such as Grammarly (you will need to paid version to get access to the editing tools) or the Hemingway App. The goal of this step is to make edits you couldn’t easily notice before to improve the readability of your article:- Are you writing too complex sentences?
- Are you using too many adverbs?
- Are you using passive voice too frequently?
- Are you repeating the same words too often? (Use WordCounter for that)
Step #4. Print the article and read it out loud.
Finally, the last step may surprise you: Print the article and read it out loud.Editing Tip: Print your articles and read them out loud.
Click To Tweet The second is that by reading out loud, you will immediately spot the awkward or too complex phrasing. On the internet, we want to keep the writing simple and quick to read. Basically, you almost want to write as you’re speaking.
So if it sounds weird when you say it out loud, it might just sound as weird for your readers.
That’s it for the editing! I must admit I don’t do all four steps for every article. They’re a little bit long, so it’ll depend on how much time you want to invest in your article.
The second is that by reading out loud, you will immediately spot the awkward or too complex phrasing. On the internet, we want to keep the writing simple and quick to read. Basically, you almost want to write as you’re speaking.
So if it sounds weird when you say it out loud, it might just sound as weird for your readers.
That’s it for the editing! I must admit I don’t do all four steps for every article. They’re a little bit long, so it’ll depend on how much time you want to invest in your article.
Polish Everything
The last step is for the last details. Improve your headline. When we started the article, we picked a headline and didn’t really work on it. I don’t recommend doing it before writing the article, as the content might change as you make progress on it. Now is the time to perfect it. I won’t go into details on how to write a good headline, but aim for a score of 70% or higher with the CoSchedule Headline Analyzer Studio. Pick a feature image. You will need one to show up when people share your article on social media. It’s usually a good idea to put the title of your post on it to catch people’s attention. Build a content upgrade. A content upgrade is a lead magnet you offer as an incentive for people to subscribe to your email list. It is something built especially for the article and is a logical add-on to the article that people who liked the article will want to have. It could be a checklist, a cheat sheet, a spreadsheet, a system, a PDF version of the article, etc. There are many ways to build content upgrades. Craft your CTA. You will also need to craft a compelling CTA to sell your content upgrade. It’s worth taking the time to write a really good one, as it can be the difference between a successful and a failed article.Follow this system to write top-notch content, every time.
Click To Tweet