How To Do A Webinar The Effective Way (Free Planner)

![How to Do a Webinar the Effective Way [Free Planner]](https://media.coschedule.com/uploads/how-to-do-a-webinar.png?w=3840&q=75)
How To Do A Webinar The Effective Way (Free Planner)
Click To TweetWebinar Statistics Highlights
According to a 2016 study that analyzed 12,780 webinars:- Webinars attract an average of 233 attendees.
- Webinar viewers watch an average of 50 minutes.
- Watchtime has increased by 31.5 percent since 2010.
- “Question and answer” time is the most popular—and expected—form of interactivity.
- Of global attendees, 20 percent downloaded content, 7 percent submitted questions, and 31 percent responded to polls.
 Naturally, we want in.
Whether this is your first, or fiftieth, webinar, you’ll find value in the path-of-smartest resistance we’re about to travel.
Here’s what’s ahead. You’re going to:
Naturally, we want in.
Whether this is your first, or fiftieth, webinar, you’ll find value in the path-of-smartest resistance we’re about to travel.
Here’s what’s ahead. You’re going to:
- Learn how to host a webinar like a seasoned pro.
- Choose the best webinar software and tools for you.
- Learn how to record a webinar and promote the replay.
- Obliterate the technical barriers with step-by-step instructions + visuals.
- Get our free Webinar Planner + Webinar Talking-Points Template + Email Follow-Up Template so you can work our proven process for hosting efficient, effective, and engaging webinars.

Use The MVP Approach To Knockout Your Next Webinar
Our approach is dead simple; and we’ve written about it before. It’s called the “minimum viable project” (MVP) approach. It’s a play on the famed “minimum viable product” of The Lean Startup fame. An MVP’s goal is to get you through a loop of “idea → ship → analyze” as quickly as possible. Our own Nathan Ellering says it like this: “The idea behind a minimum viable project is to eliminate risk by helping you:- Create and publish quickly,
- Measure your success,
- Learn to improve.”
- Repurpose a piece of high-performing content you already have;
- Or, repurpose a piece of content you’re going to create.
 From here you can run one of three reports. In this case, we’ll run the “Top Content” report:
 After our digital elves crunch your numbers, it will generate a report like the one below. In this case, you can see that our post, “How to Write Emotional Headlines That Get More Shares” has resonated well:
 Now, after 15 seconds of clicking, I have an incredible candidate for an MVP webinar topic.
My audience is interested in this content. And even better, they believe their audiences are interested too. I know this because they shared it with them.
To further corroborate this, I can check out this post’s 30-day traffic in Google Analytics:
Now, after 15 seconds of clicking, I have an incredible candidate for an MVP webinar topic.
My audience is interested in this content. And even better, they believe their audiences are interested too. I know this because they shared it with them.
To further corroborate this, I can check out this post’s 30-day traffic in Google Analytics:
Recommended Reading: The Best 30-Minute Content Marketing Brainstorming Process
How To Do A Webinar: Our 4-Stage Approach
Once you’ve landed on a subject, the rest is a matter of process. So we’re going to walk through the 4-stage approach we use for webinars at CoSchedule. We’ll cover each in detail, below. The stages are:- Adaptation: Adapt your top-performing content into a webinar.
- Promotion: Get the word out so you have as many registrants as possible.
- Delivery: It’s showtime—smile big, use the right tools, and have fun!
- Nurture: Follow up, thank your new friends, give them gifts, and use their feedback to optimize for next time.
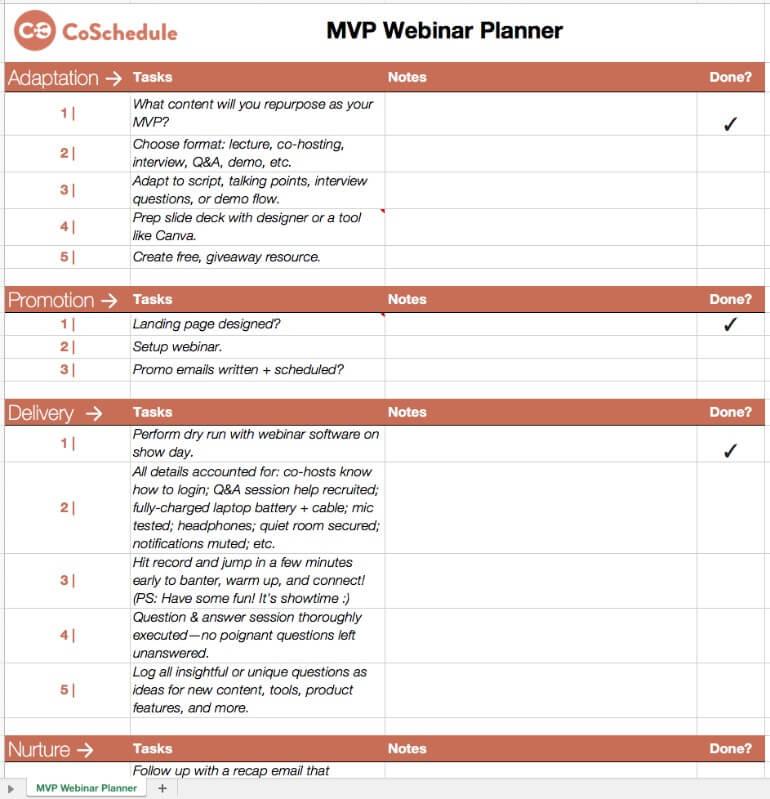
Stage 1: Adaptation
There are five steps to adapting your content for a webinar:- Decide what content you will repurpose as your MVP.
- Choose a webinar format.
- Adapt your content into a script.
- Create beautiful visuals.
- Craft a giveaway resource as an incentive to stick around, come back for more, and put your ideas to work.
Format
Now, we need to decide which format will work best for this webinar. Chances are you’ve attended a webinar or twelve and already have an idea. Search Engine Journal has a nice roundup of webinar formats and explanations:- Presentation: This is one of the most common formats where a presenter shares a PowerPoint presentation and gives a rehearsed speech. It’s easy to create, but is also less engaging.
- Interview: You can interview an expert either together on-screen, over the phone, or with a screen share. This format is engaging, but make sure you’re familiar with the guest in case they go off-script.
- Q&A: This is similar to an interview, except the questions are coming from the audience, which will boost engagement. You can have guests submit questions beforehand so there’s enough content to fill the allotted time scheduled for the webinar.
- Panel: Just like a live a panel, this is where you have several speakers discuss a certain topic. Panels are great for offering different perspectives and opinions from experts. Just make sure the panel members get along.
- Product demo: If you have a product or service, this is a great format to increase leads and reach customers who are interested in making a purchase since you’re showcasing your product.
 Step Two: ✅
Script
Next, it’s time to adapt the actual content into my script, or talking points. The key here is to pull the main points and simply bullet-point them. You’re not creating a manuscript to read from. You’re creating an outline to talk from. In this case, it’s also worth revisiting the social media stats for insight into what people loved most about it. This post got CRAZY love on Pinterest—which is of course all about pics.
As I read through the post to begin writing my script, I see some beautifully designed + highly informative images.
Especially this one, with 180+ power words for writing emotional headlines (which you should share/download and start using in your work immediately!):
This post got CRAZY love on Pinterest—which is of course all about pics.
As I read through the post to begin writing my script, I see some beautifully designed + highly informative images.
Especially this one, with 180+ power words for writing emotional headlines (which you should share/download and start using in your work immediately!):
 I know that this needs to be a centerpiece to my presentation and will certainly become a part of my slide deck (more on that in the next step).
Here’s where the “MVP Webinar Talking Points Template” comes in:
I know that this needs to be a centerpiece to my presentation and will certainly become a part of my slide deck (more on that in the next step).
Here’s where the “MVP Webinar Talking Points Template” comes in:
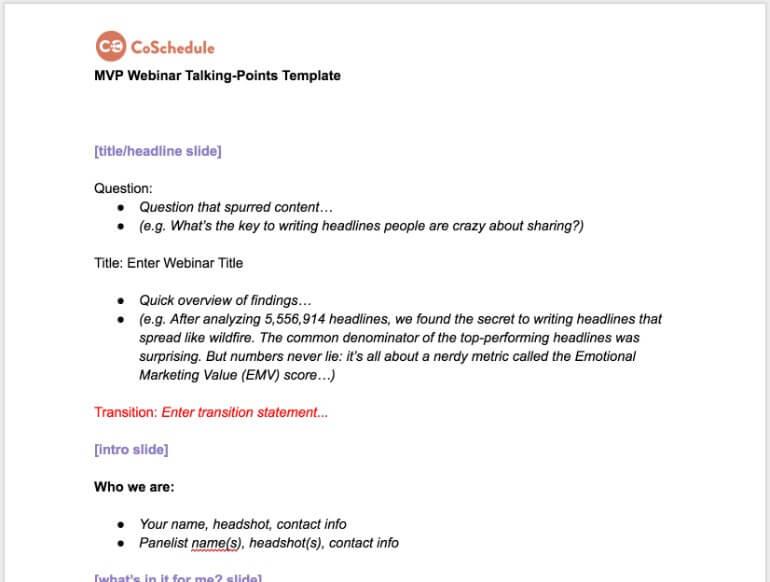 This template is setup to map your existing content straight into a presentation webinar format.
When you open it up, you’ll notice introductory content, and then five sections for each slide.
We like to layout our content color coded like this:
This template is setup to map your existing content straight into a presentation webinar format.
When you open it up, you’ll notice introductory content, and then five sections for each slide.
We like to layout our content color coded like this:
- [Purple] = slide title
- [Black] = talking points
- [Blue] = links to copy/paste into webinar chat window
- [Green] = reminder to pause for questions (this can be every few slides)
- [Red] = transition statement so you can move seamlessly from one slide to the next
 From here, simply open up the template and use its structure to map your content into talking points, links to pertinent resources you want to mention, and transition statements.
A great way to adapt your post into a script is to think about structure.
For instance, the post I’m adapting in this example breaks down into this structure:
From here, simply open up the template and use its structure to map your content into talking points, links to pertinent resources you want to mention, and transition statements.
A great way to adapt your post into a script is to think about structure.
For instance, the post I’m adapting in this example breaks down into this structure:
- Hook: After analyzing 5,556,914 headlines, we found the secret to writing headlines that spread like wildfire. The common denominator of the top-performing headlines was surprising. But numbers never lie: it’s all about a nerdy metric called the Emotional Marketing Value (EMV) score.
- “What’s in it for me?” statement: The findings of our research allows you to predict the success of your headline before you ever hit publish. After implementing our findings, you can have complete confidence your headlines will get attention amidst the flurry of content online. You can be sure of this because we built a free tool called the Headline Analyzer Studio that scores your headlines and helps you improve them via empirical data.
- Thesis: The key to effective headlines is in their emotional resonance—a metric called the Emotional Marketing Value (EMV) score.
- Body:
- Our findings: We know this is true because we crunched the numbers and learned that posts with higher EMV get more shares every time.
- Why we trust our findings: We calculate a headline’s EMV based on accepted research dating back to the ‘60s and ‘70s—research corroborated across multiple languages.
- How the measurement works: There are three layers of emotional resonance: intellectual, empathetic, and spiritual.
- How to write better headlines: To start, use our free tool that will break your headlines down and show you exactly where to improve them.
- How sentiment impacts performance: You’ll notice positive headlines consistently outperform negative ones.
- Examples (before/after): Seven examples of poor headlines, how to rewrite them for optimal performance, and why.
- A process for writing emotional headlines:
- Write 25 headlines
- Calculate the EMV for each
- Cull the poor performers
- Amp up the emotion
- Publish, test your work, and evaluate to optimize
- An overview of what we covered.
- A succinct explanation of how it will help you.
- A clear call-to-action so the audience understands their next step.
Recommended Reading: How to Repurpose Content And Make the Most of Your Marketing
Step Three: ✅
Design Slide Deck
Next, we like to actually sit down with Ashton, our designer, and walk through the outline with her. This is also a frictionless process because she’s the one who designed the post graphics. Now, we simply need to cover the content that needs to be on each slide and the presentation’s flow. If you don’t have the benefit of a professional designer, though, no problem! It’ll take a bit longer, but you can still use excellent tools like services like Slidesmash or Canva for free Powerpoint, Keynote, or Google Slides templates, or Graphic River for paid templates. If you’re doing this yourself, make sure to work through a guide like Canva’s “Presentation Design 101.” This article is an excellent primer on things like how much info to include per slide, how to choose great fonts, color palette choices, and more. This article walks through ten principles with an example slide presentation to illustrate each. Another helpful article is “The Know It All Guide To Color Psychology In Marketing.” This post walks you through the nuts-and-bolts of which colors go well together and why it matters. Step Four: ✅Create A Free Giveaway
Finally, it’s time to create a free giveaway for your webinar viewers. You can get pretty wild here—however, remember the reason behind this step. Your giveaway simply needs to help your viewers put what you taught them into action. Obviously, the format of your giveaway resource is largely dependent upon your content. In my example post, I would create a 3-part giveaway bundle like this. First, I’d include the “180+ Power Words For Writing Emotional Headlines” graphic I embedded above. It’s incredibly actionable and easy to reference. So it will add value to anyone who wants to write shareable headlines. Second, I’d create a headline writing template in either Excel or Google Sheets. The most helpful way to do this would be to take the five steps to writing emotional headlines (listed in the talking-points outline above) and give the viewers a place to work through each. It could look something like this: It covers the five steps working from left-to-right.
This way, it gives the user an option of either using our tool (notice the link at the top of the sheet) or of working the process manually.
Either way, it eliminates any additional prep work on their part. This allows them to simply fill in the blanks following a proven formula for success.
When you create resources, the sure-fire way to make sure they’re helpful is to ask this question: “How can I help my audience implement the advice I’ve given?”
Your giveaway resources should answer that question.
Notice also that this example resource also serves a business purpose for CoSchedule. It offers them a simpler way to accomplish the task—using our tool—without forcing them to use it.
They can get the same results using this resource, but it helps them see how much legwork our tool saves them.
Now that my giveaway resources are finished, I can drop them into a file and then compress them into a .zip file. To do this, I simply right click on the desktop file and choose “Compress” (Mac) or “Send to > Compressed” (Windows):
It covers the five steps working from left-to-right.
This way, it gives the user an option of either using our tool (notice the link at the top of the sheet) or of working the process manually.
Either way, it eliminates any additional prep work on their part. This allows them to simply fill in the blanks following a proven formula for success.
When you create resources, the sure-fire way to make sure they’re helpful is to ask this question: “How can I help my audience implement the advice I’ve given?”
Your giveaway resources should answer that question.
Notice also that this example resource also serves a business purpose for CoSchedule. It offers them a simpler way to accomplish the task—using our tool—without forcing them to use it.
They can get the same results using this resource, but it helps them see how much legwork our tool saves them.
Now that my giveaway resources are finished, I can drop them into a file and then compress them into a .zip file. To do this, I simply right click on the desktop file and choose “Compress” (Mac) or “Send to > Compressed” (Windows):
 Voila.
I now have a solid 2-piece giveaway resource for my webinar viewers. And because it’s compressed, it’s ready to be emailed out or easily downloaded via a link.
Step Five: ✅
Voila.
I now have a solid 2-piece giveaway resource for my webinar viewers. And because it’s compressed, it’s ready to be emailed out or easily downloaded via a link.
Step Five: ✅
Stage 2: Promotion
Now that we’ve adapted existing content into a webinar format, it’s time to make sure we get people to register! Your strategy on this is highly dependent upon three factors:- What size audience do you currently have?
- What segment of your current (or prospective) audience do you want to register?
- What budget can you allocate toward advertising your webinar?
- Create a landing page.
- Setup the webinar in your chosen software.
- Write and schedule your promotional emails (or messages).
Create A Landing Page
Creating landing pages has become something of an art. But their core function is simply to act as a clear signpost and vehicle for conversions. For an in-depth strategy behind creating landing pages, check out this article we published. For our purposes in this post, we’re going to cover how to set one up using a service like Unbounce (though there are plenty others to choose from, including Leadpages or Launchrock). The first thing to understand is that a landing page must include three basic elements:- Headline
- Body
- Call-to-action
 Create an Unbounce account, then sign in. Once you’re in, it’s time to click on “Create New Page” to launch your first landing page:
 Next, you can opt to design a landing page from scratch—or easier—work from a template. In this case, Unbounce has magical templates designed specifically for webinar promotion.
Choose “Webinar” in the templates column:
Next, you can opt to design a landing page from scratch—or easier—work from a template. In this case, Unbounce has magical templates designed specifically for webinar promotion.
Choose “Webinar” in the templates column:
 Next, you’ll find a few pre-designed templates. Click on the one you like (I just went with the first one) from the selection. Then, enter the name of your landing page on the right-hand column of the interface.
Then click “Start With This Template.”
Next, you’ll find a few pre-designed templates. Click on the one you like (I just went with the first one) from the selection. Then, enter the name of your landing page on the right-hand column of the interface.
Then click “Start With This Template.”
 Now we’re into the fun stage—designing your page and writing your copy!
Unbounce uses a standard WYSIWYG interface that’s pretty straightforward. You can go as wild as you want here… But the bones are adding your headline, your body copy, and creating your CTA.
Your flow will depend on your copywriting style. Maybe like you’re like the folks at Copyhackers and believe you should start with the button and write backwards from there…
Or dive headlong into writing an appetizing headline like the Copyblogger team suggests.
Whatever your cup-o-tea, knock out your landing page content, then move onto the geeky integrations stuff so your CTA button has a place to send form info.
Now we’re into the fun stage—designing your page and writing your copy!
Unbounce uses a standard WYSIWYG interface that’s pretty straightforward. You can go as wild as you want here… But the bones are adding your headline, your body copy, and creating your CTA.
Your flow will depend on your copywriting style. Maybe like you’re like the folks at Copyhackers and believe you should start with the button and write backwards from there…
Or dive headlong into writing an appetizing headline like the Copyblogger team suggests.
Whatever your cup-o-tea, knock out your landing page content, then move onto the geeky integrations stuff so your CTA button has a place to send form info.
 Next, you can integrate your email service with Unbounce. Here are the directions for integrating with four major providers:
Now, everyone who opts-in via your landing page can be neatly organized into an email list ready to receive more info about the upcoming show!
(If you can also go further in your analytical snooping with a Google Analytics integration if you want more insight into your visitors.)
Step One: ✅
Next, you can integrate your email service with Unbounce. Here are the directions for integrating with four major providers:
Now, everyone who opts-in via your landing page can be neatly organized into an email list ready to receive more info about the upcoming show!
(If you can also go further in your analytical snooping with a Google Analytics integration if you want more insight into your visitors.)
Step One: ✅
Webinar Setup
At this stage, we have our webinar content ready to roll. We have a sweet slide deck and a killer landing page hooked into our email service. Now it’s time to setup the webinar itself so you can officially begin promotion. However, this is where people often get hung up. Why? Because there are so many webinar platforms to choose from! In this example, I’ll be using Zoom, the platform we at CoSchedule use. Though there are plenty of solid choices like Livestorm that you can test run for free. The big deal here is to stick to your basic needs and then jump into the tool. When you’re hosting a webinar, the main technical considerations you need to make are:- How many viewers do I need to make room for?
- Will I be sharing my screen + a webcam feed of myself/presenters?
- Do I want the ability to record and replay the webinar?
- Will my viewers want the opportunity to chat, ask questions, and follow links?
 Once you’re in, click “My Webinars” in the column at left, then the “Schedule a Webinar” tab at the top of the dashboard.
 From here, enter the deets like the webinar title, description, date/time, duration, timezone, whether you require viewers to register, and your video settings (these control whether or not viewers can see you and/or your co-hosts).
 When you scroll down, you’ll see more settings. Select your preferred audio and whether or not your viewers need a password to view (we like to let ‘em view as easily as possible).
Also, notice you can choose to have the webinar start recording automatically—this is a really good idea so you don’t accidentally forget to record it. If it’s your first go ‘round, you’ll be surprised at how easy this is to do because you’re focused on so many different things at once. So make it easy on yourself and tick this radio button.
And now, polish it off by choosing “Schedule.”
When you scroll down, you’ll see more settings. Select your preferred audio and whether or not your viewers need a password to view (we like to let ‘em view as easily as possible).
Also, notice you can choose to have the webinar start recording automatically—this is a really good idea so you don’t accidentally forget to record it. If it’s your first go ‘round, you’ll be surprised at how easy this is to do because you’re focused on so many different things at once. So make it easy on yourself and tick this radio button.
And now, polish it off by choosing “Schedule.”
 Once scheduled, you’ll see your webinar’s rap sheet. This dashboard displays the info you input as well as your webinar ID (which you’ll want to keep handy for sharing and organization).
Additionally, if you plan to reuse these settings, go ahead and select “Save this Webinar as a Template” for efficiency’s sake.
Once scheduled, you’ll see your webinar’s rap sheet. This dashboard displays the info you input as well as your webinar ID (which you’ll want to keep handy for sharing and organization).
Additionally, if you plan to reuse these settings, go ahead and select “Save this Webinar as a Template” for efficiency’s sake.
 Step Two: ✅
Sending Promotional Messages
Next, there are two more essential tabs: “Invite Attendees” and “Email Settings.” And these bring us into the next step… Sending those promo messages! The important item in the invitation tab is the “Registration URL.” You’ll want to grab this to share with your email list, on your website, and on your social channels. (And remember, if you selected the setting that requires individuals to register, they’ll need to visit this link to gain access.) The next tab to note is “Email Settings.” Here you can set reminder emails for everyone who registers. (Or, if you’ve added them to a segmented list via your email tool—like we do—make sure to schedule them now!)
This is a great idea because it takes one more detail off your plate—and an important detail at that.
So choose your settings using the “Edit” text to the right of each option.
The next tab to note is “Email Settings.” Here you can set reminder emails for everyone who registers. (Or, if you’ve added them to a segmented list via your email tool—like we do—make sure to schedule them now!)
This is a great idea because it takes one more detail off your plate—and an important detail at that.
So choose your settings using the “Edit” text to the right of each option.
 Once your webinar is set up and scheduled, it’s time to roll out the digital red carpet and promote it.
 Because your webinar may be outside of the norm for your content, I recommend approaching it as its own marketing project.
If you’re a CoScheduler, here’s how to painlessly setup and automate the entire thing!
Because your webinar may be outside of the norm for your content, I recommend approaching it as its own marketing project.
If you’re a CoScheduler, here’s how to painlessly setup and automate the entire thing!
Recommended Reading: The Complete 16-Step Marketing Project Management Process
(If you’re not a CoSchedule user, get started free to promote the heck out of your webinar and get as many eyeballs on the screen as possible.)
Now, the promotional channels we use aren’t surprising:
- Landing page,
- Website,
- Email,
- Social media,
- Ads,
- And webinar partners.
- The free social message optimizer, which optimizes your messages for engagement and traffic.
- And the best time scheduling feature, which uses a data-based algorithm to share pre-written social messages at peak-traffic times customized for every network.
 Alright, now that you’ve promoted your webinar like a pro, it’s time to execute.
Recommended Reading: How to Promote Your Blog With 107 Content Promotion Tactics
Step Three: ✅
Stage 3: Delivery
As with any skill, practice makes perfect. To deliver the best webinar you can, it’s important to rehearse and prepare. To help you prepare well, this stage has five steps:- Perform a dry run with your chosen webinar software.
- Account for show details.
- Show up early to say hello + press record.
- Invite questions and prioritize answering them.
- Log all feedback or unique questions for future use.
Dry Run
Once you’re sufficiently inspired, it’s time to login and test out your webinar tool. We’ll continue with Zoom. I suggest creating a test webinar using the steps outlined above. This way you have a pressure-free opportunity to test all of the buttons, features, and potential kinks. When your webinar window launches, you’ll see an interface like this (except with your face instead of mine):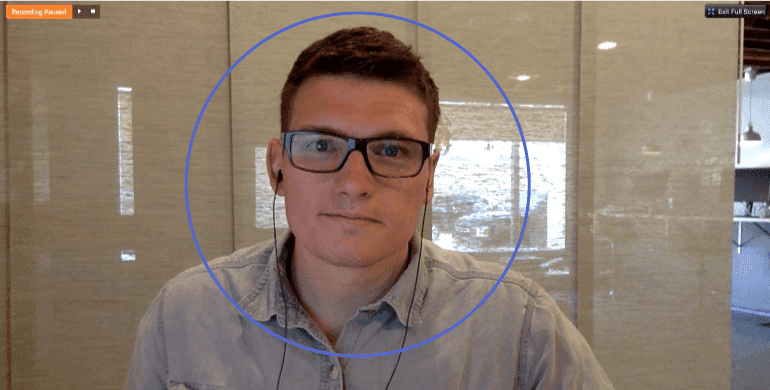 Here’s a quick rundown of the controls:
- Record toggle: This is the button you can select to start, pause, or stop your webinar recording.
- Mute mic: This icon will mute your selected audio input—meaning viewers can see you, but they can’t hear you.
- Video stream control: If you stop sharing video, a profile picture will be displayed and your audience can still hear you. Essentially, this is like “muting” video for an audio-only stream.
- Participant count: This is the total number of viewers and panelists. (This number includes hosts and co-hosts.)
- Q&A box: The question and answer function allows viewers to ask questions privately, outside of public chat. You then have the option to answer the question “on air” or privately via “text.” After the webinar is finished, you can download a log of these questions—which can be super helpful for analyzing how things went!
- Share screen: This feature allows you to share your screen rather than your webcam. Remember, this means your audience sees exactly what you see. So ensure any private information like passwords or proprietary information isn’t open.
- Webinar chat: This is the public chat available to everyone on the webinar.
- Additional options: You will find additional options by clicking on the “More” icon. These include streaming live on Facebook or YouTube, and sending individual invitations to the webinar-in-progress.
 Once you’re comfortable with the interface, hit record and run through your presentation. This will allow you to practice your talking points, switch from being on-camera to narrating your slide deck, and then ending the webinar with style.
(If you’re really hard core, record your run through and watch it back to make improvements or notes of sticky spots.)
Step One: ✅
Once you’re comfortable with the interface, hit record and run through your presentation. This will allow you to practice your talking points, switch from being on-camera to narrating your slide deck, and then ending the webinar with style.
(If you’re really hard core, record your run through and watch it back to make improvements or notes of sticky spots.)
Step One: ✅
Account For Show Details
Now that you’re comfortable in the tool, spend a few minutes double-checking the details. These may include:-
- Recruiting help for chat and Q&A moderation during the webinar.
- Setting up your gear in a quiet and well-lit room. Exhibit A:
 <li
<li
- Have your earbuds or headphones handy to avoid an echo on the webinar audio.
- Mute your phone and onscreen computer notifications to avoid interruptions.
- Have your mic ready and plugged in. (You can use the built-in mic or upgrade to something a little nicer like a Samson C01U like we use at CoSchedule.) If you decide to opt for an external mic, simply select the “Caret” icon next to “Mute” and choose your preference beneath the “Select a Microphone” title.


Are you ready to webinar with the best of 'em? Get started here:
Click To TweetShow Up Early + Press Record
Our rule of thumb is to log on 15 to 20 minutes early—especially when we’re co-hosting with multiple panelists. This gives us all the ability to ask final questions and ensure everyone’s equipment is working. Then, we take the webinar live about 5 minutes early for some banter with the early comers! This is where you can ask classic webinar questions like:- “Where’s everyone from?”
- “How’s the weather where you’re at?”
- “What are you hoping to learn today?”
- “Can everyone see/hear us okay?”
- “What is the meaning of life?”
 Now, it’ll be (mostly) smooth sailing to the end!
 Step Three: ✅
Invite Questions And Prioritize Answering Them
When you’re live in a webinar, you naturally want to watch the clock and make sure you’re getting through your content quickly enough. However, as noted in the talking points template, make sure to give your viewers every chance to ask questions as you can. It’s tempting to plow through your content—especially if you’re running behind. However, webinars give you a unique opportunity to connect directly with your audience. So take it. If people are asking you relevant questions, answer them! (The Q&A pauses are color coded in green.)
Our webinars are untraditional because we’ll even jump out of the deck to answer questions—especially when they're about our product.
Never be afraid to rock an impromptu product demo when it makes sense and directly answers your viewers’ questions!
Sometimes off-script moments are the best!
A framework we use to present content is to always begin with the content our audience most wants to talk about → then move to the intersection between our desires and theirs → and finish with what we want to talk about.
(The Q&A pauses are color coded in green.)
Our webinars are untraditional because we’ll even jump out of the deck to answer questions—especially when they're about our product.
Never be afraid to rock an impromptu product demo when it makes sense and directly answers your viewers’ questions!
Sometimes off-script moments are the best!
A framework we use to present content is to always begin with the content our audience most wants to talk about → then move to the intersection between our desires and theirs → and finish with what we want to talk about.
 This way, if you’re going to do a product demo (whether planned or impromptu), it can act as the bridge. This way, you can show how to apply your advice using your product.
So your talking points move from left to right over the course of the webinar.
This way, you don’t end with a product demo—which often sends drop-off rates through the roof!
This way, if you’re going to do a product demo (whether planned or impromptu), it can act as the bridge. This way, you can show how to apply your advice using your product.
So your talking points move from left to right over the course of the webinar.
This way, you don’t end with a product demo—which often sends drop-off rates through the roof!
Pro Tip: If you’re simply overwhelmed with questions and out of time, share your Twitter handle or email address and direct further questions there. In the case of Twitter, you can also have questioners use a unique hashtag (e.g. “#[webinarname]?”) so everyone interested can search for and find the questions.
Step Four: ✅
Log Feedback
Finally, webinars are a great way to gather feedback for specific content. You can use viewers’ questions and comments for this. And you can also use the “Poll” feature. This is also a nice way to encourage interactivity midway through your presentation. To use it, click on the “Poll” icon at the bottom of your presentation window. This will launch a dialog box that allows you to add questions on-the-fly, or select from a pre-made poll.
Once you click on “Add Questions,” a poll-creation page will load in your browser. You can name your poll, write questions, select single or multiple-choice formats, and craft answers for your audience to select from.
This will launch a dialog box that allows you to add questions on-the-fly, or select from a pre-made poll.
Once you click on “Add Questions,” a poll-creation page will load in your browser. You can name your poll, write questions, select single or multiple-choice formats, and craft answers for your audience to select from.
 Once you’re finished, choose “Save.”
Your poll will now be available in your webinar window. And when you’re ready to use it, simply click “Launch Poll” to collect the data.
Once you’re finished, choose “Save.”
Your poll will now be available in your webinar window. And when you’re ready to use it, simply click “Launch Poll” to collect the data.
 Anytime you have the chance to gain real-time feedback from your audience, take it. The more insight you have on your audience’s problems, thought processes, and buying motives, the better you can help them—and in turn, position your product or service.
Step Five: ✅
Way to go! You just knocked out your first (or fiftieth) webinar!
Now, do a little dance to celebrate before wrapping up this MVP ????
Anytime you have the chance to gain real-time feedback from your audience, take it. The more insight you have on your audience’s problems, thought processes, and buying motives, the better you can help them—and in turn, position your product or service.
Step Five: ✅
Way to go! You just knocked out your first (or fiftieth) webinar!
Now, do a little dance to celebrate before wrapping up this MVP ????

Stage 4: Nurture
The final stage of your MVP webinar is short and sweet. It’s all about three things:- Following up with a recap email + THANK YOU!
- Publishing + promoting your webinar replay.
- Leveraging fresh ideas into new content, projects, and features.
Here's how to plan a webinar in four stages:
Click To TweetFollowing Up
To follow up well requires a thank you, pertinent links and resources, and a reiteration of your webinar CTA. The “MVP Webinar Email Follow-Up Template” has a place for each. And as the name implies, we simply do this through an email.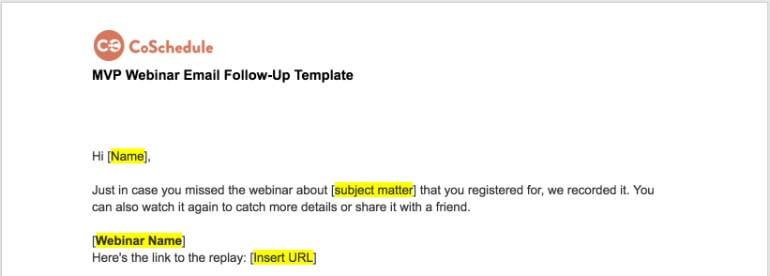 Step One: ✅
Publish + Promote Your Webinar Replay
Once you’ve knocked out your replay you can upload the recording to any video platform you’d like. Whether it’s Wistia, YouTube, Vimeo, or anywhere else! If you used Zoom, you’ll find your recording in one of two places:- The cloud,
- Or your hard drive.
 It organizes them by date of recording and other nitty-gritty details. This way if you host the same webinar (with the same title) multiple times, you can easily differentiate them.
I recorded this webinar on July 5, 2017—so that’s the folder I’ll select.
Next, you’ll find three files within the recording folder (you can ignore the “m3u” file for our purposes).
The two you’ll be concerned with are the “m4a” and the “mp4.” As indicated, the m4a is audio only. So if you just want to make the audio available, that’ll the file for you.
The mp4 is the video + audio file, which is what we’re looking for here.
It organizes them by date of recording and other nitty-gritty details. This way if you host the same webinar (with the same title) multiple times, you can easily differentiate them.
I recorded this webinar on July 5, 2017—so that’s the folder I’ll select.
Next, you’ll find three files within the recording folder (you can ignore the “m3u” file for our purposes).
The two you’ll be concerned with are the “m4a” and the “mp4.” As indicated, the m4a is audio only. So if you just want to make the audio available, that’ll the file for you.
The mp4 is the video + audio file, which is what we’re looking for here.
 Now that we’ve found our stellar webinar video, simply upload it to your video host of choice, nab the link, and share, share, share!
If you’re using YouTube, navigate to your “Creator Studio” account, and click on the “Upload” icon in the top-right corner of your window.
Now that we’ve found our stellar webinar video, simply upload it to your video host of choice, nab the link, and share, share, share!
If you’re using YouTube, navigate to your “Creator Studio” account, and click on the “Upload” icon in the top-right corner of your window.
 Next, you’ll be prompted to either select the video file from your folders list or drag-and-drop it. You can also decide whether or not you’d like your video set to “Public,” “Unlisted,” “Private,” or “Scheduled” view (here’s more on the use-cases for each).
 Once you’ve selected your file, it’s time for the moment of glory!
Now is the time to upload a custom thumbnail, add awesome tags, swipe your promo copy for a description, and manage other details (here’s a step-by-step walkthrough).
Once you’ve selected your file, it’s time for the moment of glory!
Now is the time to upload a custom thumbnail, add awesome tags, swipe your promo copy for a description, and manage other details (here’s a step-by-step walkthrough).
 Well done, you. Now share that link for everyone to see.
Recommended Reading: 30 Social Media Engagement Tactics That Will Boost Shares and Conversions
Step Two: ✅
Leverage Fresh Ideas
Finally, we arrive to the last step in the MVP webinar process. It’s time to gather and organize any feedback or new ideas you got from the webinar. After all, there’s always something to improve or optimize. So take a few minutes while things are fresh to record audience feedback or notes you may have taken. I use a combo of CoSchedule + Evernote for this. But any note-taking app that you have easy access will do. I begin by creating a new marketing project in CoSchedule: Then, I select the “Idea” content type:
 Next, it’s business-as-usual. Throw in a title, choose any pertinent labels or tasks. Or even add some comments for team collaboration.
This will allow one place for all of your team’s ideas and feedback to live.
Next, it’s business-as-usual. Throw in a title, choose any pertinent labels or tasks. Or even add some comments for team collaboration.
This will allow one place for all of your team’s ideas and feedback to live.
 The reason I like to log ideas in my CoSchedule dashboard first is because of the flexibility and ease of retrieval.
For instance, what if you jot down a real winner-of-an-idea and it becomes a blog post or video? You can simply convert it by clicking on the content type button on the top of the page and select the new content type.
The reason I like to log ideas in my CoSchedule dashboard first is because of the flexibility and ease of retrieval.
For instance, what if you jot down a real winner-of-an-idea and it becomes a blog post or video? You can simply convert it by clicking on the content type button on the top of the page and select the new content type.
 And last, there’s nothing worse than coming up with sweet ideas and then losing track of them—or even forgetting about them altogether.
Now that I organize my ideas this way, this doesn’t happen. It keeps everything in one place so I don’t lose a thing.
Step Three: ✅
And last, there’s nothing worse than coming up with sweet ideas and then losing track of them—or even forgetting about them altogether.
Now that I organize my ideas this way, this doesn’t happen. It keeps everything in one place so I don’t lose a thing.
Step Three: ✅