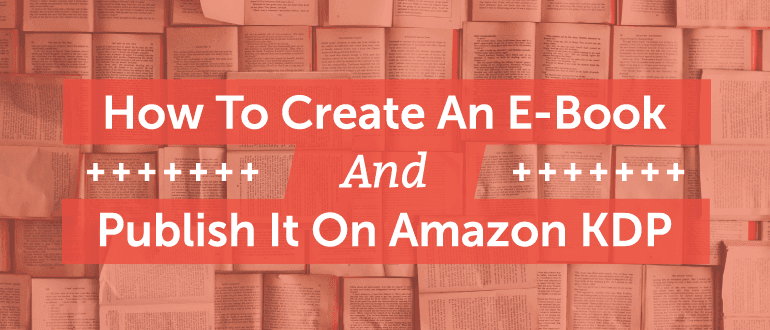
This Is How To Write An E-book And Publish It On Amazon KDP

 Want to get more mileage out of the content you've already created? Ever thought of writing an ebook and getting it published on Amazon?
If so, you've come to the right place!
In this post, I will walk you through how to write an ebook by repurposing content you've already written, how to fill in the blanks that you haven't written yet (while also getting more content to publish on your blog), and finally how to publish your book on Amazon via Kindle Direct Publishing.
Want to get more mileage out of the content you've already created? Ever thought of writing an ebook and getting it published on Amazon?
If so, you've come to the right place!
In this post, I will walk you through how to write an ebook by repurposing content you've already written, how to fill in the blanks that you haven't written yet (while also getting more content to publish on your blog), and finally how to publish your book on Amazon via Kindle Direct Publishing.
How To Create An E-Book And Publish It On Amazon
Click To TweetMake Sure You Get Your E-book Publishing Kit
In order to apply the information in this post, you’ll need this free e-book publishing kit. This will make it easy to follow each step we’re about to walk through. This is your chance to get a whole e-book publishing kit that comes with a book launching checklist, a content audit form for planning your blog/book content, and a topic/angle form for you to write all your ideas on. You'll also get your very own 3-month launch calendar.So, How Do You Write An E-book And Get It Published On Amazon?
Writing and publishing a professional e-book is split into different phases such as: writing, editing, design, and publishing it to Amazon. The exercises below will walk you through the steps to get more mileage out of your existing content. Are you ready to write and publish your book?Want to #write an e-book and get it published on #Amazon
Click To TweetExercise #1: What Do You Want To Write About?
Maybe you already know what you want to write about, or at least have an idea of what you'd like to write, or maybe you have no idea at all. 1. Get your notebook and pen out. Or open a word processor of your choice. 2. Set the timer for 5 minutes and get all of your ideas out. Write down notes for what kind of a book your ideas are for. Example: Are they self-help, how-to, or something informative? 3. Pick the top four ideas that make you most excited to write the book and keep in mind which would be most relevant to your audience. 4. If you want to know what your audience wants, do a Twitter poll. List your book topics as the options. You'll be able to find out what your audience wants to read. Set the poll for how long you want it to run.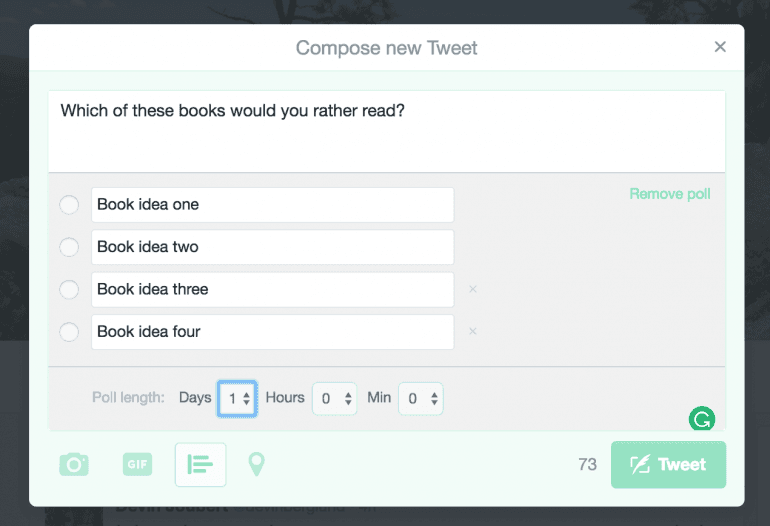 Then press Tweet and pin your tweet to the top of your Twitter account.
When #writing your book, think about what is in it for your reader. #contentmarketing
Click To TweetExercise #2: What Is Your Book Angle?
This next exercise will help you figure out what the angle is. Keep your pen and paper on hand. You'll want to jot down your ideas. You can also use this exercise when it comes to determining blog post angles as well. Figure out and write down your WIIFM statement, which means "What's in it for me?" This should be a brief paragraph explaining the benefit a reader will receive from reading your book. You have to constantly think about what your audience wants. People want information and help with their problems. So if you have the answers they need, then you are in luck.Get inside your reader's head by asking yourself "What's in it for them?
Click To Tweet- Get organized as you build a regular schedule of relevant, engaging content that will build your social media following.
- Know where to start and how to focus your time to get the most engagement.
- Cut out the noise by reading one book that will help you make the most of your time.
Exercise #3: What Does Your Audience Want To Learn About That Topic?
Write up a list of the things you think your audience would like to learn about the said topic and angle from above. Say my topic was: "how to blog consistently." And my angle was: "You'll learn how to organize your ideas, write brilliant blog posts that capture your audience's attention, and save you plenty of time." With that topic and angle in mind, I thought up a list something like this for what my audience wants to read. Here's what I came up with (in chronological order):- How to get blog ideas when you have no ideas?
- How to captivate your audience in the first few sentences?
- How to outline a blog post once you have an idea?
- What kinds of things you should look out for when editing?
- How to design graphics and images to go with your content?
 Take a look at your list. How many of the topics have you already written blog posts about? More on that in the next exercise.
Exercise #4: Audit Your Existing Blog Content And Find The Gaps
First off, do a quick content audit of your blog to see what you've already written around those topics within the angle and topic for the book. What if you've never done a content audit? No worries. Here's a simplified process to follow: Go to your blog and look at the categorized pages. Here I am looking at the "Content" category posts on our website: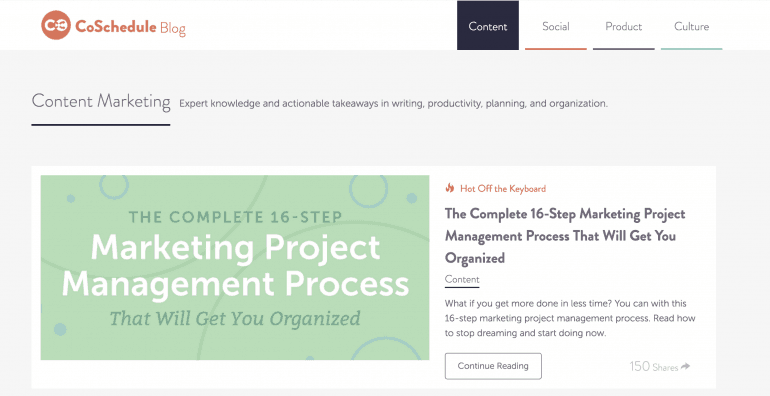
Recommended Reading: How To Choose The Perfect Blog Categories
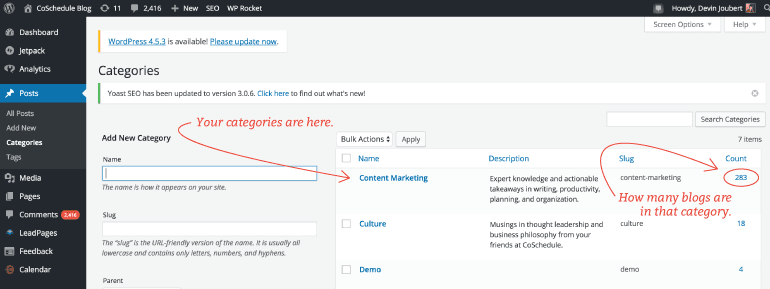
To find your categories in WordPress, go to the black sidebar on the left side. Click Posts in the black sidebar on the left and then click Categories.
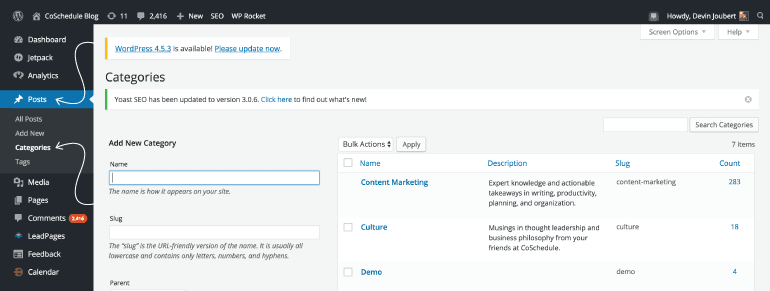 Which will open the Categories page. Your categories will be listed and to the far right you'll see how many blog posts are categorized under that category:
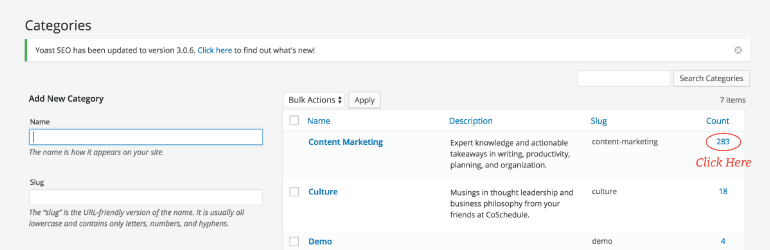
 If you click on the count under one of the categories like this:
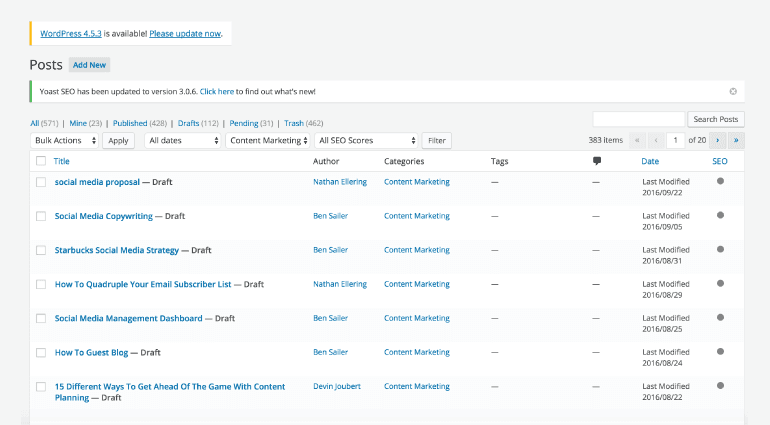
 Then you'll be brought to a page like this with all of the blog posts under that category, which means some are published posts and others are drafts.
 Go through all of the blog posts and add any to your list that would fit well with the book's angle and topic. Add a star next to it on the list so you remember you already wrote it.
Repurpose your blog content and turn it into an e-book. Find out how here:
Click To TweetIs Your Book Going To Have Chapters Or Sections? Or Both?
Are you going to have sections and chapters in your book? Or, just one or the other? You could have sections to divide the book up into different chapters. Make sure they fall under your topic and angle. Write up a list of the different sections you'd include in your book:- Section #1
- Section #2
- Section #3
- Section #1
- Chapter #1
- Chapter #2
- Chapter #3
- Section #2
- Chapter #1
- Chapter #2
- Chapter #3
- Chapter #4
 This isn't a complete outline of sections up above but you get the idea. Try to do all of this in chronological order.
Pro Tip: The great thing about writing all of this is that you'll have a lot of content. Why not use some of the new content you've written as blog posts? Kill two birds with one stone.
This isn't a complete outline of sections up above but you get the idea. Try to do all of this in chronological order.
Pro Tip: The great thing about writing all of this is that you'll have a lot of content. Why not use some of the new content you've written as blog posts? Kill two birds with one stone.
Exercise #5: What Is Your Deadline?
Start with your e-book launch date. You are going to need to know the best days to publish an e-book on the Kindle Amazon store in order to launch your e-book successfully. The best day to publish to the Kindle store is Tuesday. It's good practice, to publish your book it two to five days before you launch it. Then you can do any last-minute changes.Get A Launch Team
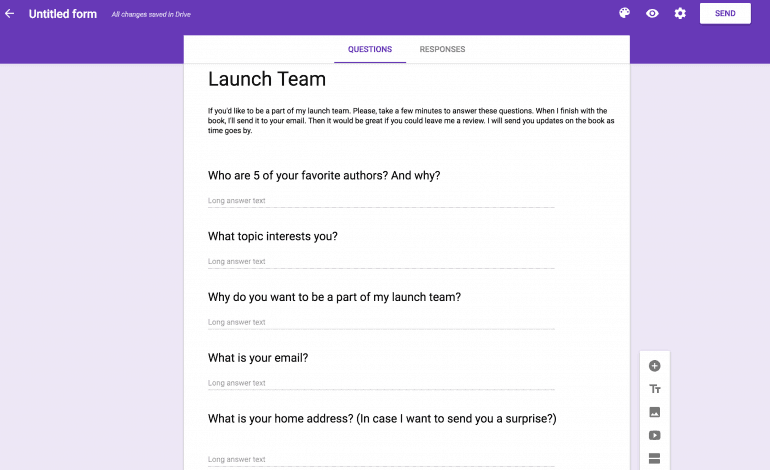
When writing and publishing a book it's a great thing to have a launch team on your side. They help you launch a successful book. Here is an example of what Jeff Goins did with his launch team. One way to keep your launch team information all together is to send out a Google Form with your "interview questions". Open Google Forms and start a new form.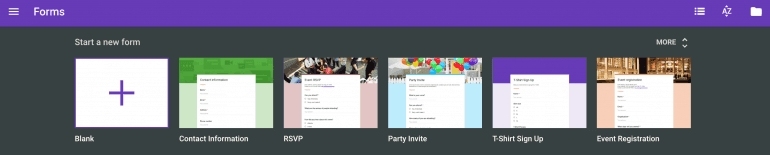 The great thing about writing up a launch team application is that you can write any questions you'd like. This all has to do with what is important to you when it comes to having a launch team.
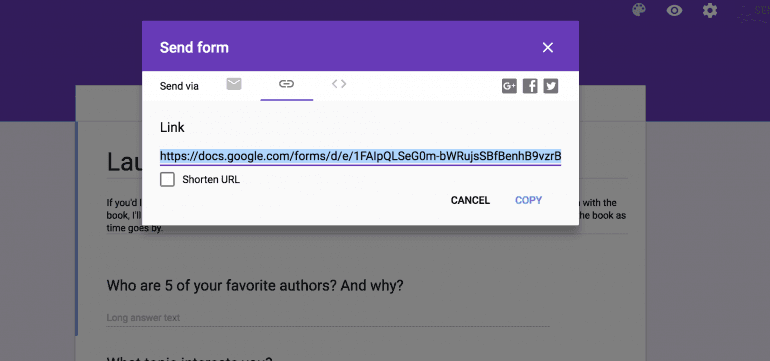
 Once you are done with your form go to the upper right side and click on Send.
 From there, you'll be able to send it to anyone. Pop it in an email update to your subscribers. You can even share your Google Form on social media.
 Pro Tip: Think of a way you can thank your readers for reading your book and also for leaving a review.
You can have your launch team:
Pro Tip: Think of a way you can thank your readers for reading your book and also for leaving a review.
You can have your launch team:
- Read through the book and give you last-minute thoughts.
- Share about your book on social.
- Keep them updated on anything around your book.
Filling The Gap
When you have your launch date set, work back from there in one-week increments.Start with your e-book launch date and work back from there!
Click To Tweet- How many blog posts do you write a week?
- How fast can you write a well put together blog post?
- How many weeks will it take you to finish your content writing?
- And while you are working on the writing, who will design your book cover?
Recommended Reading For Writing:
Recommended Reading For Design:
If you have to publish four posts a month, how many do you have to finish writing before the ship date?
Exercise #6: Get Your Book Out Of Your Mind
You know what you want to write about and you've also weeded through all your blog content for blog posts that relate to the angle and topic of your book. Now you just have to fill in the gaps and write the chapters that aren't written yet. Remember, once you finish each of the chapters you can also use those for blog posts. Here are a couple of ways to brainstorm your ideas before you sit down to write:Use A Mind Map To Brainstorm
This is a pretty simple brainstorming method, but it really works. It’s a great way to get your ideas out visually in front of you.- Set your timer for about 5 minutes.
- Write your chapter idea (problem you want to solve in that chapter) in the center of the page. Draw a bubble around it.
- What will solve that problem? Write the solutions to the problem and then connect the bubbles with lines.
- For each bubble with a solution, come up with at least 3-5 actionable bullet points to walk your readers through the solution.
Brainstorm With A One Sheet Brain Dump
Get all of your ideas and thoughts out in front of you. After you get all your ideas out and in front of you, you can make it into an outline.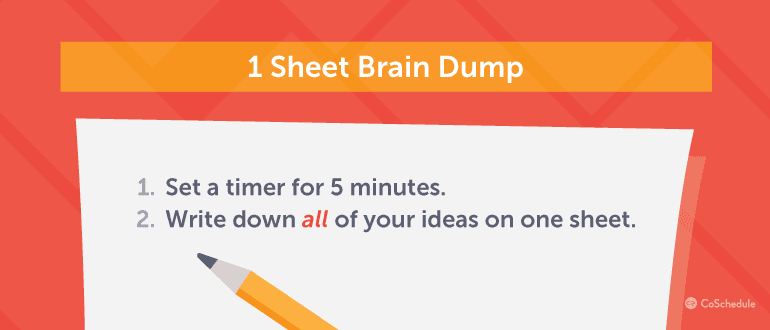 How To Do A 1-Sheet Brain Dump:
- Set your timer for 5 minutes.
- Write your ideas on a sheet. This is a massive brain dump.
Exercise #7: Now Start Writing Your Book
Writing your book is the funnest part of all of this, especially when you start to see some progress. It's super exciting when you have a stack of pages that you wrote. I recommend you start writing your book in Word format, since that is something we learned would have saved us a lot of time. Use styles to format your e-book in Word. Here is a great video to walk you through styling format:
Pro Tips From Our Content Marketing Lead:
- Use word styles.
- Edit everything with the "Show all nonprinting characters" view on. You don't want extra paragraphs. Use page breaks instead of hard returns.
- Make the images and graphics as big as you can.
This is how to format an e-book in Word.
Click To TweetEdit With Nonprinting Characters On And Don't Use Hard Returns?
First off, when editing your book it's going to be important to watch out for nonprinting characters. To look for those, click on the paragraph symbol: ¶.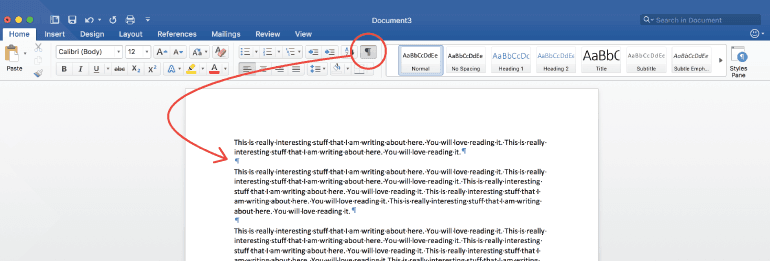 Then you'll be able to see the nonprinting characters.
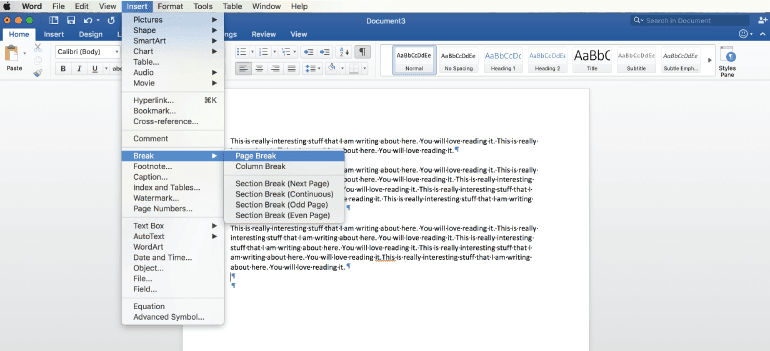
Use Page Breaks
You'll also want to avoid using hard returns because they'll show up as white space when you upload your book to Amazon. Use page breaks instead. In order to find these, click on Insert and then Break. Click Page Breaks.
Then you'll be able to see the nonprinting characters.
Use Page Breaks
You'll also want to avoid using hard returns because they'll show up as white space when you upload your book to Amazon. Use page breaks instead. In order to find these, click on Insert and then Break. Click Page Breaks.
 You'll see this Page Break symbol.
 Make A Clickable Table Of Contents
This video will walk you through the steps to create a clickable table of contents:
Make A Clickable Table Of Contents
This video will walk you through the steps to create a clickable table of contents:
Biggest Takeaway:
- Use headings in your styles panel for your chapter titles. It will make the process easy as cake.
Alternative to Word: Scrivener
For my personal book writing, I use an awesome paid program called Scrivener. I love it because it makes it easy to write a long form book. You can set up each of the chapters in their own files within the main book file. If you've never heard of Scrivener, be sure to check it out. It allows you to organize and write your content all in one place.Speak Your Ideas Before You Write Them
This really helps me get my ideas out and in front of me. Sometimes you need a break away from the computer screen when writing.- Get your smart phone recorder or recorder. Talk about what you want to write about in the chapter.
- When you’re done, listen to your recording. Type everything you said out. You’ll probably want to press pause a lot since other ideas will rush back to you when you write it down.
The Different Sections That Make Up Your Book
Book Copyright Page: This is a page that is normally used for writing down all the important information that helped your content get published. Your name, the publisher's name, the editor's name, designer's name, the website name, your copyright, and the year of publish. Here is a great guide on how to build a copyright page. Dedication: This is a great place to dedicate the book to someone. It usually shows up in the first few pages. Foreword: Once you've written your book reach out to someone you'd like to write a foreword for your book. It helps if you've gotten to know them. Like for us, we reached out to Jay Baer with our rough draft to see if he'd be interested in writing a foreword. When you are writing your book work on building connections with people who you might want to write the foreword. Intro: The intro is what hooks your readers. You should incorporate some of that into your book description on Amazon. Conclusion: Your conclusion is what rounds it all up and ties everything together. You show your readers what they learned throughout the entire book or at least a glimpse of the most important things you want them to remember. Acknowledgments/Thank You Page: This is a great place to share thank you’s with the people who helped your book become possible. Think editors, designers, and other writers. At The End Of Each Chapter: Make sure you write a couple of sentences that will lead your readers into the next chapter. Your goal is to make your readers keep reading.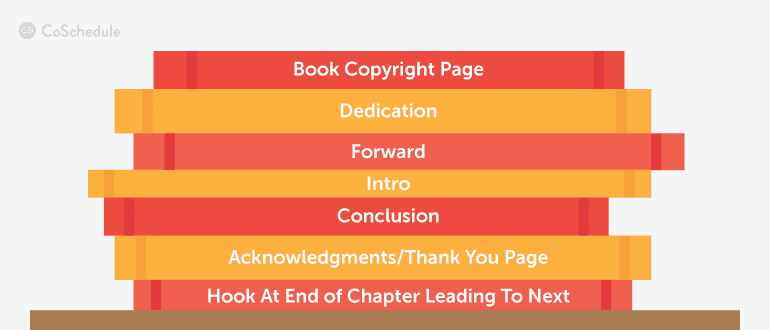
Exercise #8: Final Design And Editing Touches For Your Book
There are plenty of things that go into creating a professional looking book. You have to know that when you upload your book to Amazon that you are playing against millions of authors and writers. You are going to want to make sure that your book can compete against them professionally. First off, take a look at least 5-10 other books that your book is similar to. What things did they do with their book? Look at and compare these things:- What is their cover like?
- What's the font on the cover like?
- What is the size of their font? Small or Big?
- What colors are more popular?
 You can see from this example which books stand out more than others.
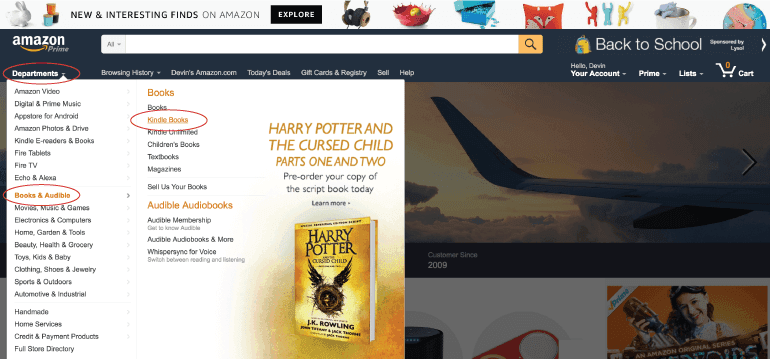
To find books that are comparable to your book go to the Amazon homepage:
You can see from this example which books stand out more than others.
To find books that are comparable to your book go to the Amazon homepage:
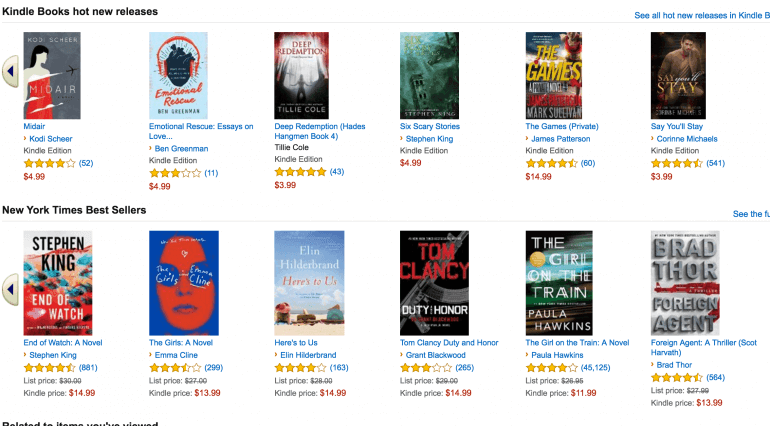
 Then you'll see this page. You can check out the Kindle Best Sellers to see what other people have done.
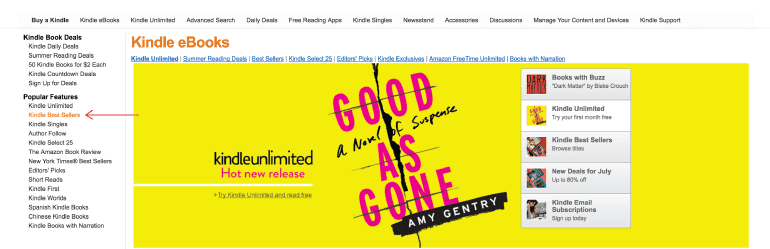 When you are in there you will be able to see the best sellers in the free Kindle ebooks as well.
Make it easy for your readers and don't give them a reason to not click on your book.
When you are in there you will be able to see the best sellers in the free Kindle ebooks as well.
Make it easy for your readers and don't give them a reason to not click on your book.
Do you know why self-publishing has gotten such a bad rap? Because people do shoddy work — both in writing and design.—Jeff GoinsMake sure your book is comparable to the professionally edited and designed books put out by traditional publishers.
Want An Editor?
If your team has an editor, have your editor look over your book and make changes. It's important to catch typos, grammar flops, and punctuation mishaps as well as areas that don't really make sense. Having your editor or hiring an editor to edit through your book will save you from embarrassment later. You can find editors on Freelancer.com and Upwork (formerly known as Elance).Need A Designer?
Want to have any images, graphics, or artwork throughout your book? But don't have the time or skills to create your own? You can find a designer on the same sites where you can find an editor. You may also want to try Dribbble. If you'd like to design your own graphics here are some helpful blog posts you should read. Most of them have to do with designing graphics for blog posts, but they can also be used for designing graphics for your book:- The Ultimate Guide To Using Color Psychology In Marketing + Free Color Schemes
- How To Work With Designers With Authentic Advice From CoSchedule's Designer
- How To Attract An Audience With The Best Blog Photography Tips (+128 Free Images)
- 10 Stunning Examples Of Visual Content Marketing
- Should You Use Stock Or Free Images For Blog Posts?
- 5 Super Easy Ways To Create Images For Your Blog Posts
- How To Design The Best Blog Graphics With Free Tools And Design Theory
- How To Make The Best Blog Graphics (For Non-Designers)
Exercise #9: Uploading And Publishing Your Book On Amazon
Getting into Amazon can be a bit tricky if you don't know your way around in KDP. But never fear, for I am here, and I am going to walk you through how to publish your book on Amazon.Want to publish your book in the Amazon Kindle store? Here's how:
Click To Tweet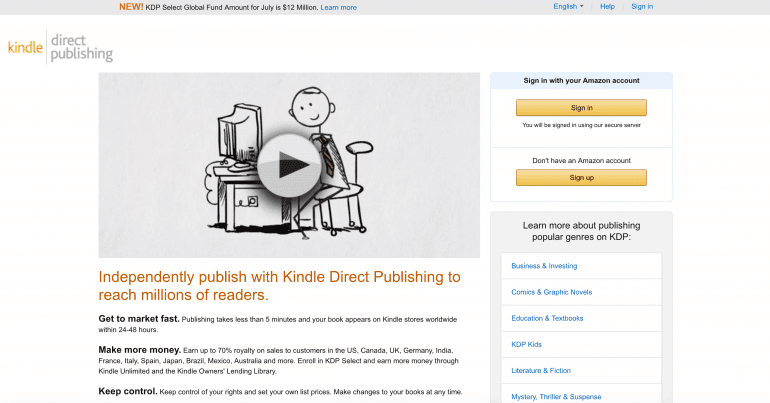 Once you sign in, you are going to want to put in all of your bank details so your money will go into your account.
 Once you click there you'll be brought to a page like this where you can enter your address, tax information, and also your bank details.
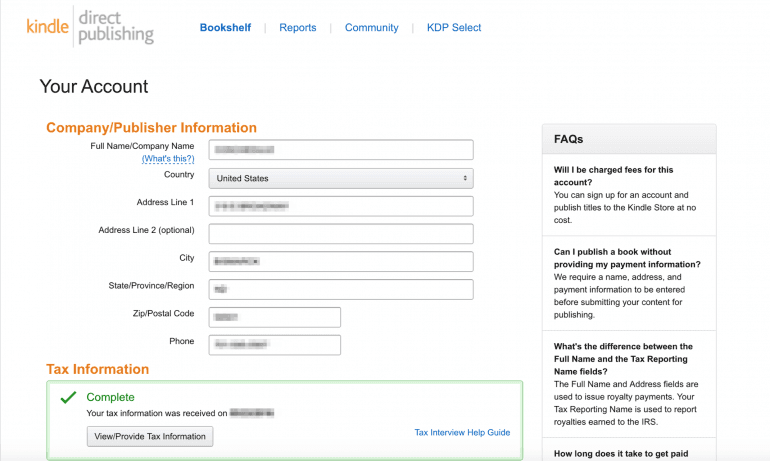 After you are done filling all of that out, scroll to the bottom and press the yellow save button.
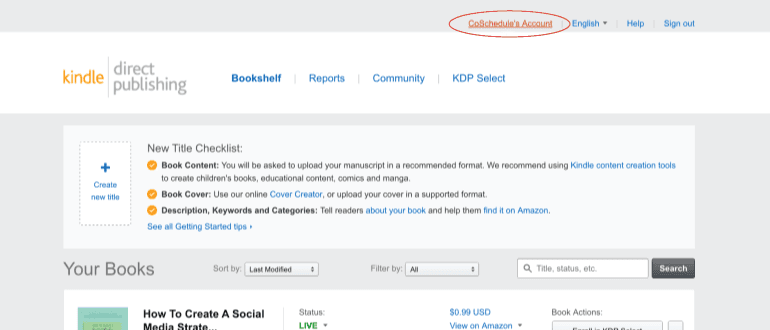
To upload a book to Amazon click on the Bookshelf and then click on Create new title.
After you are done filling all of that out, scroll to the bottom and press the yellow save button.
To upload a book to Amazon click on the Bookshelf and then click on Create new title.
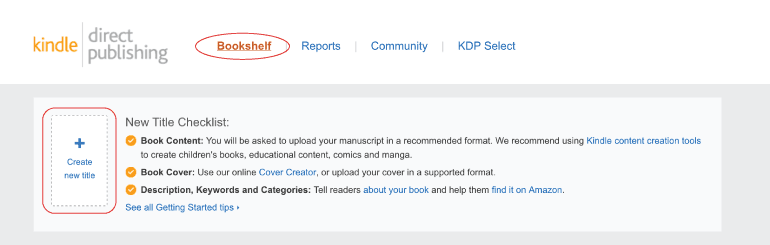 You will be brought to this page:
 Remember if you click to enroll your book in KDP Select that your book must not be available anywhere else online for 90 days. That even means on your own blog or website. Amazon wants to have exclusivity with you.
After those 90 days are up, you can put it elsewhere online.
Scroll down and you will find:
Remember if you click to enroll your book in KDP Select that your book must not be available anywhere else online for 90 days. That even means on your own blog or website. Amazon wants to have exclusivity with you.
After those 90 days are up, you can put it elsewhere online.
Scroll down and you will find:
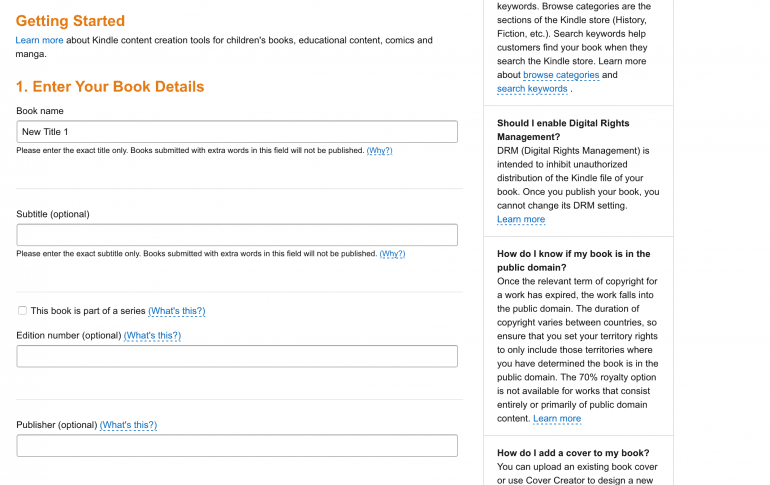 Type in your book name and your subtitle. If you have a publisher name, put it in as well. If you don't, some people just put their blog name or a made up publisher name that they use for all of their books.
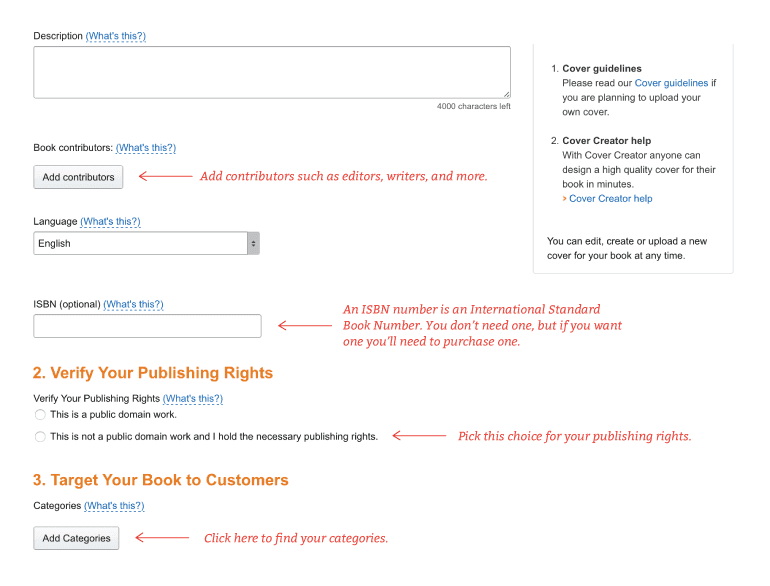 Your book description is your Amazon book description. It will be what encourages or discourages people from buying your book.
What Goes Into Your Book Description?
First off, take a look at 5 other writers who have published books that you look up to.- How did they format their description?
- How'd they hook you to read the entire description?
Here is an example from the intro of our book description: Have you been staring at a blank slate without any inspiration for your social media marketing? Do you struggle to find time and keep up with a consistent social media schedule? If you’ve answered yes to any of these questions, then you’ve come to the right place.
2. Show your unique solution to your readers problems.
Here is our example: This actionable book will help you get organized as you build a regular schedule of relevant, engaging content that will build your social media following.
3. Speak to the reader. Call them out by their job title or something similar.
Example: Maybe you're a marketer, a social media manager, or a blogger who wants to cut out the noise by reading one book that will show you how to make the most of your time.
4. Show your credibility. Why are you an expert and why should your audience learn this from you?
Example: As the content marketers at CoSchedule, we’ve personally used every piece of advice in this book. It’s helped us get around 60K followers across our social platforms—and you can experience the same success.
5. What will they find in your book? Share what they'll learn from reading your book.
Example: In this guide, you'll learn how to:
- Get organized and take control of your social media strategy.
- Listen to and connect with your audience’s needs to create content that’ll boost engagement.
- Figure out a social media editorial calendar that will quadruple your traffic.
6. A quote from an influencer.
7. A closing question.
Example: What’s stopping you from finding more time, being more efficient, and rocking your social media content sharing strategy?
What's An ISBN Number?
An ISBN number is a 13-digit number that identifies the book published internationally. If you have an ISBN number you can fill it into your book information in KDP. For an e-book, an ISBN isn't really needed, but If you don't have one and want one, you can find out how to purchase one here. Okay, let's move onward. When you scroll down you'll see this: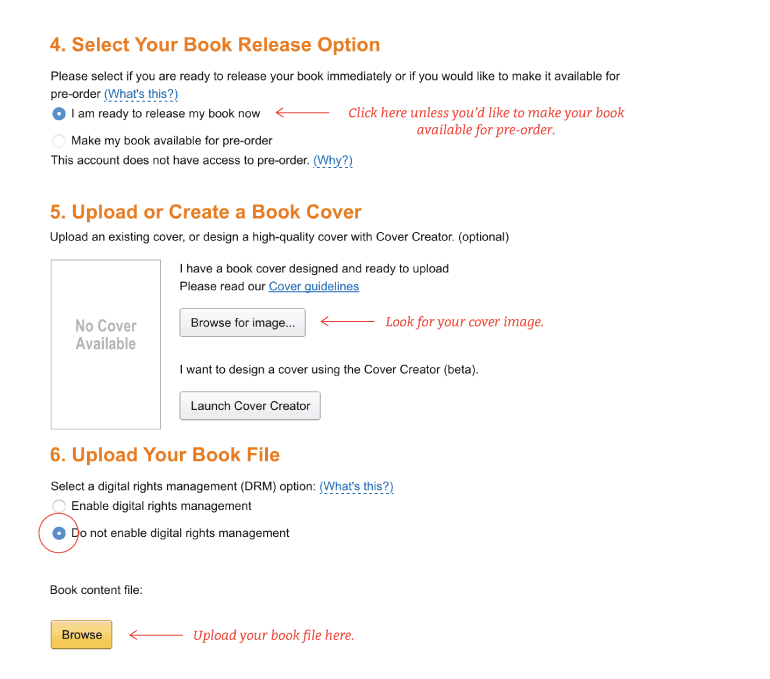 When you are done with that scroll to the bottom and press Save and Continue. This will bring you to the Rights And Pricing page:
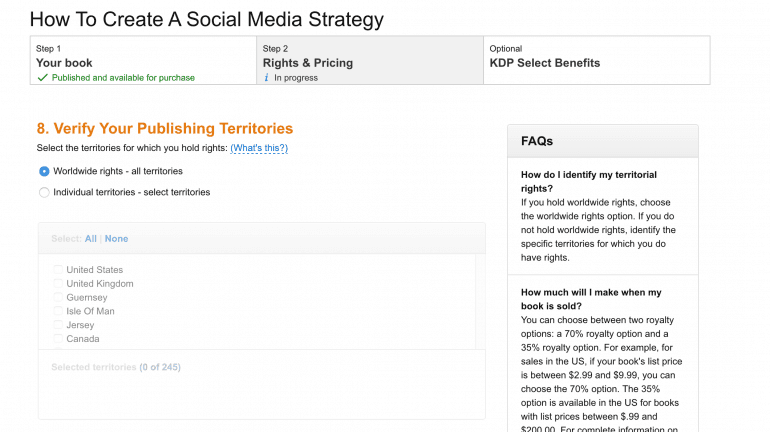 If you want the book to be available everywhere click Worldwide rights.
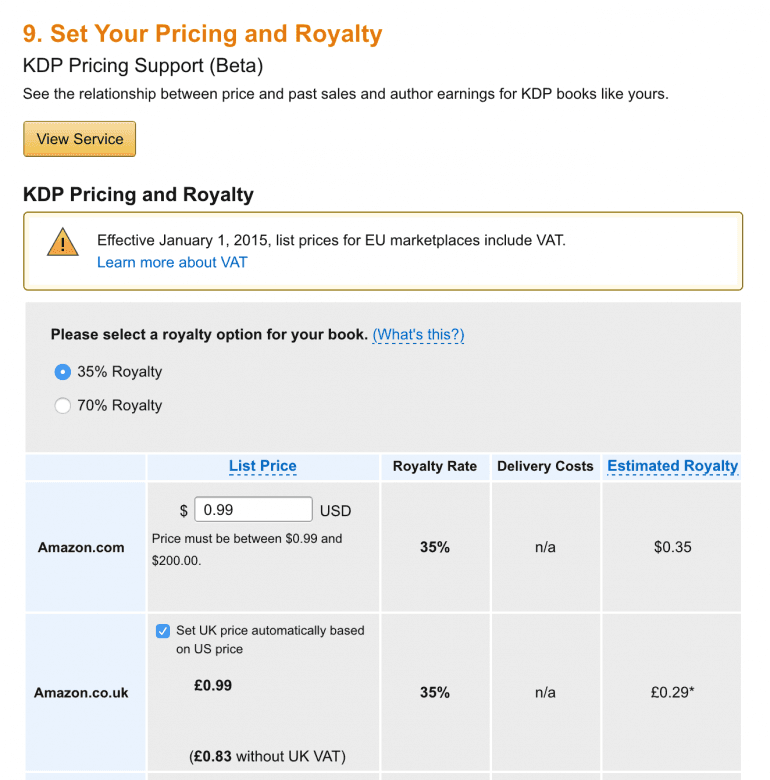 You can set your royalties to either 35% or 70%. KDP has a whole list of what the differences are between the two.
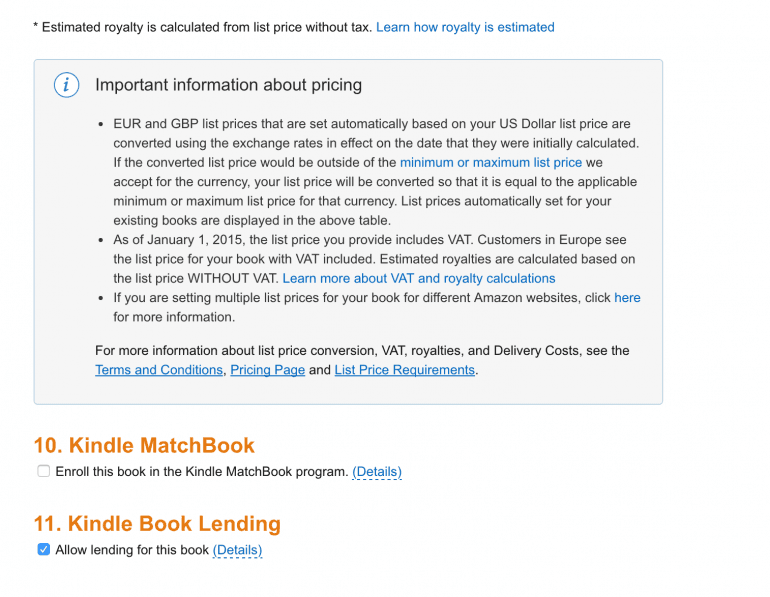 If you'd like to spread the word about your book by allowing lending it will allow your readers share the book with a friend for a certain amount of time.
Why not?
When you've made it to the bottom you'll see this:
If you'd like to spread the word about your book by allowing lending it will allow your readers share the book with a friend for a certain amount of time.
Why not?
When you've made it to the bottom you'll see this:
 Click the check box at the bottom of this page and then click Save and Publish. If you have any problems in KDP, Amazon is really helpful and will call you to help solve your problems.
Bonus Section: The Mistakes We Made That You'll Want To Miss
There are quite a few things that we messed up on while writing, creating, and launching our e-book. Learn from the mistakes we've made and avoid them at all costs. It'll save you a ton of time.- We didn’t take advantage of a launch team early enough. This is something I definitely recommend, especially if you want your e-book to perform well. The reviews are needed in the first few weeks that it's on Amazon. We will do this will our next book.
- There really isn't a FREE e-book on Amazon unless you sign up for KDP Select. But with that, Amazon wants to have exclusivity with you for 90-days. KDP Select would allow you to give your book away for free so many days of the year. We didn't sign up for KDP Select because we had the book elsewhere online. It's really up to you whether you choose KDP Select or not.
- Make sure your cover is comparable to the other books that your book will be competing with. The bigger the font the better and brighter colors seem to do better. This is something we will improve with our next book.
- The table of contents in our book don’t link to the pages they are supposed to link to.
- Make the Amazon e-book into a PDF and give it away for free along with a bundle of free stuff. Gait it to get more subscribers. And then use the preview of the book in Amazon as a landing page that directs people to your other landing page where they can get the PDF e-book and the bundle.
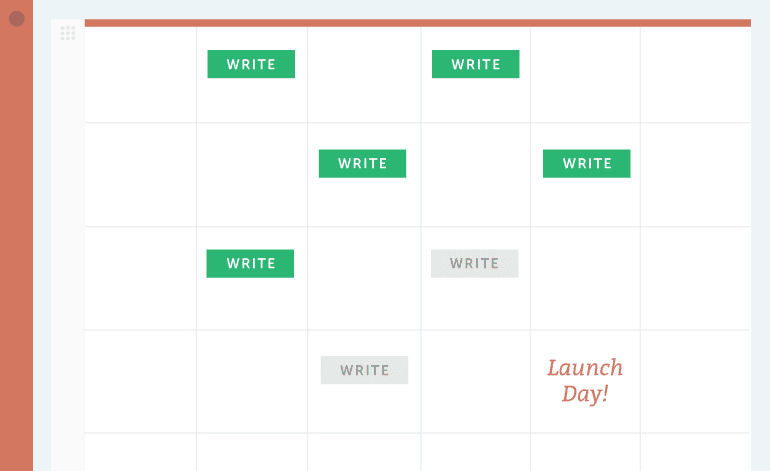
What If It Could Be Easier?
You have all the steps it takes to write and publish an e-book on Amazon's Kindle store. If you'd like to make the entire process to easier, then consider signing up for CoSchedule's 14-day free trial. You'll be able to schedule your e-book launch calendar along with the goals you want to meet before your book publishes. Here is an example of how you could schedule out your book launch on CoSchedule: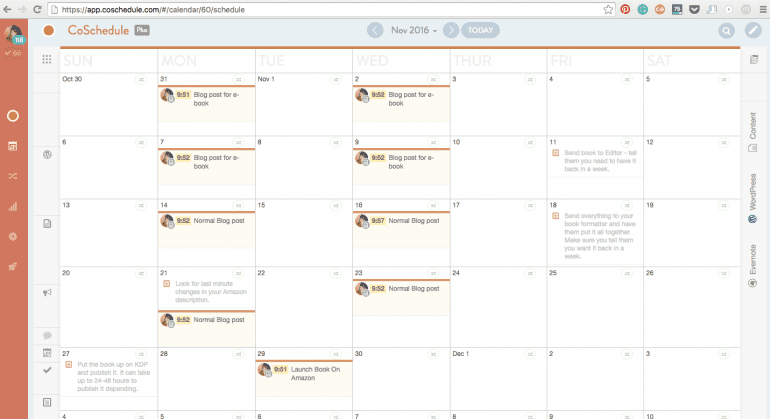
Ready... Set... Write... And Launch Your E-book
You now have everything that you'll need to plan, write, edit, design, and launch your e-book in the Amazon store. Are you ready to become a published author?Want to know how to create and #publish a #book on #Amazon?
Click To Tweet