The Most Complete Content Editing Process to Avoid Copy Disasters

 After tons of hard work, your latest piece of long-form content is finally drafted.
It’s ready for thousands of potential customers to read and enjoy.
…or is it?
What if the content’s not right for your audience? What if nobody cares? Worse, what if it flat-out sucks—like so bad even your mom hates it?
Every content creator knows these worries. But when you're on a consistent publishing schedule to achieve growth, there’s little time to second-guess yourself.
#publishordie
The problem is that speed and quality are usually mortal enemies. But what if you could create content with speed and quality—while improving your content editing process at the same time?
Oh, it’s possible ?
After tons of hard work, your latest piece of long-form content is finally drafted.
It’s ready for thousands of potential customers to read and enjoy.
…or is it?
What if the content’s not right for your audience? What if nobody cares? Worse, what if it flat-out sucks—like so bad even your mom hates it?
Every content creator knows these worries. But when you're on a consistent publishing schedule to achieve growth, there’s little time to second-guess yourself.
#publishordie
The problem is that speed and quality are usually mortal enemies. But what if you could create content with speed and quality—while improving your content editing process at the same time?
Oh, it’s possible ?
 This post is a step-by-step content editing process for making any piece of written content publish-ready at high standards. From rough draft to show time, your team is unleashed to focus on the right work in the right sequence.
(You know, instead of wondering which version of “ebook_final_Final_FINAL.doc” is press-ready.)
More good news. This won't add barriers between you and shipping content. After all, the best processes simplify.
This process nestles beside your "bias-for-action" marketing philosophy. And will get you to publication faster and more polished than ever.
So, if you work on a team, this process will:
This post is a step-by-step content editing process for making any piece of written content publish-ready at high standards. From rough draft to show time, your team is unleashed to focus on the right work in the right sequence.
(You know, instead of wondering which version of “ebook_final_Final_FINAL.doc” is press-ready.)
More good news. This won't add barriers between you and shipping content. After all, the best processes simplify.
This process nestles beside your "bias-for-action" marketing philosophy. And will get you to publication faster and more polished than ever.
So, if you work on a team, this process will:
- Save you time. Never ask, “What’s next?” Or get stuck in email or chat threads about undocumented project details.
- Eliminate mistakes. Never publish content with major warts.
- Improve your team's working dynamics. The team that can give—and take—constructive criticism will thrive and grow.
- Ensure you never miss a deadline. Keep in step with your publishing schedule.
- Keep you perfectly organized. Never lose a document version, comment, or question.
- Excel template: See the full process at-a-glance and manage it right in a spreadsheet.
- Evernote template: See the full process at-a-glance and manage it via shared notes and notebooks.
- Naming convention cheat sheet: Keep your document names synced and clear.

A Complete Content Editing Process: A Team-Based Approach
This process uses four distinct roles: author, editor, designer, and manager. (Even if you're flyin' solo in the content editing department, you always need to know which hat you're wearing. So this process still rocks for you, too.) Here's a quick overview of what each person's role looks like: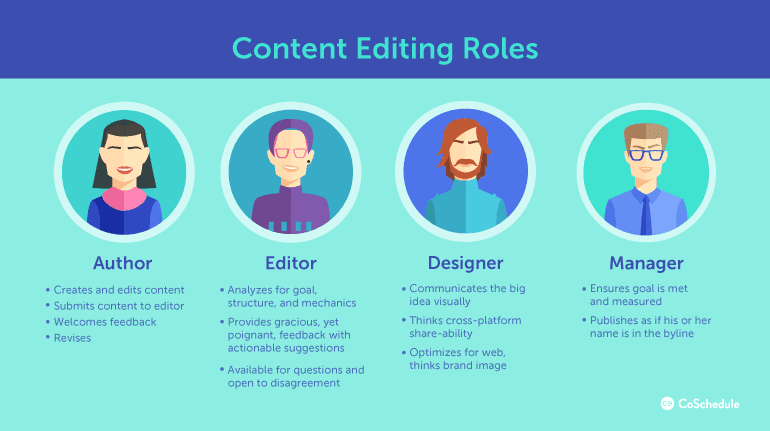 When working any process as a team, the key is to understand that everyone’s end goal is the same.
To work well as a #marketing team, the key is to understand that everyone’s end #goal is the same.
Click To TweetRecommended Reading: How to Structure Your Marketing Team to Create the Best Content
The 3-Stage Content Editing Process For Written Content
Now, let's jump into the nitty-gritty and polish up that fresh piece of content. First, note that this process is portable across all written content types. You can use it for editing ebooks, blog posts, email copy, and more. There will be differences in a few stages—but the bones are the same. For our sake, let's say we have an ebook draft that's just been submitted from our writer. You'll find the complete process in the Excel doc titled: "Content_Editing_Process_Template."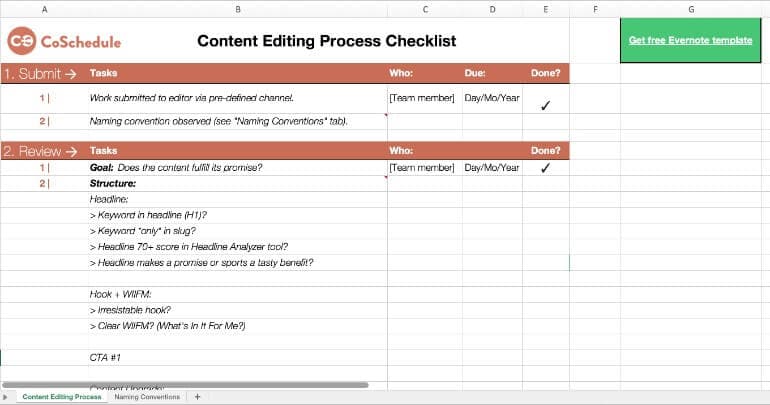 If you're an Evernote fan, you can click the green cell with the "Get free Evernote template" hyperlink. This URL allows you to copy the template into the notebook of your choice.
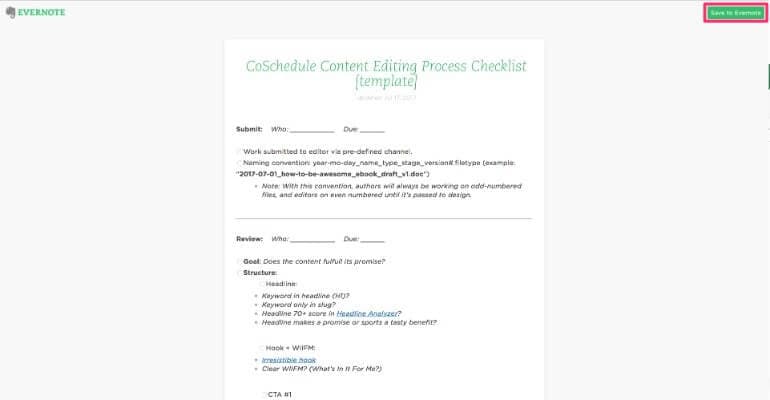
To do this, simply click on the green "Save to Evernote" button in the upper-right of your browser window.
If you're an Evernote fan, you can click the green cell with the "Get free Evernote template" hyperlink. This URL allows you to copy the template into the notebook of your choice.
To do this, simply click on the green "Save to Evernote" button in the upper-right of your browser window.
 Now you're all set to work the content editing process.
Stage 1: Submit
This first stage is pretty dang easy. Our ebook is drafted and the hard part's over—right? Almost. Often, one of the toughest things for a creator to do is accept criticism on his or her work without getting defensive. There are plenty of psychological reasons why criticism is hard to take. But if a team member can't accept honest feedback, a communication channel is shut down. And work that could be improved suffers. That's why the first part of the process is about the author's attitude. When a piece is submitted for editing, the mindset needs to be one that invites critique, rather than hopes it doesn't happen.Writers should invite critique, rather than hope it doesn't happen.
Click To TweetHey [teammate], The draft of [project name] is done! Here's the work I've put in so far:The other half of submitting work for editing is file management. When working on shorter pieces like blogs or articles in Wordpress or a similar platform, this is less of an issue. However, anytime there is a longer-form document to manage organization is critical. This is true whether it's a Word, Google Doc, or anything else. To keep things organized, I included a naming convention cheat sheet in your kit. It's under the "Naming Conventions" tab in the template.Now, I need you to help make it better. I'm really relying on you to catch any mistakes or blindspots. So get out your red pen and have at it :) Would you be able to turn this around by [date] so I have enough time to revise according to your feedback? Thanks, [Your Name]
- Research,
- Outlining,
- Drafting,
- Revisions,
- Final proof.
 The cheat sheet gives you some example naming conventions to keep your content organized. The essential elements for five example content types are included. But if you need conventions for additional types, go ahead and add them!
 Naming conventions are like mini-templates for your document names. They offer a standardized way of naming files so they don't get lost or confused.
 This cuts down on back-and-forth and rework by leaving a trail of digital breadcrumbs to follow.
For our ebook project example, let's say the title is "How To Write Content That Increases Sales By 1,001%: A Beginner's Ultimate Guide To Copywriting For The Web."
That's a mouthful... So here's how the naming convention simplifies things.
This file would simply be named: "2017-07_htwc_ebook_rd_v1.doc"
This cuts down on back-and-forth and rework by leaving a trail of digital breadcrumbs to follow.
For our ebook project example, let's say the title is "How To Write Content That Increases Sales By 1,001%: A Beginner's Ultimate Guide To Copywriting For The Web."
That's a mouthful... So here's how the naming convention simplifies things.
This file would simply be named: "2017-07_htwc_ebook_rd_v1.doc"
Tip: Never. Ever. Name append a document name with: "...final." Why? Because when inevitable revisions need to be made, your goose is cooked. Plus, it's just plain silly to have documents with file names like "final_Final_FINAL" or "final_v2." < Yeah, I've totally seen that. :(
Stage 2: Review
Next it's time for the heavy lifting—editing. The editor has four steps here:- Goal: Does the content fulfill its promise?
- Structure: Is the structure optimized for engagement and on-page SEO?
- Mechanics: Is it free of spelling errors, grammar mistakes, passive voice, etc.?
- Sent for revisions: Are additional revisions required? If so, is the naming convention observed?
✅ The Content Delivers On Its Promise
First, the best headlines and content make big promises—and then keep them. So, that's the editor's first task and it starts with a simple read through with this question in mind: "Does this content make a big promise and deliver on it?" Before mechanics are ever addressed, higher-order considerations should be made. Let's take our ebook entitled, "How To Write Content That Increases Sales By 1,001%: A Beginner's Ultimate Guide To Copywriting For The Web" as an example. The first question the editor needs to answer is whether or not the content can really increase a newbie copywriter ability to sell on the web by 1,001%. Are there real case studies? Step-by-step how tos? Lessons or exercises? To do this, the editor should read from your ideal reader's perspective (AKA: user persona). If the reader is a new copywriter, but the content is fluffy advice—it's not fulfilling its promise. A 1,000%+ increase in sales is a crazy-big promise, which means the tactics that'll get those results will be uncommon. And if they're uncommon, there'd better be actionable, step-by-step instructions. This perspective is a huge part of content editing. In fact, I'd say it's more important for content to deliver on a big promise than be beautifully designed and spelling-error free. I'll take a messy manuscript that gets results over a pretty piece of fluff any day.
I'll take a messy manuscript that gets results over a pretty piece of fluff any day.
Click To Tweet✅ The Content Is SEO Optimized
Next up: rocking your search engine optimization! Woohoo :) Obviously, if your content editing is for an ebook SEO isn't really a factor. But if you're blogging, you simply can't leave home without it. Savvy content editing will get even the flabbiest content into fighting shape for on-page performance. And this is done by understanding the perfect anatomy of a blog post. If you're new to SEO—or want to get serious about it, check out these resources:
✅ The Content Is Edited And Mechanically Sound
After you've worked through structure and strengthening value and promise delivery, it's time for editing. For our purposes, I'm using the term pretty loosely—as there are many stages of content editing. There are developmental edits, line edits, copy edits, proofreading, and more. However, you'll likely find the bulk of your time is spent in copy editing and proofreading. Grammarly has a nice description of how copy editing and proofreading differ:The tasks involved in copy editing include checking written material for grammar, spelling, style, and punctuation issues before it’s prepared for proofreading. A copy editor may also do a rewrite, if necessary, to fix any problems with transitions, wordiness, jargon, and to ensure the style of the piece fits with the publication. This work is known as revision.While this isn't the post for an in-depth "how to" on a full-scale content edit, I can offer a primary directive. The goal of any content editing process isn't to produce a literary lamb without blemish. Instead, it's to remove every barrier—mechanical or otherwise—between the reader and fulfilling the promise your content makes. The rest is just bonus ? A few notable tools to quicken and improve your copy editing process:
Speed up your content editing process with this process + these tools:
Click To Tweet✅ Revisions Are Requested With A Set Deadline
Finally, things get done when deadlines are attached. So every request made needs a due date. This is super simple—but often ignored! Here's the deal, deadlines increase productivity. So highly-efficient teams use and embrace them. Not only that, this is the shortest part of the process. It takes all of four seconds to ask: "I'd love to see X project by Y date, please! That way everyone can ship their parts on time. #teamwin" In your template, you can track and manage this in the "Who, Due, and Done" columns. After you've described the task, assign it to a member of your team:
 Then, use the calendar button to assign a deadline. The bonus of being able to select a certain number of days "before publish" is the dynamic nature of these deadlines. This is incredible because if the entire project's deadline gets moved backward or forward by any amount of time, ALL task deadlines shift intelligently without any additional work (like you'd have in a non-dynamic management system):
 Then, once the assignee knocks out the task and clicks in the white checkbox to mark it finished, both parties receive a notification that the task is finished:
 Boom—edited.
 All that's left is for the writer to revise accordingly. And once that's done, it's design time.
Recommended Reading: How to Meet Deadlines When You're Sick and Tired of Missing Them
Stage 3: Design
Legendary designer Saul Bass famously said: “Design is thinking made visual.” And that's the perfect way to articulate a designer's role in content creation. They help visualize the big ideas your readers simply must understand. Design and marketing go together like glue sticks and a good time... Like happiness and ice cream... Like puppies and YouTube... Great design elevates the content it's paired with. And more importantly, it ensures the scanners in the club will still get a shot at engaging with your big ideas. This is especially important because most of you will only read about 20 percent of the words in this very article. Visuals are landmarks for your audience. They say: "Hey, look at me, I'm important!" Next, some pretty smart folks published findings on computer models that can predict how much an image will be shared via social media (called an image diffusion path). Simply put, if your visual content is highly-related to your audience's interests, they are more likely to share it—and their followers are more likely to share it as well. The closer aligned with their interests and intent, the further it will spread across the Interwebs. (This is a direct result of nailing user-intent and capitalizing on tactics like latent semantic indexing.) I could blather on about why design is a critical part of content editing—but I hope you get the picture. You simply can't leave home without it. Here's some great insight on how we do this at CoSchedule:
How to Make Visual Content More Meaningful | #OverheardAtCoSchedule


