This Is The HTML Cheat Sheet & Tutorial Every Content Marketer Needs

 In today's economy, you've probably heard something about the importance of developing coding skills.
However, not all bloggers or content marketers are familiar with HTML.
Even among those of us who know a little bit of code, there's always more we can learn. In your job, you probably don't need to know how to build an entire site from the ground up with nothing more than a text editor and your wits.
However, if any part of your job involves working in WordPress or another content management system, knowing a little bit of code can be immensely helpful.
In today's economy, you've probably heard something about the importance of developing coding skills.
However, not all bloggers or content marketers are familiar with HTML.
Even among those of us who know a little bit of code, there's always more we can learn. In your job, you probably don't need to know how to build an entire site from the ground up with nothing more than a text editor and your wits.
However, if any part of your job involves working in WordPress or another content management system, knowing a little bit of code can be immensely helpful.
Are you a #blogger or #marketer looking to learn useful HTML?
Click To Tweet- Understanding HTML can help you learn how your blog or website is structured.
- Knowing even a little bit of code can help you become more self-sufficient (and it may help you save time asking for help).
- You'll be able to fix stubborn WordPress formatting issues more easily and with less yelling at your computer.
Learn #HTML basics to improve your #blog formatting skills. #blogging
Click To Tweet The standard Wordpress kitchen sink offers a lot of power. It isn't always perfect, however, and sometimes it's faster to edit your content's formatting manually. That's where some basic HTML knowledge comes in handy.
What Is HTML?
HTML stands for Hyper Text Markup Language. It forms the structure of a website and has been the backbone of the Internet since the dawn of time (or at least the dawn of the modern Internet). HTML is used in conjunction with CSS (Cascading Style Sheets), which is used to control the appearance of a website. For the purposes of this post, we'll focus just on HTML, and only on a small handful of tags any beginner can put to use. This video provides a simple overview of how HTML documents are created (watch this before you proceed):- Google Chrome: Right-click and select View Page Source.
- Firefox: Right-click and select View Page Source
- Safari: Open Preferences, select Advanced, and click "Show Develop Menu In Menu Bar" at the bottom. Then, go to the Develop menu and select Show Page Source.
- Internet Explorer: Right-click and select View Source, or press the F12 key on your keyboard.
- Microsoft Edge: Right-click and select View Source, or press the F12 key on your keyboard.
 Here is an example of Google's home page with the Show Page Source option selected in Safari on Mac OS X.
Why Do Bloggers And Content Marketers Need To Know HTML?
 If you've ever tried to edit content in WordPress, then you know the formatting functions fail to work the way you want them to sometimes. That's because WYSIWYG editors don't always work as well as intended. For example, a bulleted list may appear with extra spaces. Your text might not copy and paste correctly. You might want to change the color of your blog theme, but you might not know how.
Content marketers should know basic #HTML. Get started here:
Click To TweetWhat Are Some Things I Can Do With HTML?
In general, you'll gain more control over your content's structure and appearance. Here are some specific tasks bloggers and marketers can tackle with HTML:- Create and edit text links.
- Control paragraph structure.
- Fix broken lists.
- Build tables.
- Remove unwanted spacing.
Why Do I Need An HTML Cheat Sheet?
If you haven't yet, we highly recommend downloading the HTML cheat sheet that accompanies this post. It's useful for you to have on hand so that all the common HTML tags are readily accessible.Learning #HTML? Use this #cheatsheet!
Click To TweetHow To Write HTML With Text Files And A Browser
Ready to write and edit some HTML yourself? You could get started now using the Text editor in any WordPress post. However, you can also use Notepad (Windows), TextEdit (Mac), or Sublime Text (Mac, Windows, Linux) and your web browser of choice. 2) Click File in your top navigation bar. Then, scroll down to Open File:
 3) Select your HTML file and click Open. It'll look something like this:
Basic HTML Tutorials For Beginners
 Now that you have some understanding of what HTML is and how it works (and you've downloaded the HTML cheat sheet, right?), let's get started on some basic HTML tutorials.
How To Format Text Using HTML
Let's start with some basic text formatting.How To Create Headings
HTML uses six different levels of section headings. They are structured like this: Here's what they look like on the CoSchedule blog:
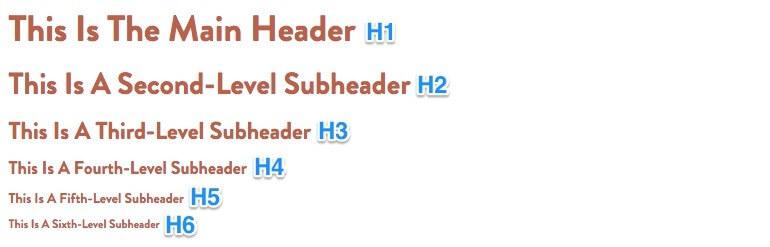
- It's generally considered best practices to include only one H1 tag (this is important for SEO). Generally, WordPress themes use H1 tags for blog post headlines. Keep this in mind when formatting headings.
- You'll likely use multiple H2, H3, etc. tags per post.
- It's okay if you use heading tags "out of order" (ex: your H2 is lower on the page than an H3). Here's a useful explanation about heading tags from Matt Cutts:
How To Make Text Bold
If you'd like to make text bold, use this tag:How To Make Text Italicized
Similar to making text bold, there are two different tags you can use to create italics. The emphasis tag is the best one to use:How To Create A Paragraph
To create a text paragraph, use <p>Insert Text</p>. Here's an example:How To Create A Line Break
If you'd like to force a space between two lines of content, consider using a page break. Simply add the <br> tag between lines of content, like this: We don't actually think we're geniuses, and I'm certainly no Shakespeare. We just wanted to make sure you were still paying attention.
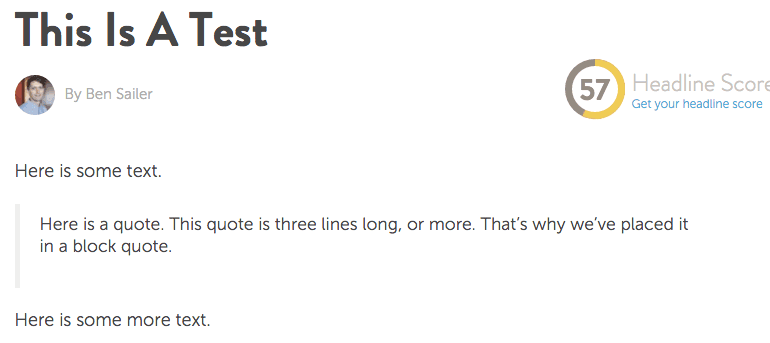
How To Create A Block Quote
If you have a quote that's a few lines long (or more), it should be formatted in a block quote. You could do this in WordPress by clicking here: Or, you can wrap your text using this tag: <blockquote>Insert Text</blockquote>.
 Here's how block quotes appear on our blog:
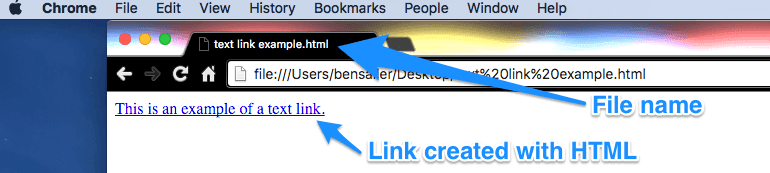
How To Create And Edit Links Using HTML
You're probably thinking, "WordPress makes it easy to create links, doesn't it?" However, there is still value in knowing how to manually create links. Plus, there are some things WordPress can't do when it comes to links, that need to be performed manually. Let's go over how links are built in HTML, how to link between different sections of an individual post (this is a handy way to build a table of contents), and how to add no-follow attributes (which are potentially powerful for SEO).How To Manually Build An A Href
To create a text link, you'll need to use the "href" tag. It looks like this:


How To Manually Edit Link Anchor Text
Let's say we want to change the anchor text in the example link shown above. In this case, simply open the Text view option in WordPress. Then, delete the existing anchor text, and rewrite it: That's all it takes.
How To Add A No-Follow Attribute To A Link
If you know a little bit about search engine optimization, then you likely understand follow versus no-follow links. In short, search engines use links to determine the importance of web pages. When a site links to another site, they see this as a vote or an endorsement saying, "This content is useful, and related to the web page linking to it."- You're linking to a page that isn't reputable (but may be related to your blog post).
- You're writing a sponsored post (buying or selling links is SPAM, and search engines may consider sponsored content links to be paid for).
- You're writing a guest blog post or hosting a guest post on your own blog. It's important that links in author bio boxes in guest posts be labelled no-follow, because these were once commonly abused for SEO benefits.
 It's as simple as that.
How To Deep Link To A Specific Blog Post Section
Now you know how to add a link to another web page or website. However, how do you link to another section within a single blog post?- Switch to the Text view tab in WordPress, and add this tag: <a name="NAME"></a>.
- Delete the NAME placeholder text and write your desired anchor text.
- Add <a href="#NAME"></a> to the location you would like linked.
 Here's what the end result looks like:
 Now, we can navigate from the top of the page to the next section in one click. However, there is one problem: we can't get back to the top as easily.
Fortunately, there is an easy solution.
We'll add a "Back to Top" link underneath the "Here's Something About Lorem Ipsum" section. We will also add a destination anchor at the top of the page with no anchor text (this way, the link will direct to the top of the page, but no unwanted text will appear to readers).
Now, we can navigate from the top of the page to the next section in one click. However, there is one problem: we can't get back to the top as easily.
Fortunately, there is an easy solution.
We'll add a "Back to Top" link underneath the "Here's Something About Lorem Ipsum" section. We will also add a destination anchor at the top of the page with no anchor text (this way, the link will direct to the top of the page, but no unwanted text will appear to readers).
 Here's how the Back To The Top link appears:
 Since we did not specify anchor text for this link destination, nothing appears to the reader. However, clicking "Back To The Top" still directs to the top of the blog post.

How To Build Lists In HTML
There are two different types of lists you can create using HTML. These are bulleted (or unordered) and numbered (or ordered) lists. Here's how to create each one (knowing how to build these manually can help you edit them more easily by hand in case WordPress messes up their formatting).How To Create A Bulleted List
It's easy to create a bulleted list (or an "unordered list") using the appropriate button in your WordPress tool bar: You can also build one manually:
 Here's what this code looks like in a web browser:

Why Are You Telling Me This?
Have you ever tried creating a bulleted list, only for WordPress to somehow mess up your formatting? Sometimes, minor formatting issues are easy to fix using the WYSIWYG editing bar. However, sometimes it feels a little bit more like this: In cases where WordPress won't cooperate, it's probably faster to edit your list HTML manually.
How To Create A Numbered List
To create a numbered list (or an "ordered list"), follow the same directions as shown above, but change the <ul> and </ul> tags to <ol> and </ol>. Here's what this list looks like:

How To Build A Table Of Contents In HTML
The deep linking technique described above can be used to build a table of contents.- Create a list in the section where you would normally add your text.
- Make each list item a link.
- Add links between each section in your post back to its respective table of contents position.
 This looks something like this on our blog:
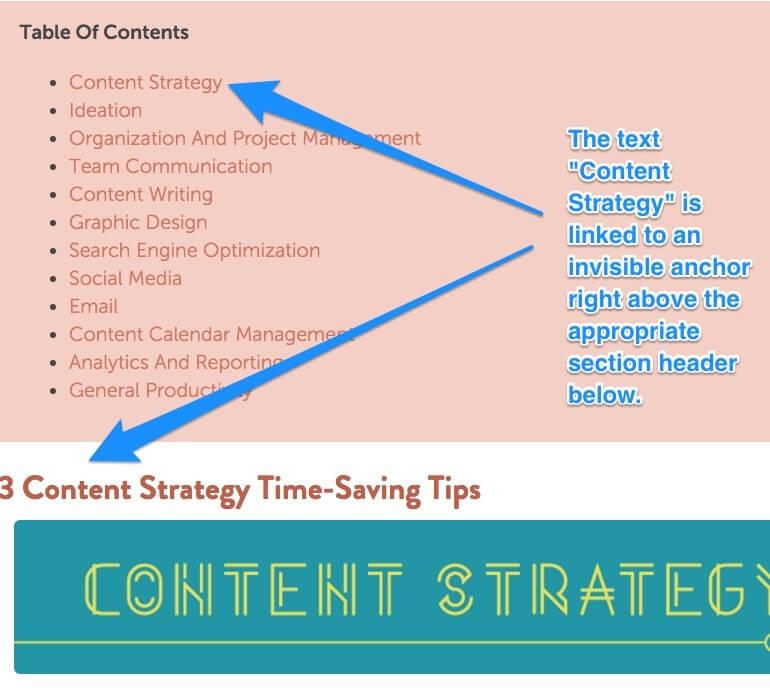
 This process is repeated throughout the post to build a working table of contents. To see how this table of contents works in action, visit our post on time management strategies and try clicking around.
How To Build Tables In HTML
Tables are useful for many different purposes, such as building simple image galleries or creating comparison charts. While WordPress doesn't provide a built-in means of quickly creating tables, they're easy to build on your own. This image illustrates how tables are constructed using HTML: Here is what the end result looks like:
 If you'd like to adjust the alignment or appearance of your table, it's best to use CSS. Since we're sticking to HTML in this post, we'll have to cover this topic at another time.
How To Add Images In HTML
You now know how to format text and build tables in HTML. If you want to add an image, use the HTML image and the Alt Tag attributes:<img src="Insert Image URL" alt="Insert Alt Text">
 2.) Paste the image HTML tag into your table in WordPress. Then, paste your URL and write your alt tag in the appropriate spots until you have something that looks like the following:
 3.) Here's what the end result looks like:
 Armed with this knowledge, we think you can probably create something more interesting than a repeating logo. This is just a quick test to walk you through the process.
How To Clean Up Common Copy And Paste Issues In WordPress
Have you ever tried pasting text from a Word document into WordPress, only to have your formatting get screwed up? That's because copying and pasting from Word (or another similar word processor) will usually include a lot of hidden formatting.- Paste your content into a plain text document in TextEdit (Mac) or Notepad (Windows) before pasting it into Wordpress. This will strip out hidden formatting that would otherwise get turned into stubborn HTML.
- Paste your text straight from Word into WordPress and clean up the formatting manually.
- Write your posts directly in Wordpress.
Ever wonder why copying and pasting from Word never looks right in #WordPress? Read this.
Click To TweetUnderstanding Non-Breaking Spaces
Copying and pasting text from WordPress into the Visual editor in WordPress will add non-breaking spaces to your text. This is probably one of the most common sources of headaches for bloggers when pasting text from Word. Let's dig into what these are and what to do about them.How To Remove Non-Breaking Spaces In HTML
Here is some sample text we'll try pasting directly into the Visual view in WordPress: Now, we'll copy and paste this directly into the Visual view in WordPress:
 Hmm. That doesn't look quite right. Odds are, you've encountered an issue like this at some point. Let's switch to Text view to see what's going on here:
 See the weird tag? This is called a non-breaking space. It forces a space to appear and prevents the formation of another line of text in its place.
The issue with copying and pasting from Word is that the text carries non-breaking spaces along with it. This causes an additional space to appear. Sometimes you can delete these spaces in the Visual editor, but when that fails, you can delete them manually in the Text editor.
Now if you notice weird and seemingly unmovable spaces in your WordPress text, you'll know what to do.Additional HTML Learning Resources
 You've read through this post. You've downloaded your HTML cheat sheet. You've started experimenting with troubleshooting common WordPress formatting issues. If you're interested in taking your HTML knowledge to the next level here are some recommend resources to continue your learning:
Remember, everyone learns differently, and
Now Put Your New HTML Skills To Use!
There's a lot to learn when it comes to HTML. However, we hope this HTML cheat sheet and step-by-step guide has provided you with just enough tips to make your blogging life a little bit easier. You now know how to do basic blog formatting with HTML. You know you can create and edit text links, control paragraph structure, fix broken links, build tables, and remove unwanted spacing. Knowing these HTML tips are going to help you tons and you'll be super thankful for the cheat sheet.Learn #HTML basics to improve your blog formatting. #blogging
Click To Tweet


