
Getting Started With CoSchedule for Power Users
Set Up Your CoSchedule Calendar
Introduction
You’ve come to CoSchedule with the promise of:- Completing more work.
- Delivering projects on time.
- Proving the value of your marketing team.
- What the home dashboard is and how it will be used by you and your team.
- When to plan a marketing project vs a marketing campaign.
- How to get started with the marketing calendar.
The Home Dashboard
The home dashboard is one of the most important areas for ensuring the on-time delivery of projects. It’s the first place your team members will turn to when setting their daily priorities. Everyone will see a list of their tasks for the day, a list of notifications to stay in-the-know on all their projects, and a list of their recent/favorite projects to make it easier to jump back in where they left off. You can also use this to set tasks for yourself or strategically favorite projects to keep an eye on your team's progress. To add a new, private task (like a reminder to respond to an email), click on the orange “New Task” button on your home dashboard.
Recommended Reading:
Home Dashboard Power Tip
The Marketing Calendar
CoSchedule’s marketing calendar is the single most important thing that will increase visibility into what your team is working on. It serves as the blueprint for all of your events, content, social media, and more. Finally, you’ll have visibility into how every project interacts, overlaps, and supports your goals at a glance—confirming your team is working on the right priorities at the right time.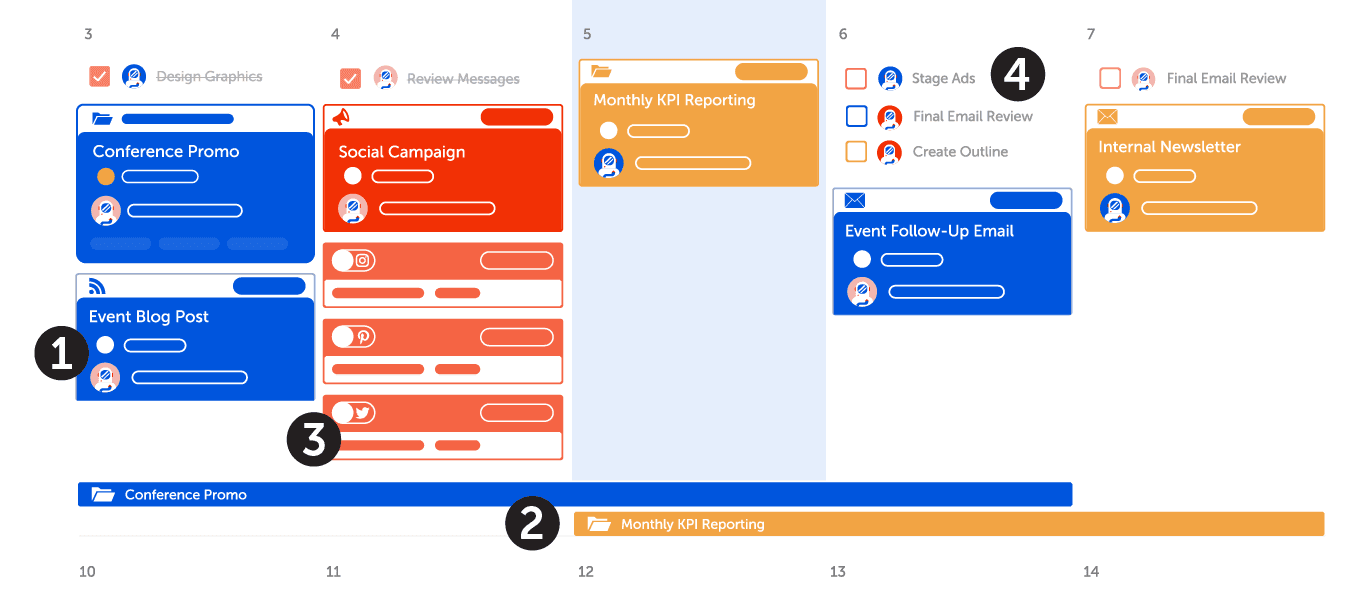 Here are some things you should know about the marketing calendar.
Your calendar will be made up of four items:
Here are some things you should know about the marketing calendar.
Your calendar will be made up of four items:
- Marketing Projects - These are one-off projects like sales slide decks or new tear sheets.
- Marketing Campaigns - These are comprised of multiple projects like social campaigns, blog posts, emails, ads, etc. that all work towards one goal – like the launch of a new product.
- Tasks - Team members will see a list of all the tasks they need to accomplish every day.

The Calendar View
CoSchedule is the only marketing software that allows you to see everything you have scheduled in a calendar view. Let's explore its features to help you navigate your calendar.
- Hamburger menu: This is where you will access the expanded navigation, your settings, and support.
- Breadcrumb navigation - tools: Quickly navigate to different features of CoSchedule Marketing Calendar. Here you will find things like your analytics & reports, ReQueue, and the Kanban board.
- Breadcrumb navigation - saved views: Choose specific saved views of your calendar to filter out the info you don’t need.
- Filtering: Organize your Saved Views your way using filters by adding & customizing your filter settings.
- Display settings: Easily choose how far out you want to view your projects and declutter your calendar by hiding items you don’t need to see.
- Read-only sharing: Once you save your new view, you can create a read-only link and share your work with your team.
- Date navigation: Choose specific months/years or navigate forward/backward through your calendar. For example, use this to easily see what you delivered last month.
- Search: Find past or future marketing projects on your calendar using keywords. For example, if a recently published blog post needs an edit, search the title to find it.
- Create: Add projects to your calendar like new blog posts, social media messages, and newsletters.
- Ideas: The ideas bin is where all project ideas live. When the project is ready to be scheduled, it can be dragged to the calendar. Tip: Use this to see projects that will be coming down the pipeline.
- Support center & notifications: Use the question mark icon to get best practice advice or message the CoSchedule support desk. Use the bell icon to see notifications, recent projects, and favorites.
- Create a project on a specific date: Know the date you want to schedule a project? Add items to specific days using the plus sign on a date.
Planning a Marketing Project
To add a new marketing project to your calendar, click the orange “+Create” button in the top corner or click the plus sign on a date on your calendar. Choose the option that says “Project”. Then, use the dropdown menu to pick which type of project you’re planning. Choose a color label and name your project.

Planning a Marketing Campaign
Marketing campaigns have a lot of moving parts. Here’s how to plan one in CoSchedule Marketing Calendar to make sure everything moves like a well-oiled machine. Add a new marketing campaign to your calendar just like you did with a marketing project. From the dropdown list, choose the “Campaign” option. Give the campaign start and end dates; add a color label and name it.
 This will create a campaign calendar of all the projects associated with the campaign.
 From here, start adding marketing projects to the campaign. Once you’ve got some projects in your marketing campaign, you’ll see the strategy to come to life.
Recommended Reading:
Marketing Campaigns Power Tip
Now that you know a little bit about how to start setting up your CoSchedule calendar, why not get started in real life?
Head over to your calendar to execute everything you learned in this lesson.
