How To Plan Your Next Trade Show Using CoSchedule
 Planning a trade show booth is one of THE hardest things to do as a marketer.
There are always a million very specific rules + guidelines to follow…
(that vary from trade show to trade show)…?
A thousand random deadlines to keep track of….
(uh, the booth design was due when again?)
AND a million things to coordinate…
(ranging from giveaways + landing pages to the ever-stressful shipping logistics).
The problem?
With all these moving pieces plus coordinating everything between sales, finance, operations, and your own marketing team....
Some of those important details are bound to get missed.
*insert panic attack here*
Luckily, with CoSchedule…
You can easily create a solid strategy to plan, execute, and track your entire trade show from start to finish!
 And as the one responsible for making sure the trade show goes off without a hitch…
You can rest easy knowing every task will get completed…
Zero details will get missed…
AND you’ll never miss a deadline.
Because with CoSchedule, you’ve got everything under control.
Let’s dive into how you can do it in 4 easy steps.
?
How To Plan Your Next Trade Show Using @CoSchedule
Click To TweetStep 1: Create A Marketing Campaign In CoSchedule
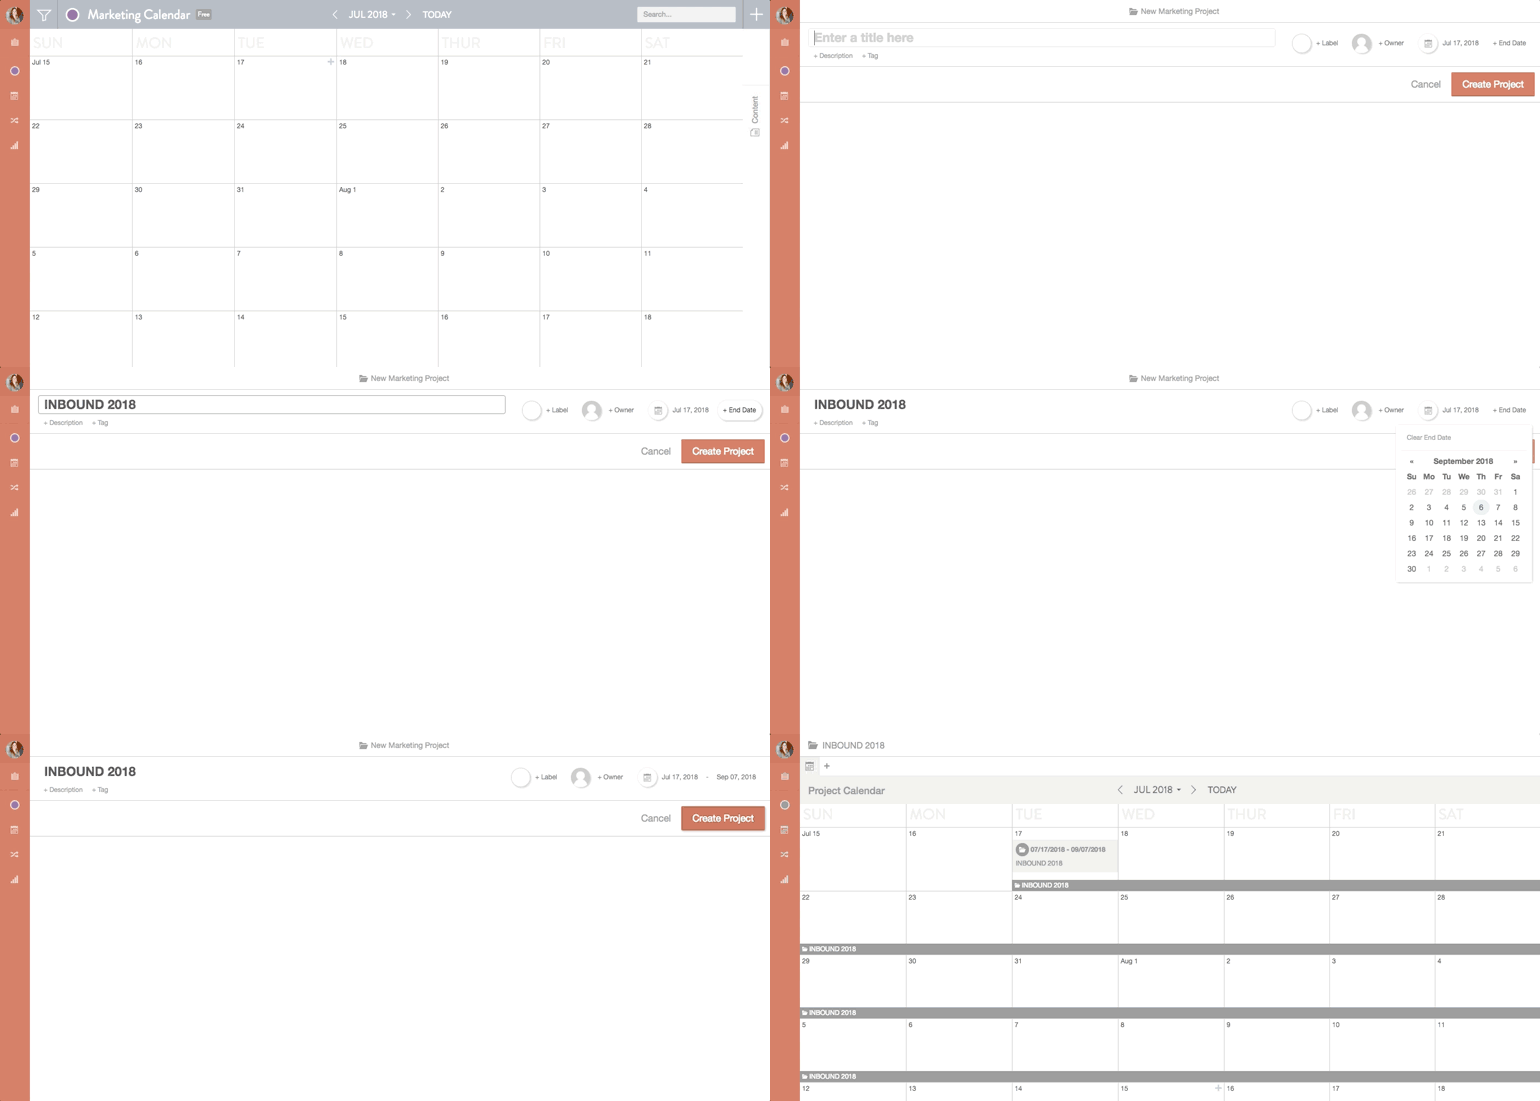
After you get a clear idea of everything you need to get done to execute your trade show… It’s time to create a marketing campaign in CoSchedule! AKA a folder inside CoSchedule that can house every single piece of content, project, event, social campaign, task, and deadline related to your trade show booth. Here’s how to make your marketing campaign in CoSchedule:- Head to your CoSchedule calendar
- Use the + sign to add content to your calendar and select “Marketing Campaign”
- Give your marketing campaign a name (ex. INBOUND)
- Select a color label (to make it easy to find on your calendar!)
- Give it a start date (the day you start working on items for the trade show) and an end date (this could be the start date of the trade show, the day your last post promo email goes out, or whenever the last item related to the trade show is due!)
 Onto the next step!
What's the secret to planning perfect trade show booths with @CoSchedule? It starts with Marketing Campaigns ...
Click To TweetStep 2: Add EVERYTHING You Need For The Trade Show To Your Marketing Campaign
Once you’ve added your marketing campaign to the calendar… You can start adding everything (and yes, I mean EVERYTHING) you need to get done to perfectly execute your trade show. Here are a few ideas to get the wheels turning:
- Trade show booth design
- Swag + prizes
- Geo-targeting Facebook Ads
- Itineraries for sales team
- Book hotels, flights, etc.
- Booth handouts/flyers
- Social campaigns (pre-trade show and post-trade show)
- Landing pages
- Blog post
- Booth video or presentation
- Post-trade show email campaign
- Inside your marketing campaign, hit the + sign in the upper right-hand corner.
- Select the type of project/type of content you want to add you want to add (article, project checklist, social campaign, etc.)
- Give it a title (ex. “Trade show booth design”)
- Give it a color label (usually the same label as the overall marketing campaign, but that’s up to you!)
- Choose the owner of the project (aka the person responsible for making sure the project is completed).
- Select the date that specific item is due.
- Repeat until you’ve added everything you need for your trade show!
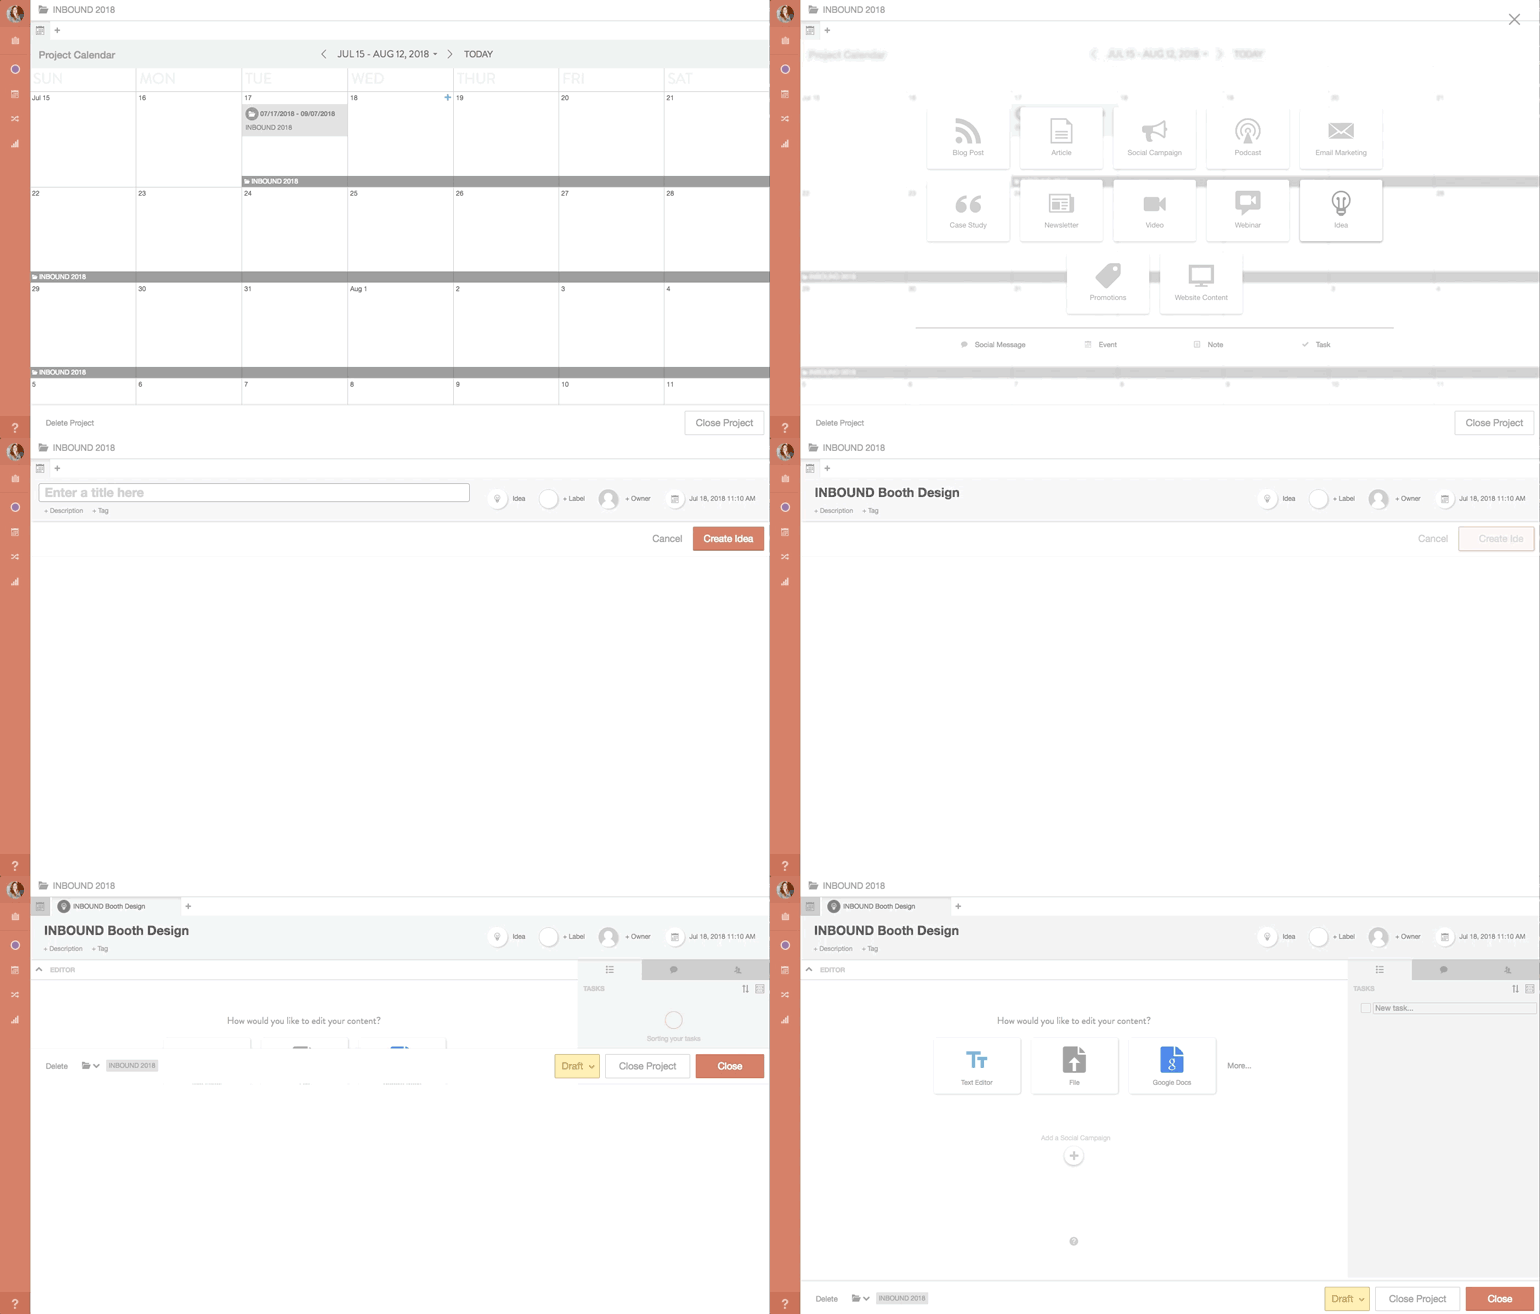 And if other projects come up later, you can easily add those to your trade show plan as they come!
Just make sure everything gets added to your trade show marketing campaign so all those moving pieces get in ONE place.
Manage all the moving pieces that come with trade show planning in one place. Here's how to do it with @CoSchedule:
Click To TweetStep 3: Add Tasks, Owners, And Deadlines
Now for the BEST part…. Adding every task, owner of said task, and date the task is due to every item in your entire trade show plan! Yep, you read that right. LITERALLY EVERY SINGLE TASK you need to get done for your trade show can live inside CoSchedule. For example, here’s how you might layout the tasks for your “trade show booth design” project:
- Research booth designs + layouts
- Design booth layout
- Research pricing
- Get approval on booth layout
- Order booth items
- Ship booth to trade show location
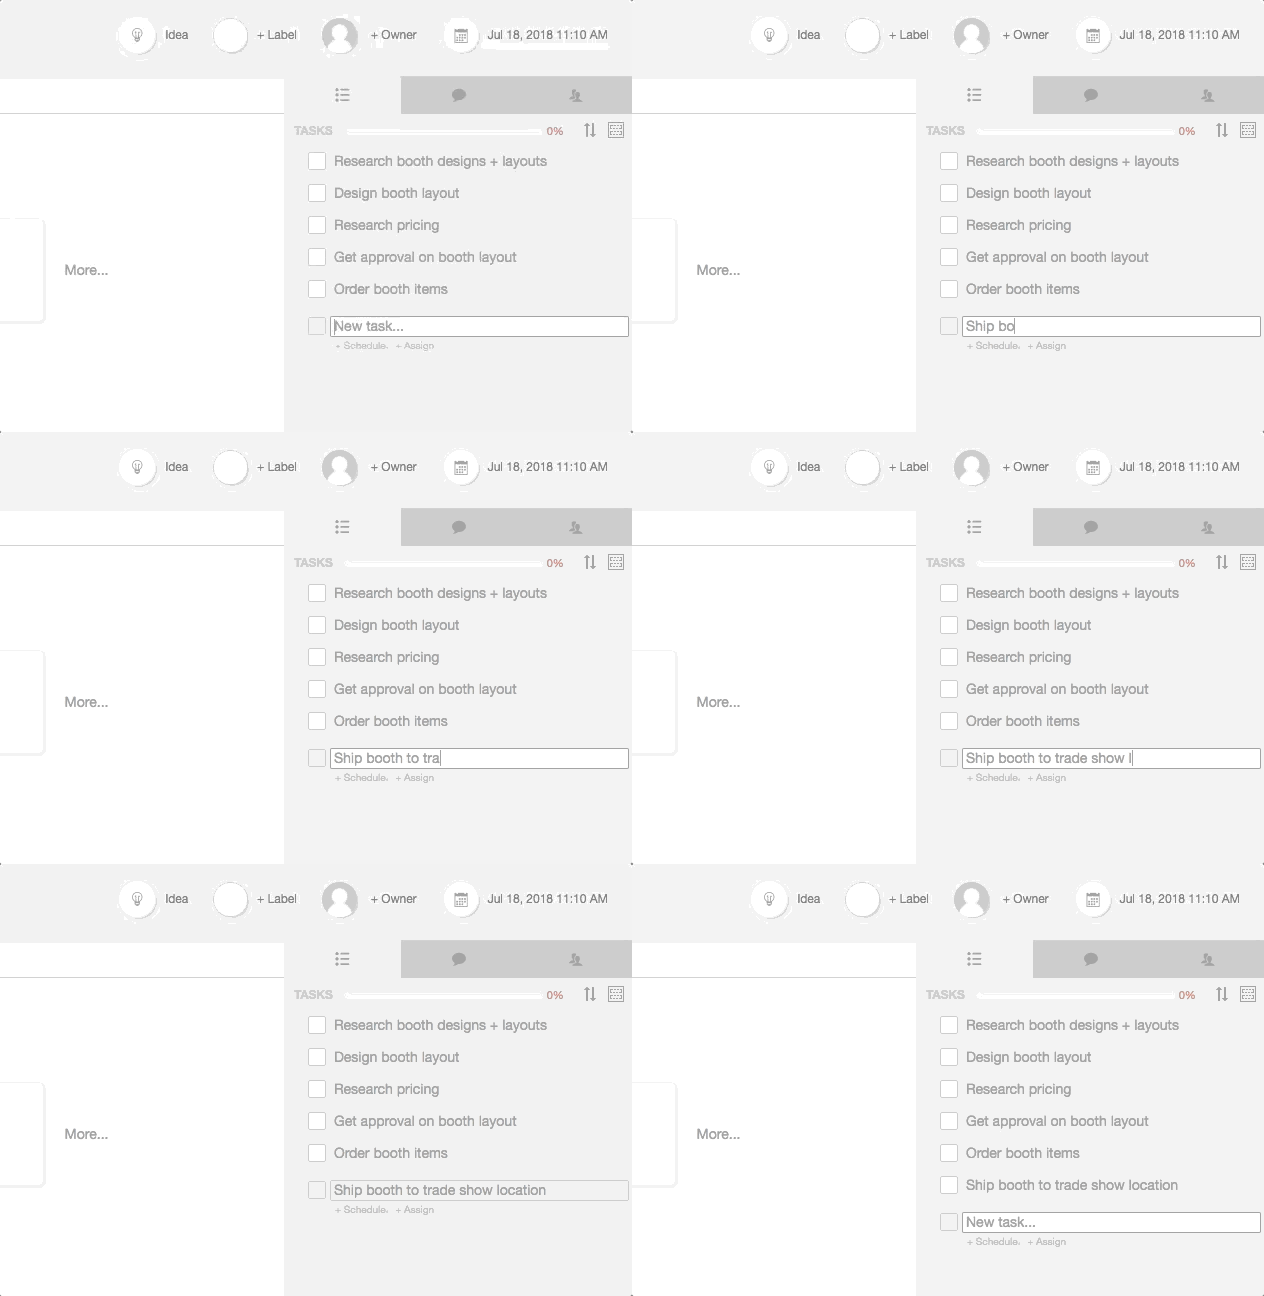 And once you’ve laid out all the tasks associated with your booth design…now you can start assigning owners and deadlines!
- Select one of the projects within your trade show folder
- Head to the right side of your screen (inside the project you just chose) and click on the bullet point tab to open up the task checklist
- Type your first task in the text box next to the empty check box
- Select the +Schedule button underneath your task to set a deadline
- Select the +Assign button underneath your task to assign a teammate to the the task
- Repeat until you’ve added all the tasks, deadlines, and owners related to this project!
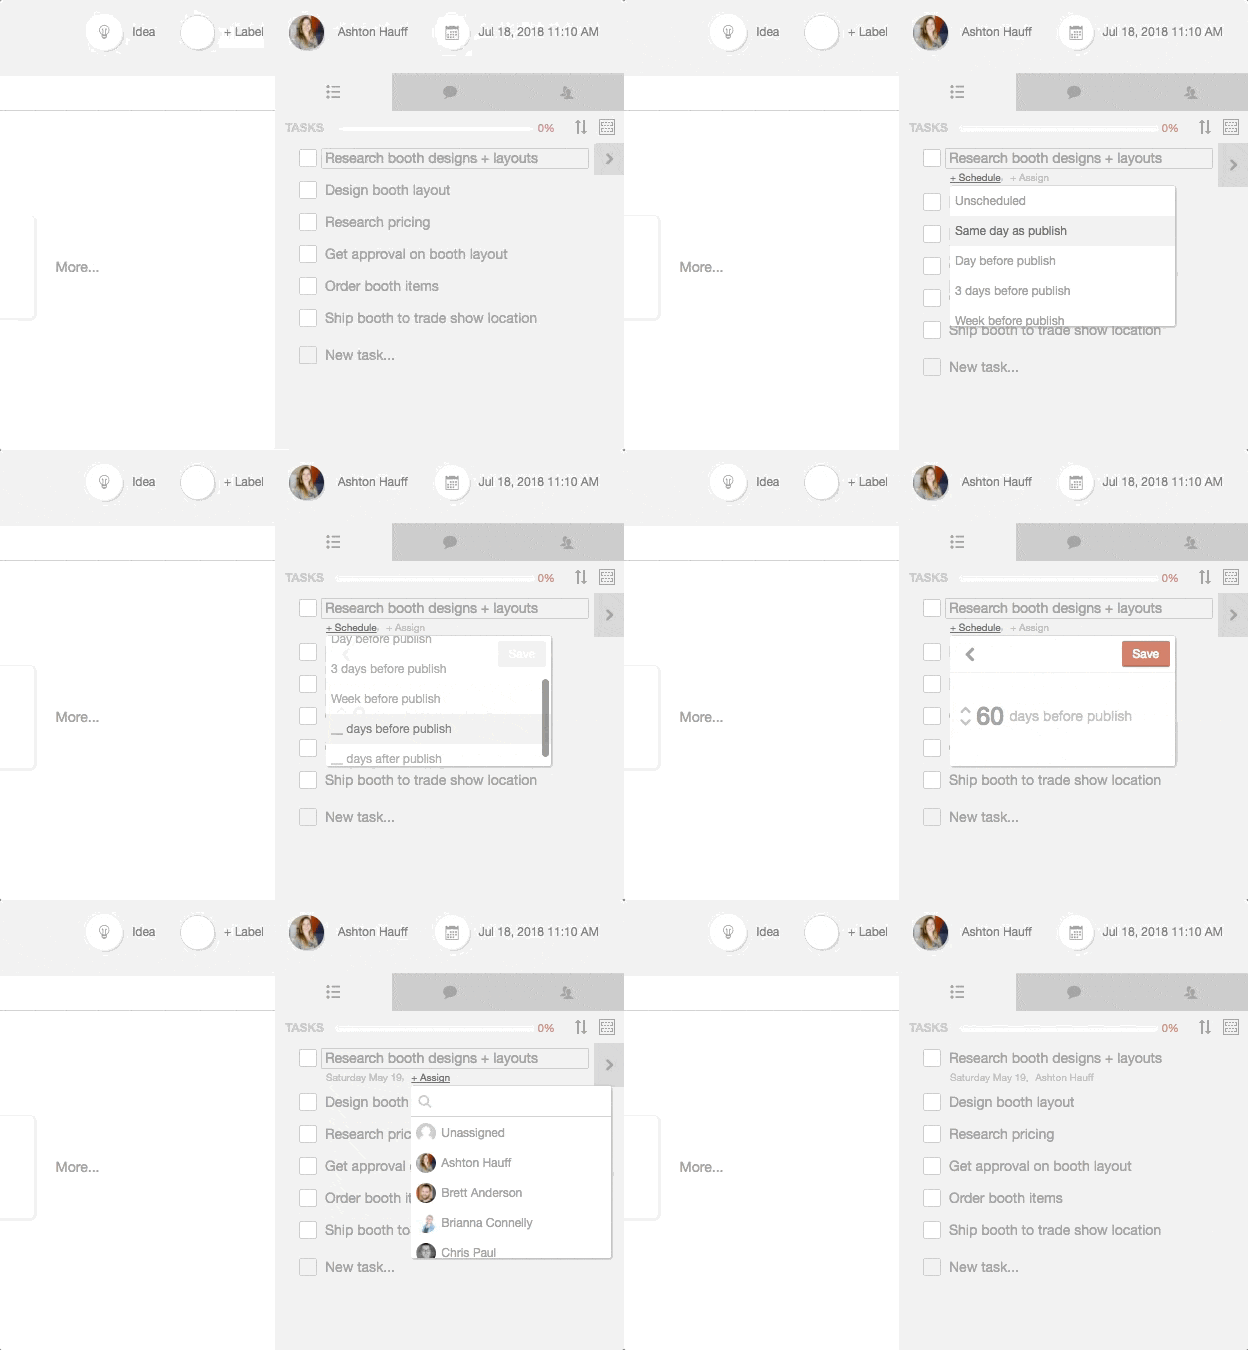 And if certain tasks need approval by various parts of your team (or you, cuz let’s be honest, the success or failure of this thing is ALL on you)…
You can easily add tasks approvals!
Task approvals keep you “in the know” about critical pieces of your trade show, and let you know when a task is ready for review.
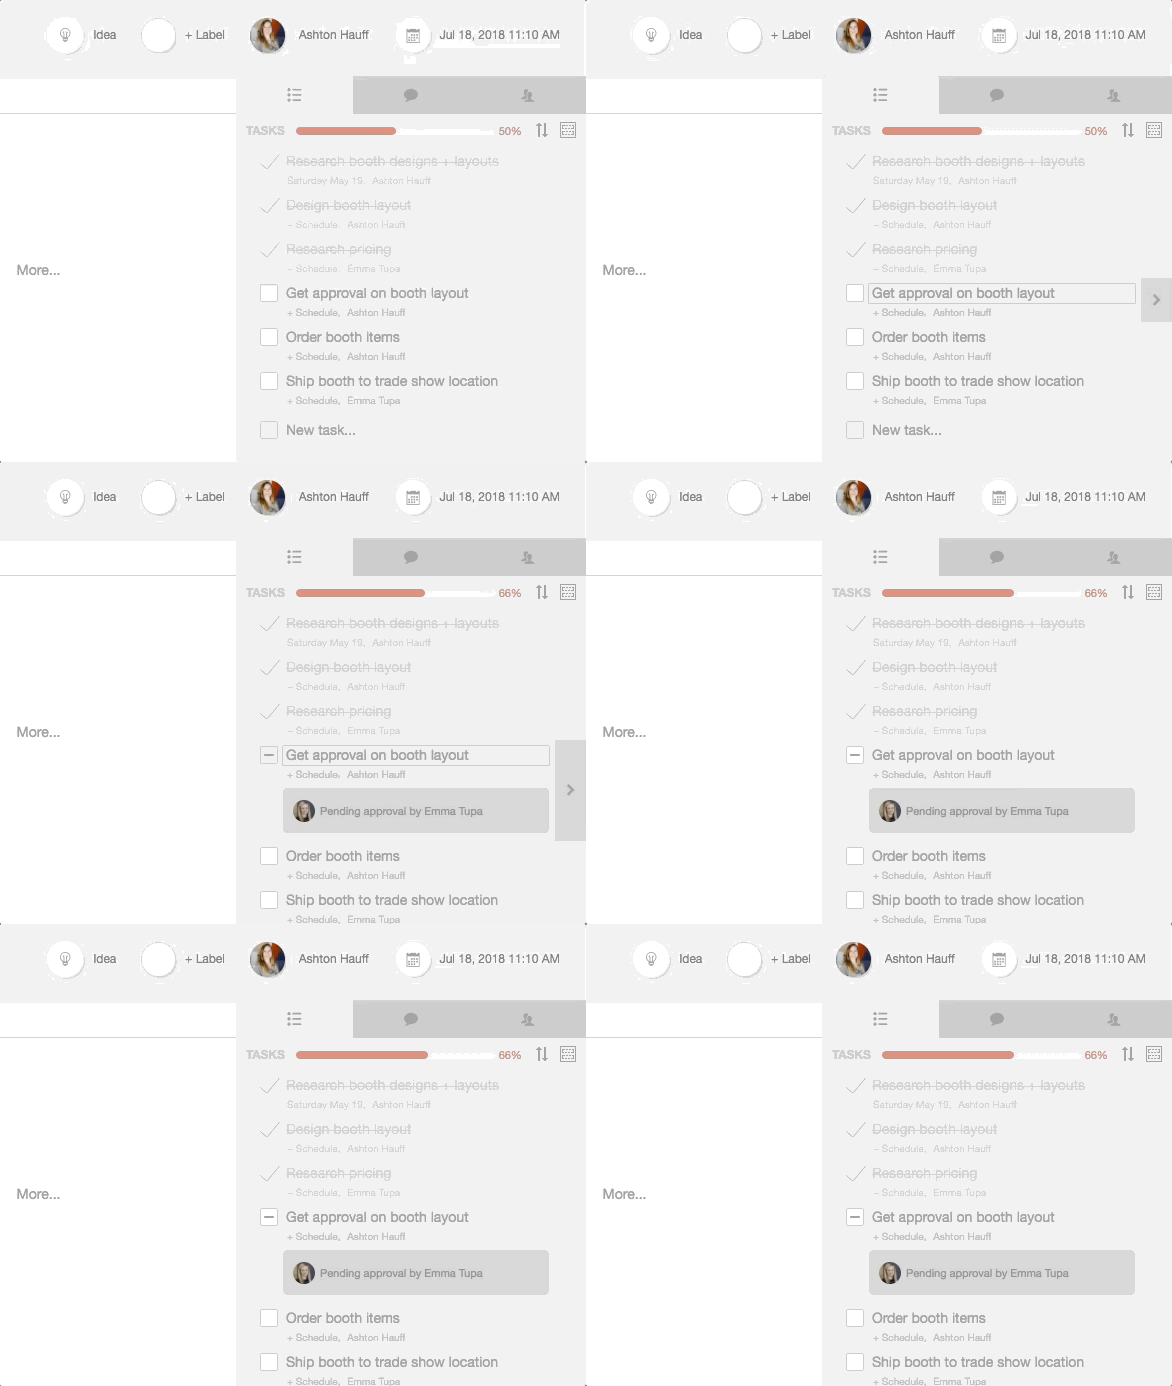 So while a task might have been marked as “complete” inside the checklist...it doesn’t officially get checked off until the assigned approver (you, or whoever else might need to see it) has reviewed the task.
Which means things get done the RIGHT way, every time.
 Want to add a comment or drop a file into your project? No problem.
Next to your checklist tab, is a handy discussion tab! This is where you (and your team) can drop files, add comments, or ask questions related to this specific piece of your trade show.
The best part? Discussions makes it easy to track comments and ideas related to specific projects in ONE place. Which means no more wasted hours sifting through emails and chat rooms!
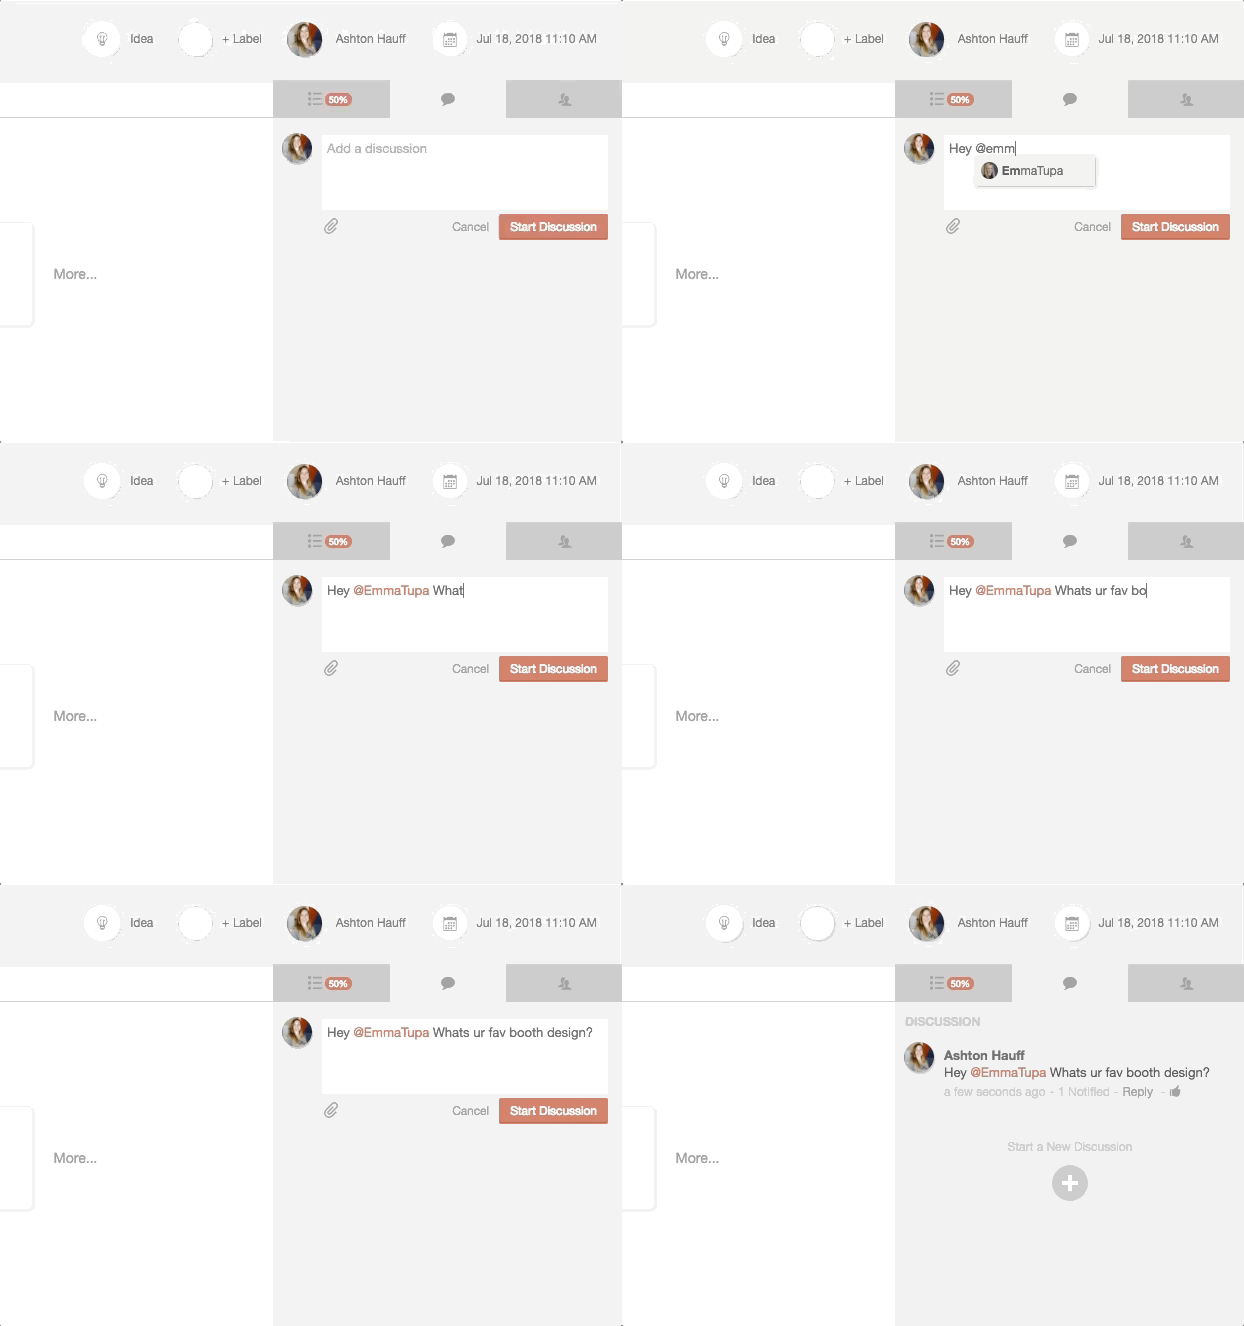 Using task checklists and discussions in every project for your trade show keeps everyone (in multiple departments) in sync, ensures nothing slips through the cracks, AND that you and your team meet every. single. deadline.

Step 4: Track + Manage The Progress Of Your Entire Trade Show
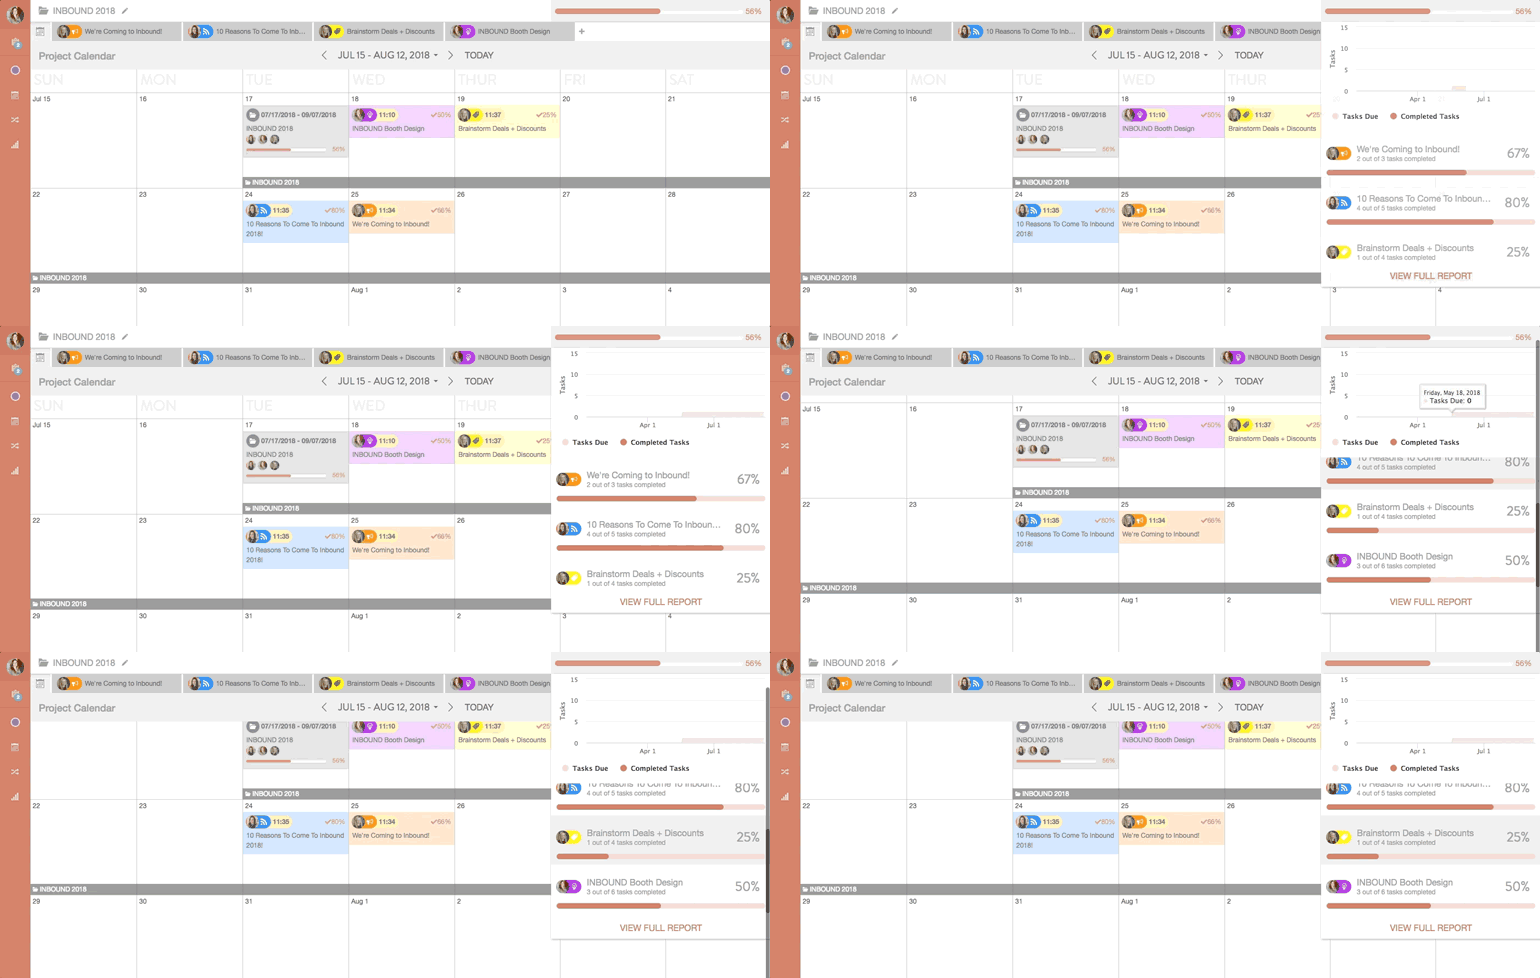
Once you’ve got everything you need for the trade show booth planned out in CoSchedule… AND added all your tasks, deadlines, and owners… Now it’s time to make sure EVERYTHING gets done! And with CoSchedule…that’s the easy part. ? As tasks start getting checked off (and the trade show gets closer and closer)...CoSchedule makes it easy to get a bird’s eye view of individual projects in the trade show… Or even view the progress of your entire trade show using a handy BURN CHART! (#nerd)
 Or, if you’re looking to dive into the details (but don’t want to dive into every project associated with your trade show) head over to your Team Performance Report!
Here you can gain powerful insight into your team’s overall progress on the trade show…
Identify peaks and valleys in your team’s performance…
AND get a quick view of who’s fallin’ behind on tasks (and who’s rockin’ it) with just a couple clicks.
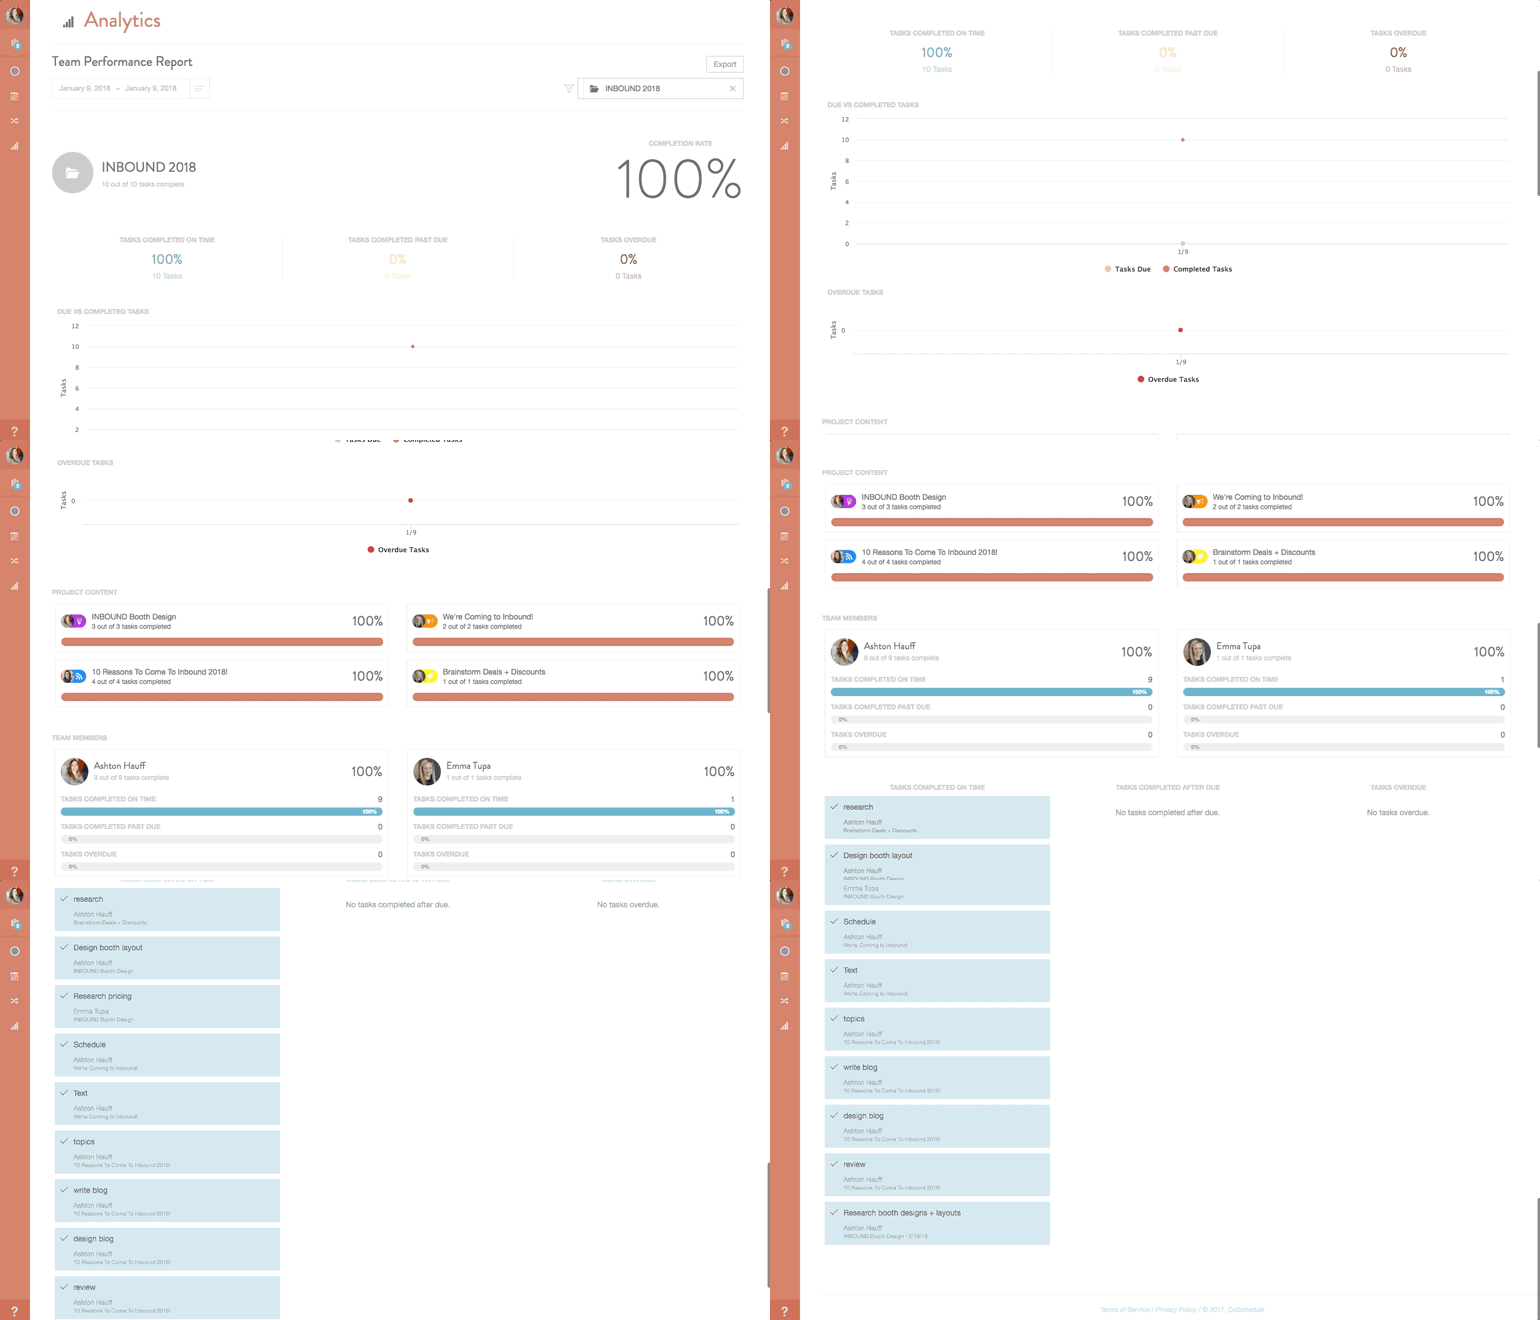 The best part? Having reports and progress percentages at your fingertips means you can spend less time tracking down incomplete tasks…
And MORE time working on the thousand other items on your to-do list.
 Planning a trade show booth is one of THE hardest things to do as a marketer…
AND one of the most anxiety-producing.
#truth
But with CoSchedule, you can rest easy knowing every task will get completed…
Zero details will get missed…
You won’t miss a deadline...
And that you’re gonna look like a rock-star marketer…
Because your trade show is gonna go off without a hitch (and you made it all look like a piece of cake). ?


