
No matter how good your content is, not all your readers will read it word for word.
In fact, the
majority of them will skim read it. So if you’ve been wondering how to format a blog post, you’re on the road to success.
The reason? A reader-friendly blog format keeps folks on your page – better engaging them and encouraging them to read. It also optimizes blog posts for SEO and improves opportunities for conversion.
Ready to drive all these benefits from good blog post formatting? Follow this actionable guide to learn everything about blog formatting.
We’ve got an 11-step proven blueprint to blog post formatting together with blog format examples. We’ll also share blog post templates to help you start today.
Write Better Posts With This Blog Templates Bundle
Don't leave this post without the resources you need to improve your blog's format. This bundle features a ton of great templates to help you speed up your writing process and create beautiful blog posts your audience will love.
Why Does Blog Post Formatting Matter?
Your blog format carries a lot of weight as it determines how many folks will read your content. In fact, it won’t be an overstatement to say that blog post formatting is a leading factor that either encourages or discourages visitors to read.
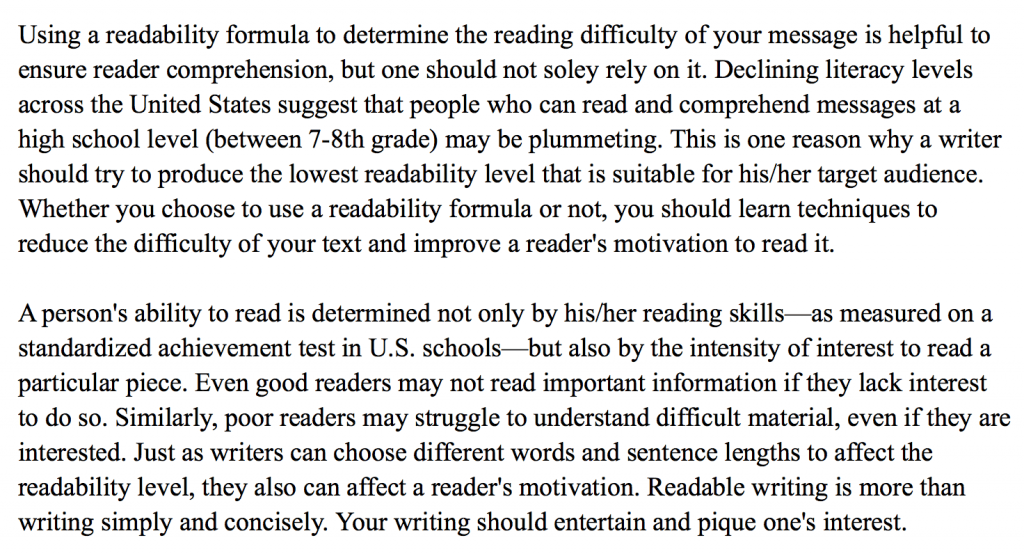
Consider this:
Now, look at this:
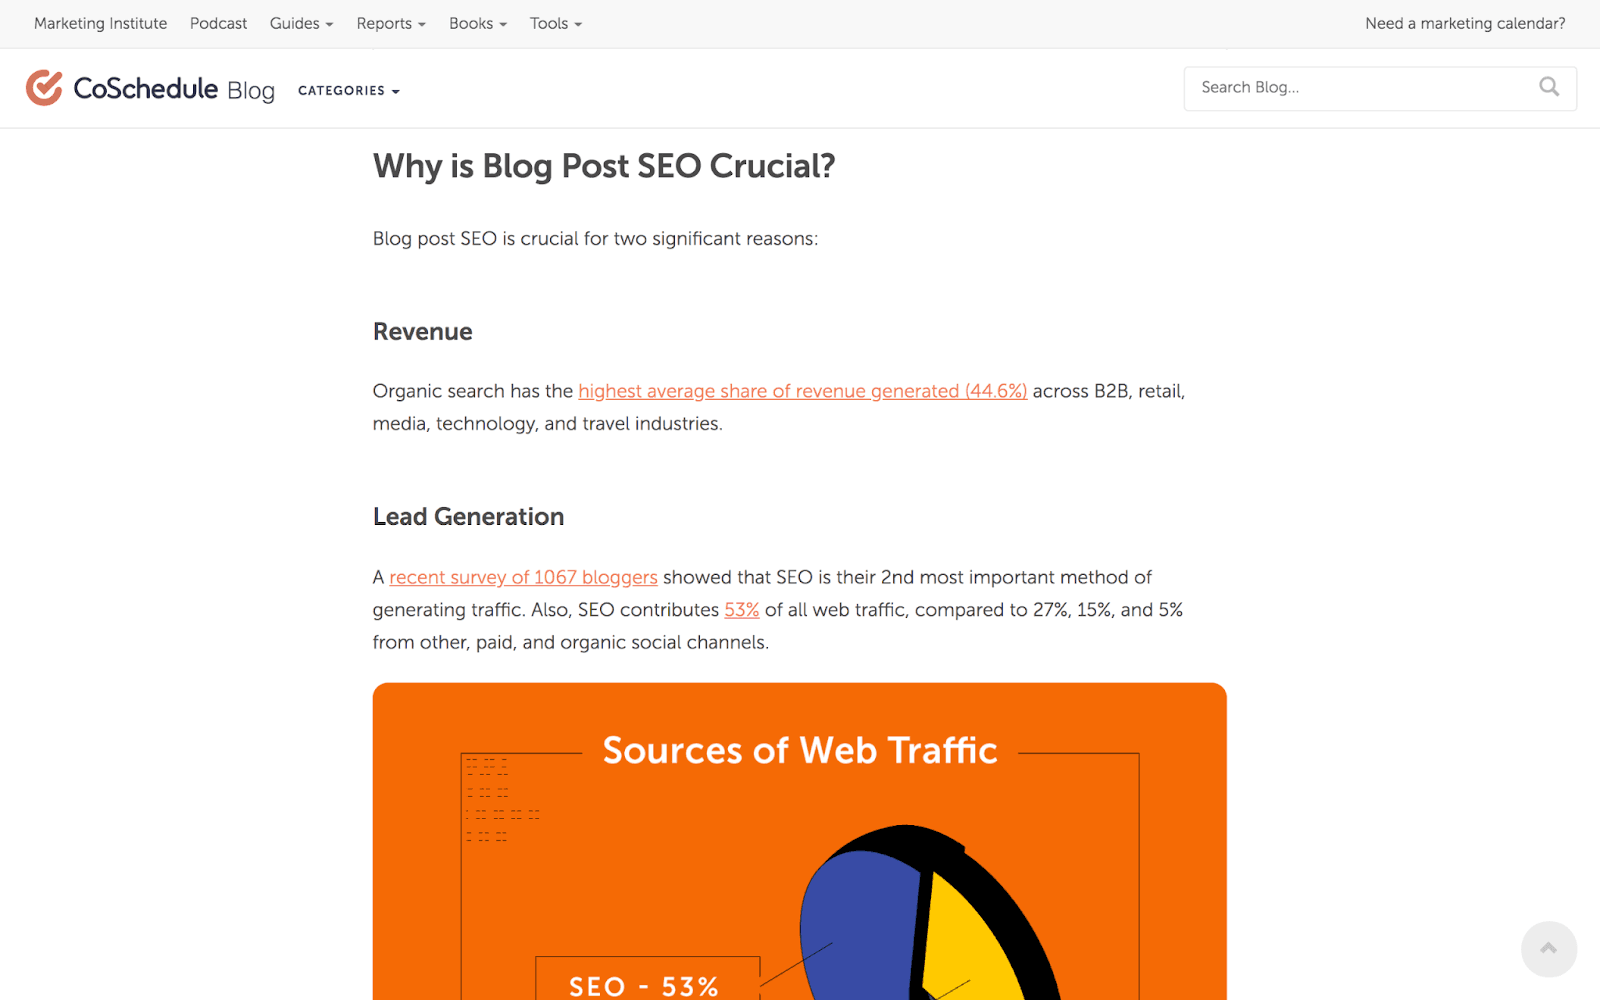
Which post would you read? I bet the second one, isn’t it? The reason: the blog format is egging you on to read.
Put simply, you need an effective blog writing format to:
- Make content easy to read
Always remember: a content structure that breaks text – pairing it with short to medium-length sentences – is widely read.
- It can impact how readers perceive the quality of your content and brand
Large blocks of text consisting mainly of long sentences and no regard for ease of reading signal hasty work. Without a solid blog format, your content’s quality is likely not going to show either.
- It can also make your content easier for search engines to crawl
Search engines look at the way content is structured (think: H2s and H3s) to crawl the topic for ranking. So an effective blog post format is essential for improving your SEO game as well.
The Anatomy of a Well-Formatted Blog Post
Convinced you need to work on your blog format? Great call. Here’s a handy walk through the skeletal framework of a well-formatted blog post.
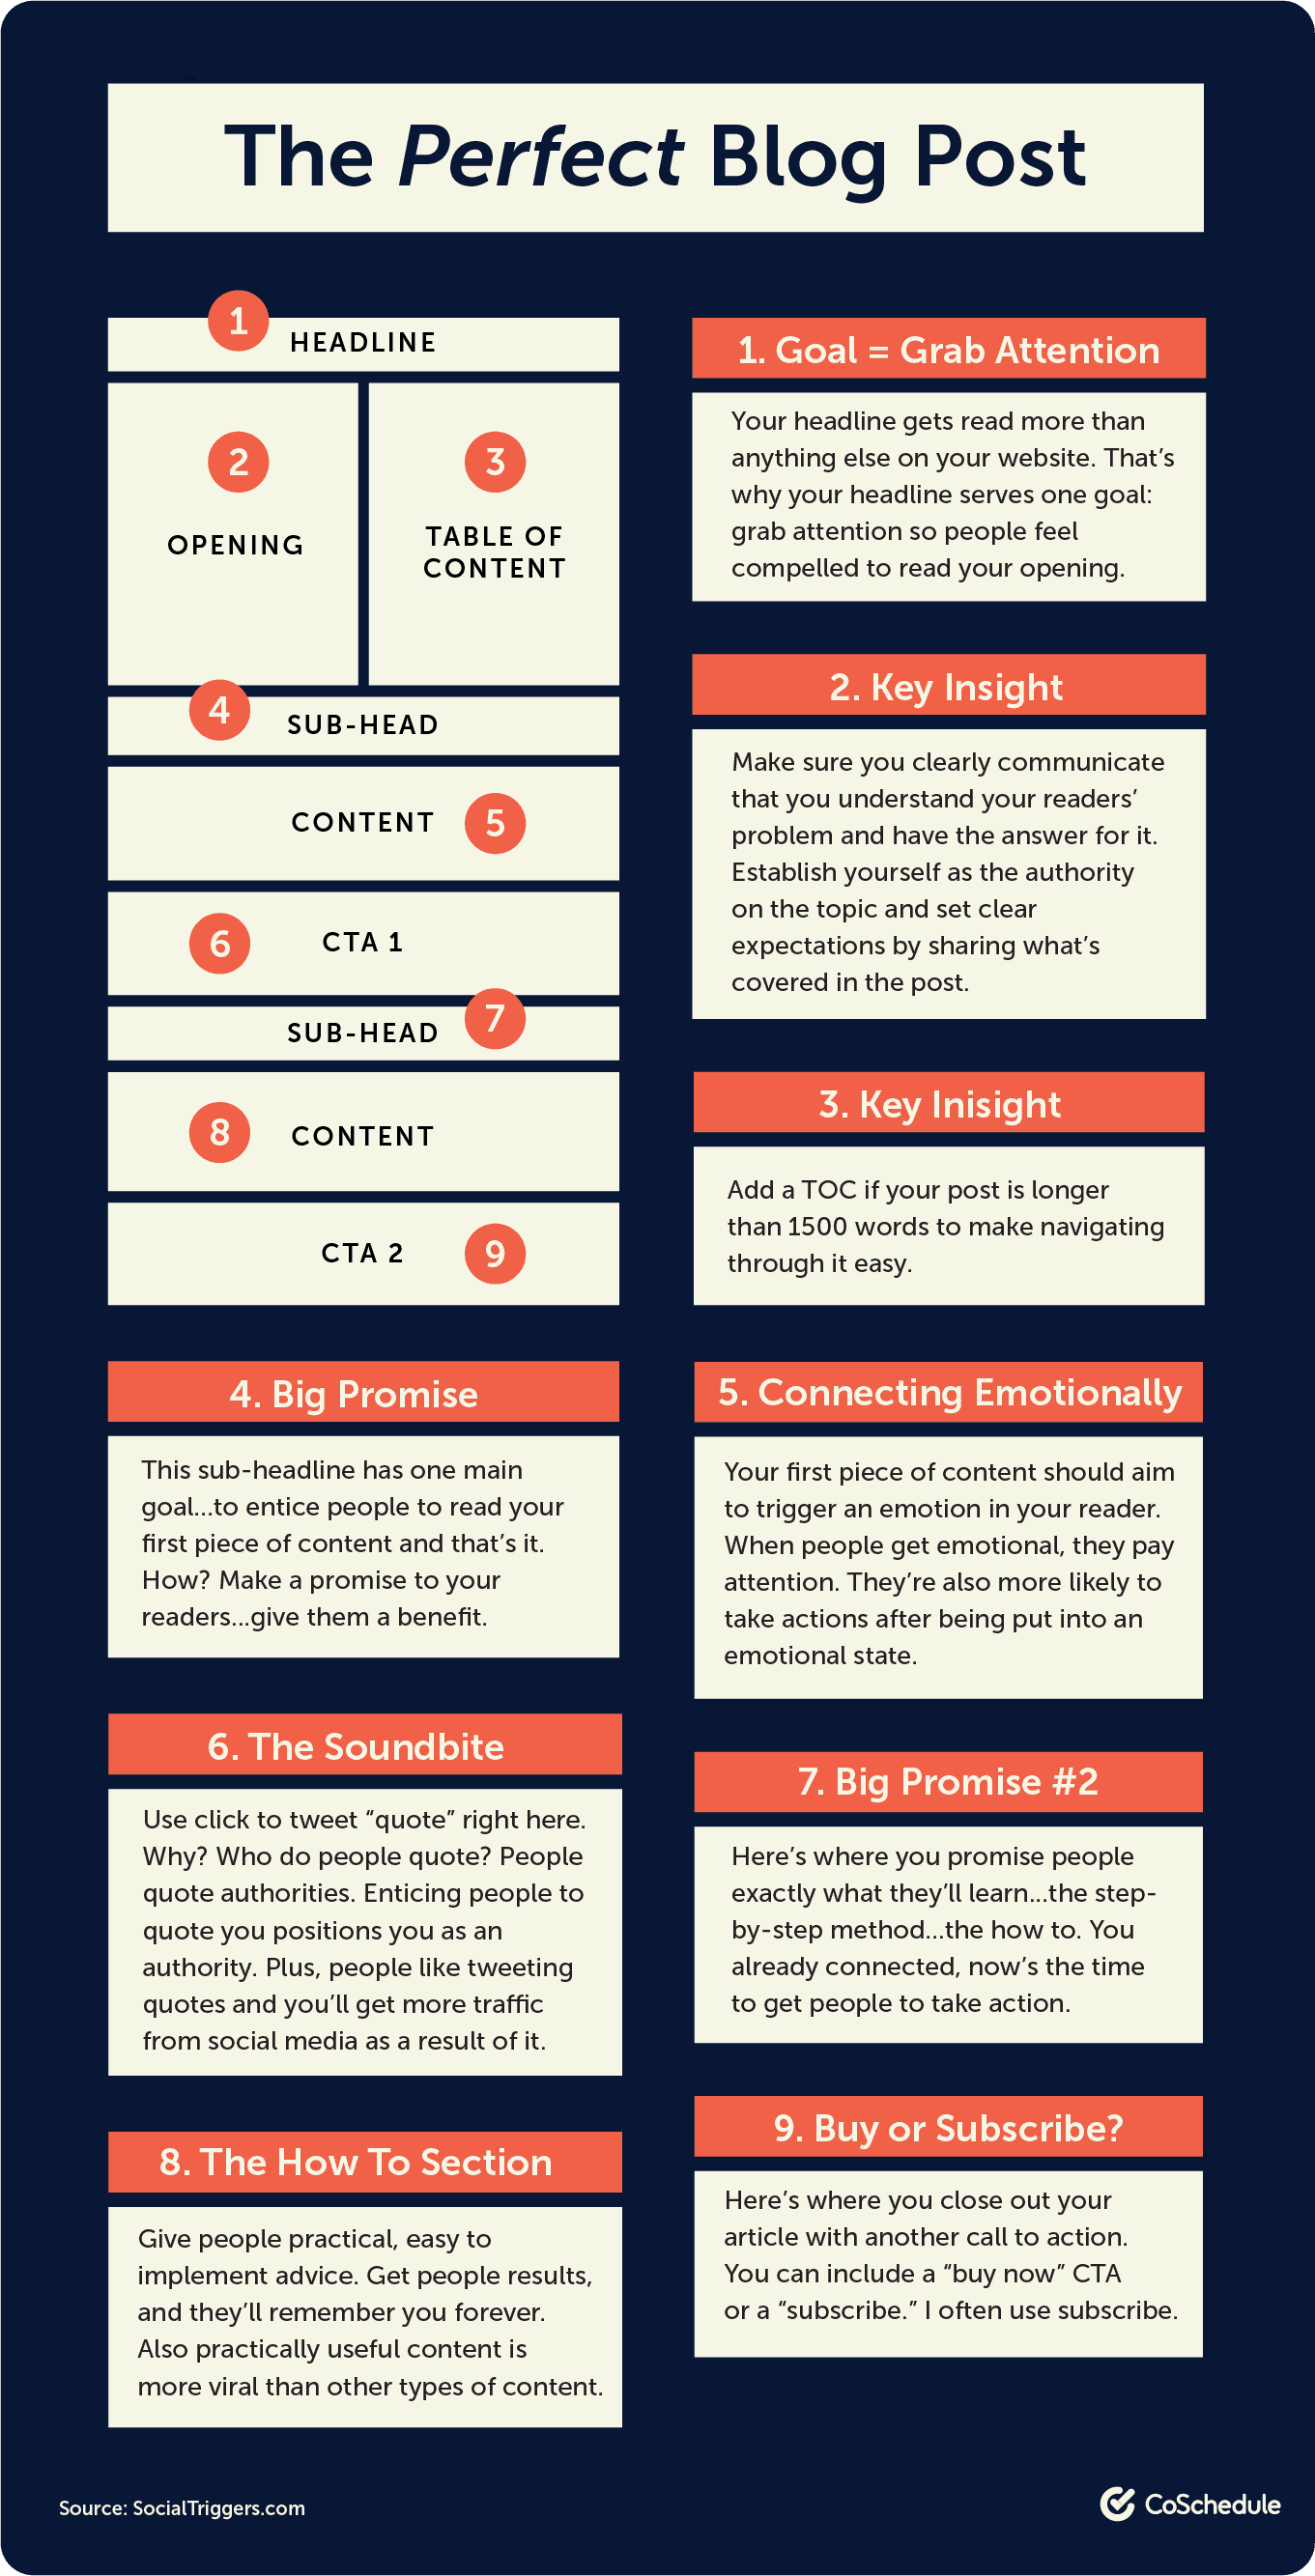
Ready to learn how to put these principles into practice? Keep reading.
Examples of Blogs That Nail Their Formatting
Here are blog format examples from sites that feature read-me-now formatting:
Not all of the posts on all of these sites follow each of the best practices we’ve outlined above. But they follow enough of these principles, which helps them consistently offer content that’s well-structured and easy to read.
The takeaway? The most readable blogs aim for clarity and usability – not perfection. And, that’s exactly what you should aim for as well.
Blog Formatting Best Practices to Follow
Want a shortcut to improving your blog posts’ usability and readability? Follow this checklist and it’ll get you over halfway to this finish line:
- Keep sentences under 25 words
Consecutive long sentences are repelling to look at. They’re also difficult to understand. Short sentences, on the other hand, are easy to consume and understand.
- Keep paragraphs to three sentences or less
This saves you from serving blocks of text to readers. Needless to say, what looks challenging to read is rarely ever consumed.
- Make sure the headline is clear and conveys an action, a benefit, or both
Recall that readers scan – not read. With clear headlines that outline a benefit or action, you’ll give away value to skim readers. In fact, they’d even stop by to read subheadings most relevant to them.
- Keep your introduction to three to five paragraphs
Aim to establish credibility, tell readers you understand their problem (therefore, have the answer to their question), and set expectations. And while you’re at it – write it all succinctly.
- Use one visual element per 300 words
Visuals such as custom graphics and screenshots will help you break the text and improve readers’ understanding of the topic at hand.
- Avoid creating bulleted lists with too much text between bullets
Again, bulleted lists promote readability. Too much text around them, however, beats that purpose.
- Place calls to action where they are easy to see
Whether in-line or as pop-ups, make sure your CTAs are clear and prominently positioned to promote action.
- Use H2 subheads for subsections, and H3 subheads for sub-points within subsections
Doing so helps with SEO. More importantly, structuring content with H2s and H3s makes navigation and reading easy. For this same reason, avoid H4 and under if possible as heavy structuring can jeopardize reading experience.
- Make sure links open in a new tab
This is a surefire way to retain engaged readers rather than losing them to a resource that opens where your page is.
- Write well-optimized title tags and meta descriptions
These tell searchers what’s included in your blog post, therefore, encouraging them to click and read.
How to Format Your Blog Content in 11 Simple Steps
Let’s now show you how you can organize your content into an effective blog post format from the get-go.
Keep in mind, following these 11 easy steps will save you time and your blog format will be mostly ready to go as the first draft comes alive.
Dig in:
Step 1: Start with a clear outline
An outline helps you figure out what to cover and how to answer your readers’ questions on the topic.
So a good way to go about
outlining a blog post is to:
- First, create a list of all the questions you’ll address
- Then, organize the questions in a logical sequence based on H2s and H3s
Doing so will give you the following format:
Introduction:
(H2) First section: Explanation of point 1
- (H3) Sub-point 1
- (H3) Sub-point 2
- (H3) Sub-point 3
(H2) Second section: Explanation of point 2…
Taking the time to outline in advance saves time you invest in writing and blog formatting later on.
It also gives your post a clear direction. This improves reading experience as each point builds upon another – making the content easy to understand.
Finally, mapping out a logical structure aids in keeping SEO best practices to the front since the start.
Step 2: Write your blog content according to the outline
Now make sure you follow the outline you’ve created. Of course, you can think on the page and change a couple of things as you draft.
But don’t backtrack and write new subsections altogether.
If you hit a snag and no longer find the outlined structure valuable or think that it can be made better, go back to the drawing board. Doing so preserves your draft’s direction and clarity.
Step 3: Write a clear headline
An
effective headline is specific about revealing the benefit a reader can drive by reading your post.
To this end, add the following to your headlines:
- Keywords to tell readers you’re covering the topic they’re searching for
- Power words or words that trigger people to take action. Example: ‘proven,’ ‘ridiculously simple,’ ‘easy,’ and ‘free’
- Benefit, for instance, they’ll leave with the steps to do a specific job.
 Source
One more thing: Always test how good your headline is. Try
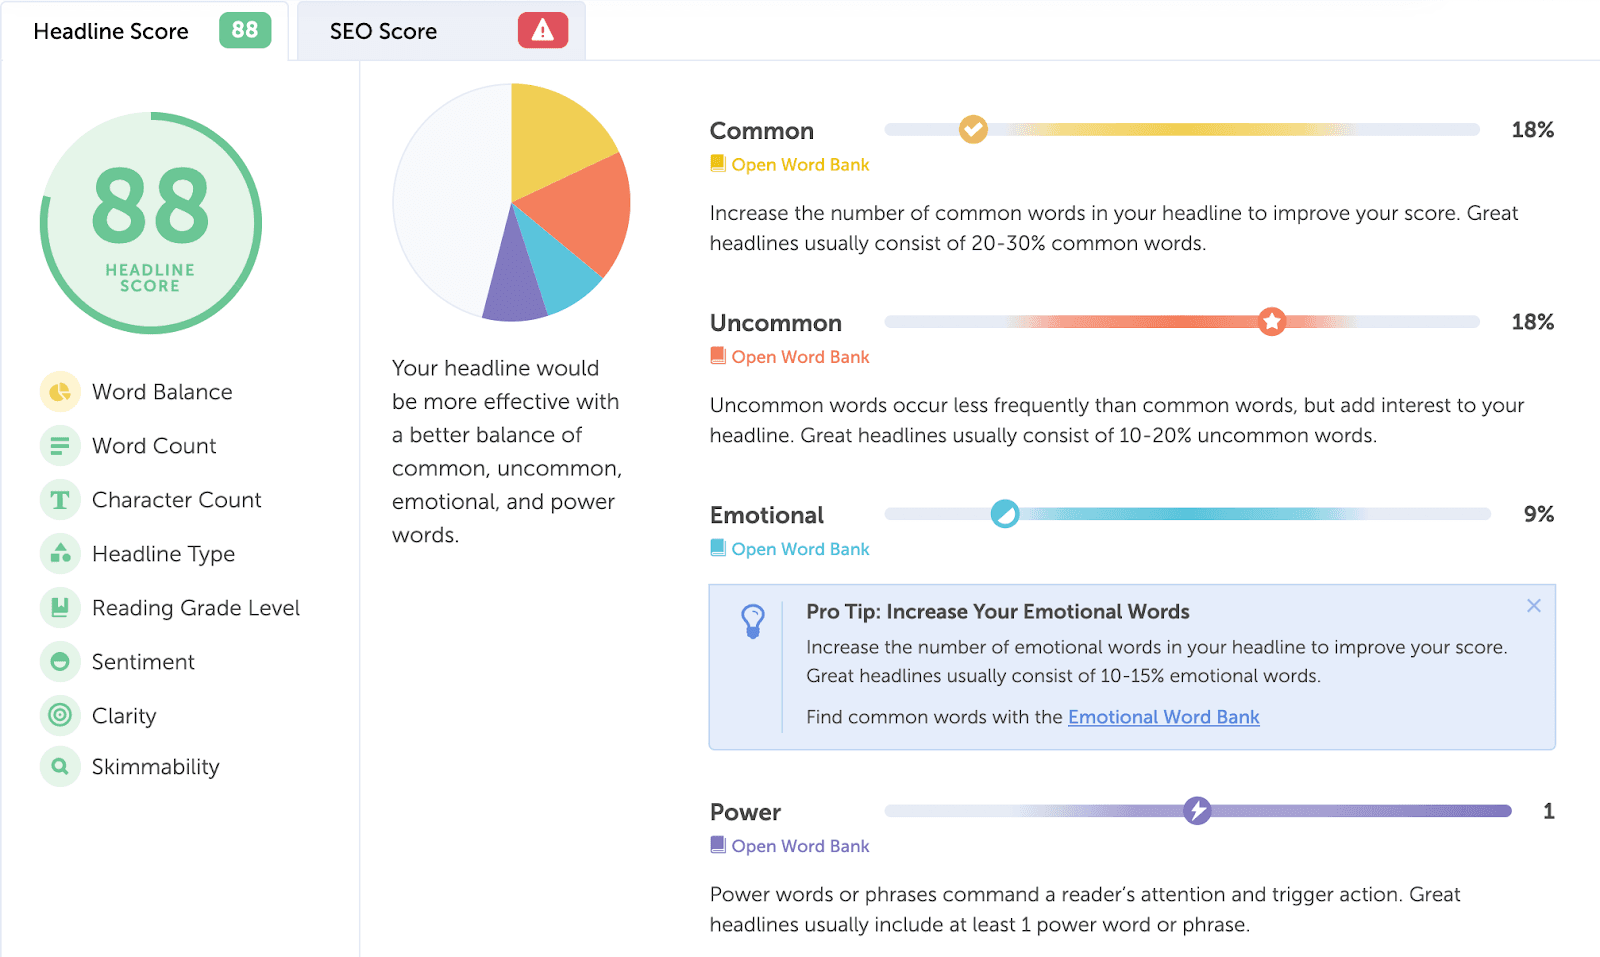
Headline Studio for this. It gives each headline a score based on how SEO- and reader-friendly it is.
Simply write your headline in the Studio and hit
Analyze.

This will give you a full breakdown of how effective your headline is:
Fancy a head start on writing read-me-now headlines? Try these
101 catchy blog title formulas.
Step 4: Perfect your blog post introduction
You’d probably have written your introduction with your draft.
In this step, review it – even rewrite it. The goal? To ensure it immediately captures readers’ attention. Fail here and your odds of losing readers grow.
So a good introduction that cheers folks to read should:
- Capture readers’ problem. Tell a story. Ask a rhetorical question or use a metaphor.
- Establish credibility. Tell what makes you an authority on the topic.
- Set expectations. Lay down exactly what you’ll cover to build anticipation.
 Source
Step 5: Read through content to ensure information flows well
Now, go back to your draft. Ideally, after you’ve left it overnight so you can look at it with a fresh perspective.
Read through it without stopping to edit or correct mistakes to test how well the narrative flows. Find yourself losing your focus as you read? Rephrase sentences and cut unnecessary words.
Step 6: Ensure all sentences and paragraphs are short
Not all your sentences need to be under 25 words. The majority, however, should be around that word count.
Besides encouraging readability, a mix of short to medium-length with an occasional long sentence (that’s written clearly) creates a smooth narrative.
Unsure if a sentence is way too long to read or hampers the flow? Read it aloud. If you find yourself running out of breath, rewrite it.
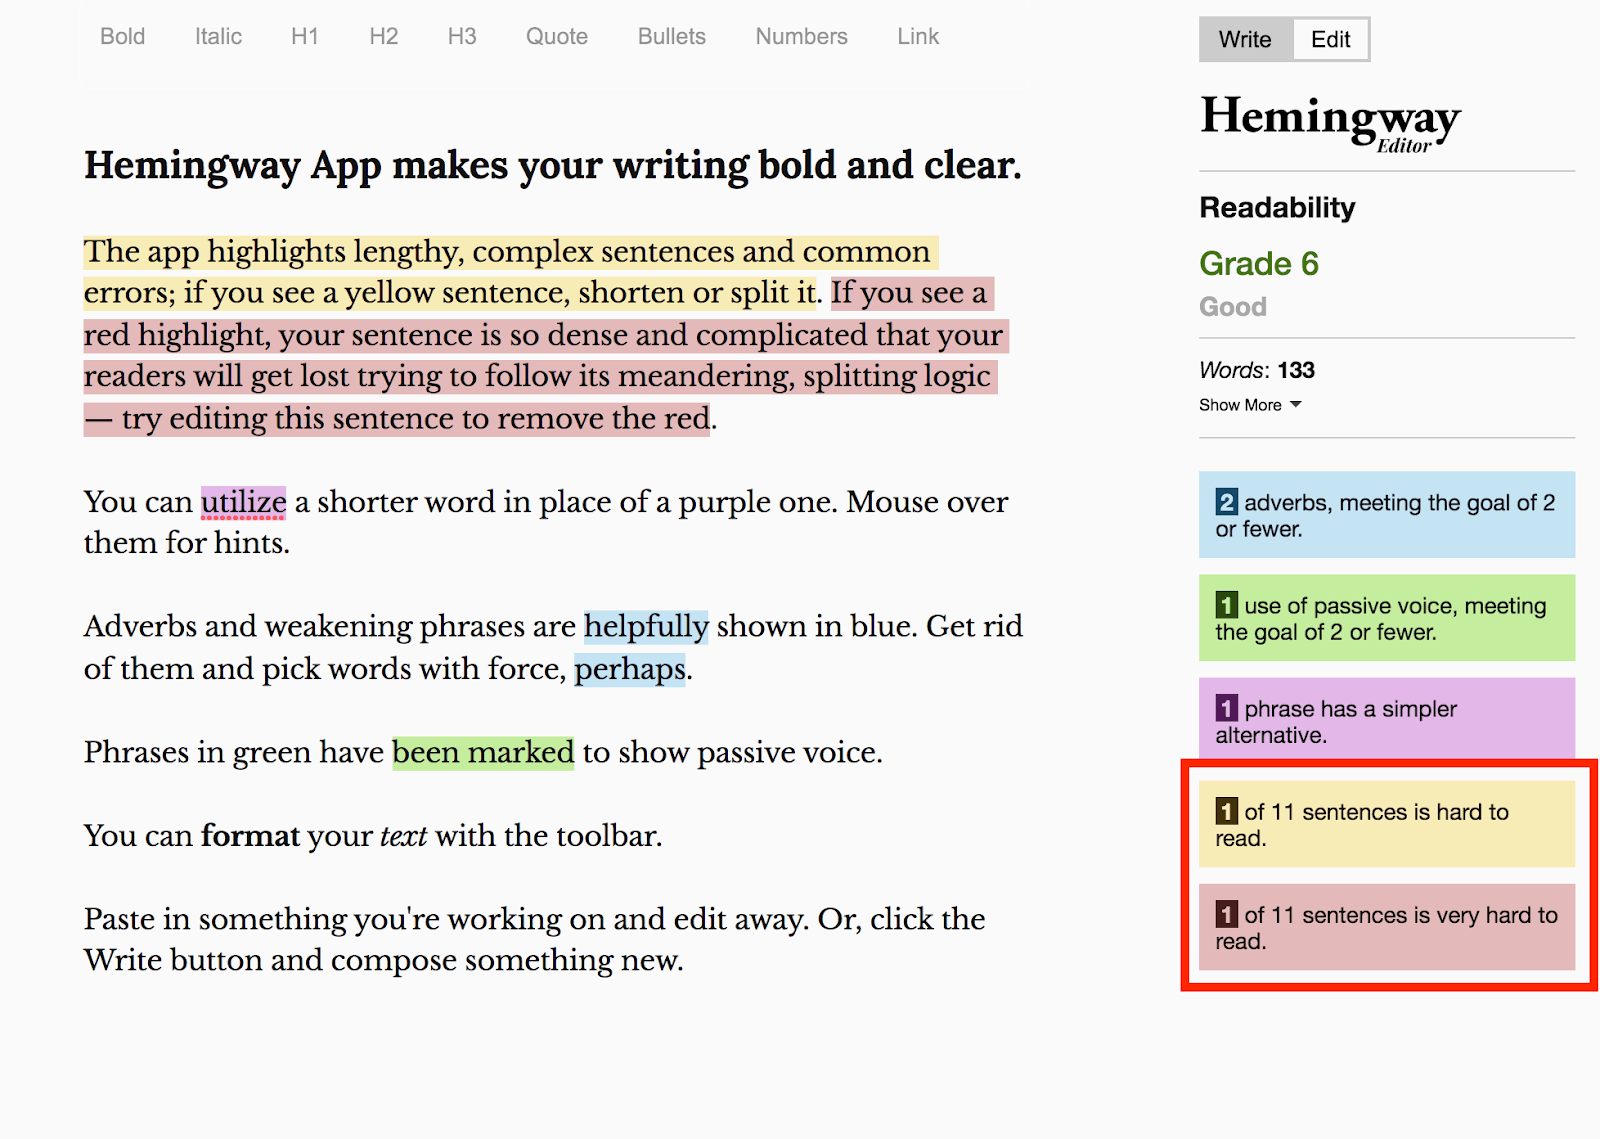
Alternatively, use tools like
Grammarly and
Hemingway Editor that help identify hard-to-read, long sentences in need of rephrasing and/or pruning.
Don’t forget, shortening paragraphs is equally important. So if you find one exceeding three lines, break it.
Plus, if you have a couple of takeaways or pointers to share, break them down into bullet points.
Step 7: Include a table of content (TOC) if over 1,500 words
Tables of content send SEO-friendly signals.
More importantly, they help keep readers on the page by making it uber-simple for them to navigate the blog post.
For those readers scanning the content, a TOC also makes it easy to jump to sections most relevant to them. Therefore, helping you provide a value-first blog format.
Pro tip: Keep your table of content above the fold so visitors can see it without having to scroll. This way, you can reinforce their interest by showing a glimpse of the gold you’ve covered without revealing much.
Step 8: Add all the visual content
When it comes to screenshots, you can always add them as you draft your blog post.
If you’re designing custom images and videos, add a placeholder text in the draft to preserve your writing flow. Take the time to design and add these visuals now.
Ideally, it helps to plan your ideas for where to add visuals such as infographics, graphics, and videos in the outline. But there’s no hard and fast rule.
All you have to remember is to add a visual element at least once every 300 words.
Step 9: Ensure all subheads are formatted correctly using H2 and H3 subheads
Next, scrutinize your draft for its structure. Check for the following:
- Subheadings are following a well-organized structure
- All H2s and H3s are clearly written – giving actionable insights without revealing too much
Step 10: Make sure internal and external links are properly placed
Links (both external and internal) are
essential for SEO. However, aim for
optimizing readers’ experience first. This will automatically help SEO as it lifts visitors’ time on your page (dwell time).
Here’s what will help:
- Ensure you don’t go overboard with links. Only add links that are helpful and relevant to the post.
- Add links to offer value to readers – providing them as resources to read more related to the topic.
- Write a conversational anchor text. Bonus points if you can add the target page’s keyword subtly to the text.
Also, include both external and internal links. The former shows you’ve done your research. The latter helps keep readers on your site by showing you have content on related topics. This positions you as the authority on the parent topic too.
Step 11. Ensure title tags and meta descriptions are properly written
While not directly linked to sending positive SEO signals, meta descriptions help increase click-through rates. This, in turn, improves your SEO.
On the other hand, title tags help both readers and the search engine understand your web page’s relevancy to the topic. This aids your content in ranking better.
With both meta descriptions and title tags though, the idea is to entice the reader to click to read. Hence, every blog post’s title tag and meta description should basically:
- Tell readers you have the answer to their problem
- Incite curiosity to cheer them to take action (and click)
Go Ahead And Create A Winning Blog Format Today
And that’s a wrap. The idea in a nutshell is to format your writing in a way that it encourages visitors to read and keep reading.
So what are you waiting for? Give your post a breathable structure. Break down paragraphs, prune sentences, and write more clearly, succinctly, and to the point. No matter how good your content is, not all your readers will read it word for word.
In fact, the majority of them will skim read it. So if you’ve been wondering how to format a blog post, you’re on the road to success.
The reason? A reader-friendly blog format keeps folks on your page – better engaging them and encouraging them to read. It also optimizes blog posts for SEO and improves opportunities for conversion.
Ready to drive all these benefits from good blog post formatting? Follow this actionable guide to learn everything about blog formatting.
We’ve got an 11-step proven blueprint to blog post formatting together with blog format examples. We’ll also share blog post templates to help you start today.
 Now, look at this:
 Which post would you read? I bet the second one, isn’t it? The reason: the blog format is egging you on to read.
Put simply, you need an effective blog writing format to:
 Ready to learn how to put these principles into practice? Keep reading.
 Source
One more thing: Always test how good your headline is. Try Headline Studio for this. It gives each headline a score based on how SEO- and reader-friendly it is.
Simply write your headline in the Studio and hit Analyze.
 This will give you a full breakdown of how effective your headline is:
 Fancy a head start on writing read-me-now headlines? Try these 101 catchy blog title formulas.
 Source
 Don’t forget, shortening paragraphs is equally important. So if you find one exceeding three lines, break it.
Plus, if you have a couple of takeaways or pointers to share, break them down into bullet points.


