Content Outline: Write Better & Faster Than You Ever Thought Possible With a Template

 Quick question: what (if done right) isn’t supposed to catch someone’s attention in a piece of content?
A great flow.
If your article jumps from one idea to the next in a proper sequence, your readers won’t even notice that there is a structure to all of it — a structure that isn’t random, but something you carefully planned.
This is because the readers are having a great, easy-to-follow reading experience.
On the other hand, a piece of content with poor flow will stick out like a sore thumb. Your readers will instantly know that something is wrong. They’ll struggle to connect the dots, and they aren’t likely to continue reading this concoction of jumbled ideas.
How do you make sure that your content has a great flow, each and every time?
The answer is simple: a great flow is the result of a great content outline.
In this step-by-step guide, I’ll go over all the benefits of a content outline and show you the exact method I follow to organize my thoughts and produce a piece of content, which reads like a charm.
Quick question: what (if done right) isn’t supposed to catch someone’s attention in a piece of content?
A great flow.
If your article jumps from one idea to the next in a proper sequence, your readers won’t even notice that there is a structure to all of it — a structure that isn’t random, but something you carefully planned.
This is because the readers are having a great, easy-to-follow reading experience.
On the other hand, a piece of content with poor flow will stick out like a sore thumb. Your readers will instantly know that something is wrong. They’ll struggle to connect the dots, and they aren’t likely to continue reading this concoction of jumbled ideas.
How do you make sure that your content has a great flow, each and every time?
The answer is simple: a great flow is the result of a great content outline.
In this step-by-step guide, I’ll go over all the benefits of a content outline and show you the exact method I follow to organize my thoughts and produce a piece of content, which reads like a charm.
Content outline: write better and faster than you ever thought possible with a template.
Click To TweetDownload Your Own Content Outline Templates
Before you read on, make sure you download these amazing templates for your future content outlines. They'll get you started on the right foot, so you don't have to worry about the content process becoming a hassle. This bundle includes a:- 2021 Annual Content Calendar Template
- Blog Post Outline Template
- Content Outline Template
Why Use a Content Outline?
Guess what? A great flow is not the only benefit you get from creating a content outline before writing. In fact, content outlines improve your entire writing process, from idea to publication. That’s why professional writers don’t start typing their draft without a content outline. Here’s why content outlines are essential:
Make Your Content Comprehensive
Comprehensiveness adds a lot of value to your piece. A comprehensive piece of content will always win in the battle with short, quick-snack type of content. In fact, take a look at this graph — which depicts average content length for top 10 Google search results.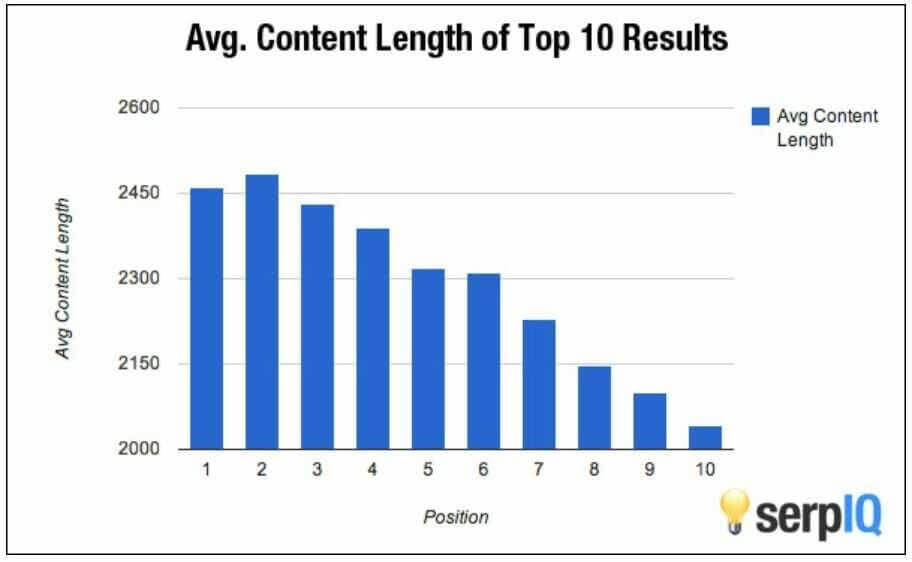 Swear
As you can see, there is a strong correlation between depth of content and high search engine rankings. Needless to say, a great piece of content is thorough and holistic.
When you write a piece of content without preparing a content outline, there’s a high chance that you may forget some essential subtopics.
On the other hand, working on a content outline helps you identify knowledge gaps, so you can make sure your article covers all the aspects associated with your topic.
Swear
As you can see, there is a strong correlation between depth of content and high search engine rankings. Needless to say, a great piece of content is thorough and holistic.
When you write a piece of content without preparing a content outline, there’s a high chance that you may forget some essential subtopics.
On the other hand, working on a content outline helps you identify knowledge gaps, so you can make sure your article covers all the aspects associated with your topic.
Working on a content outline helps you identify knowledge gaps.
Click To TweetRamp Up Content Creation
If you really want to move the needle with your content creation efforts, data from Hubspot suggests that you must publish at least one to two high quality articles every week. The best case scenario is 4–5 blog posts per week.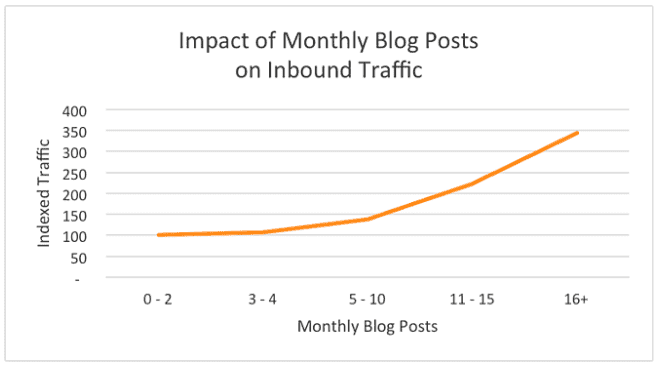 Marketing Insider Group
In most cases, you’re not just a writer; you’re also a marketer, manager, or business owner, so it’s almost impossible to create so much content on your own.
At some point, you will have to delegate the job to other writers with a document, which covers detailed specifications on how the content is to be written (i.e. a content brief).
What’s the most important part of a content brief?
You guessed it: the content outline. It helps you convey the exact information you want to be covered in a piece.
Writing is a subjective endeavor, and without a content outline, a writer can go in a totally different direction than what you had in mind. Having a content outline helps you prevent such a mishap.
Marketing Insider Group
In most cases, you’re not just a writer; you’re also a marketer, manager, or business owner, so it’s almost impossible to create so much content on your own.
At some point, you will have to delegate the job to other writers with a document, which covers detailed specifications on how the content is to be written (i.e. a content brief).
What’s the most important part of a content brief?
You guessed it: the content outline. It helps you convey the exact information you want to be covered in a piece.
Writing is a subjective endeavor, and without a content outline, a writer can go in a totally different direction than what you had in mind. Having a content outline helps you prevent such a mishap.
Crush Writer’s Block
A content outline is a great remedy for writer’s block. It allows you to have something fleshed out as quickly as possible — instead of staring at a blank page. Moreover, once you have a content outline, you don’t have to think too much when writing your draft. Since the basic plan is already laid out, you’re free from the macro-level thinking to focus more on the subtopic you’re expanding on. In other words, you’ll be able to write faster without frequently stopping to assess the arrangement or overall logic. Whether you’re working on a blog post, video script, or infographic, preparing a content outline first is a relieving move that sets you free to create the best content you can on a given topic.Create a Content Outline in 5 Easy Steps
Now that you know why outlining your content is a must, I am sure you’re pumped up to see how it’s all done. Let’s take a look at my exact process, step by step.
Determine Your Working Title
Before you begin with a content outline, you need a clear understanding of what you’re going to write about. Without a concrete scope, your article can go in a hundred different directions. That’s why you need a working title that can keep you focused. A great working title is specific. For example, “How To Generate Leads From Facebook Ads,” is a better working title than “Guide To Facebook Marketing". Unless, of course, you are actually writing a guide which covers all aspects of Facebook marketing — leading to a really, really long blog post. Having a working title with a narrow scope makes it really easy to draft and organize your content later. Don’t worry if your working title isn’t too catchy. This is probably not the final title that you are going to publish. Our goal here is to have something that prevents you from going astray. You can make the title more engaging later when you’re about to finalize your content.A great working title is specific and keeps you focused.
Click To TweetBrainstorm the Main Takeaways
Now, it’s time for the brain dump. List all the key takeaways you want your audience to get out of your content. What do you want your readers to know and remember by the time they finish your article? These don't have to be sections or subtopics. In fact, don’t even think about how the information will be organized for now. For example, let’s say I were writing a piece about adding graphics to your content. I would probably want the readers to know the following takeaways:- Why add visuals to a piece of writing?
- How many images are appropriate for a piece of content?
- What type of images can they add?
- How should they align the images with their brand identity?
- Where can they find relevant images to use?
- What legal issues should they be aware of?
- How can they customize pictures
- How can they optimize the photos they use for SEO?
- What if they’re not professional graphic designers?
Recommended Reading: How to Design an Editorial Process That Fits Your Needs
Organize Takeaways Into Broader Categories
Next, consider each takeaway and think about what other takeaways might be related to this one. The idea is to form groups or themes of related takeaways. These groups will then become the different sections or subtopics in your content, with their own headings. This is kind of like how you arrange different different utensils and edibles in a kitchen. You have a single, separate space for salt, pepper, and other spices. Another for spoons, spatulas, forks, and similar items. Another for plates and bowls. The list goes on. The point is, there is a separate pile for each set of related objects; the same goes for your takeaways. Continuing the same example from the previous section, let’s see how we can fit the takeaways I wrote into subheadings:- Introduction
- Benefits Of Visual Content
- Why add visuals to a piece of writing?
- Types Of Visual Content
- What type of images can they add?
- Sourcing Photos To Use In Content
- Where can they find relevant images to use?
- What legal issues should they be aware of?
- Graphic Design & Customization
- How can they customize pictures?
- What if they’re not professional designers?
- How should they align the images with their brand identity?
- Embedding Images In Content
- How many images are appropriate for a piece of content?
- How can they optimize the photos they use for SEO?
Add Missing Takeaways
When organizing takeaways into larger themes, you don’t have to be too rigid about the process. In fact, you can make or break rules as you see fit for your content. For example, if you feel like there is a takeaway that doesn’t belong together with any of the other takeaways, then it could be a section or theme on its own. You may get ideas for a totally new section or subtopic, which you didn’t consider before. There are really no benchmarks, and you can let your knowledge on the topic be your guide. If you feel like there are sections which are missing some points, now is the time to fill the gaps. Consider the points you might have overlooked in your first brainstorm. In the previous outline, for instance, you can see that I don’t have points in the introduction or the benefits or types of visual content I am going to cover in my piece. Let’s take a look at what my outline looks like, once I add those details. I have bolded the new items, so you could easily distinguish between the previous and new content outline.- Introduction
- Text alone isn’t enough
- Images are treated as after-thought
- Benefits Of Visual Content
- Why add visuals to a piece of writing?
- Increases Sharability
- Make the content more memorable
- Makes the content more readable
- Types Of Visual Content
- What type of images can they add?
- Images with text/quotes
- Process diagrams/flowcharts
- Screenshots
- Sourcing Photos To Use In Content
- Where can they find relevant images to use?
- Google image search
- Free stock photo sites
- Take original photos
- What legal issues should they be aware of?
- Graphic Design & Customization
- How can they customize pictures?
- Tools - Canva, Crello, DesignBold
- What if they’re not professional designers?
- How should they align the images with their brand identity?
- Standard image dimensions
- Embedding Images In Content
- How many images are appropriate for a piece of content?
- What does research say about the number of images?
- Which is better: JPEG or PNG?
- How can they optimize the photos they use for SEO?
- Image naming, alt text and file compression
Polish Your Content Outline
By now, you’ve already done much of the hard work: the thinking and the organizing. Now, you can take a final look and tighten up your outline. Make sure it includes only the most relevant points. In addition, see if you’d like to revise any of the bullets to have them make more sense, or if you’d like to reorganize something to convey the most logical story. You can also trim things that don’t seem to add value or may be so obvious that you don’t need to mention them explicitly. For example, I may remove the takeaway in our example content outline about what if the readers are not professional designers, since I already covered that part when mentioning easy to use design tools, like Canva.Make sure your content outline includes only the most relevant points.
Click To TweetBonus Step: Add Examples and Data
 This is an optional but a highly recommended step that makes it really easy to get to a great first draft.
For all the points in your outline, see if you can think of any examples, research industry statistics, or use other ways to back up your claims.
When you find something you can add or cite, just add it under the section in which it relates, so when you sit down to write, it’s all neatly accessible and organized in front of you.
Taking the research and examples into account, here’s my final outline:
This is an optional but a highly recommended step that makes it really easy to get to a great first draft.
For all the points in your outline, see if you can think of any examples, research industry statistics, or use other ways to back up your claims.
When you find something you can add or cite, just add it under the section in which it relates, so when you sit down to write, it’s all neatly accessible and organized in front of you.
Taking the research and examples into account, here’s my final outline:
- Introduction
- Text alone isn’t enough
- Images are treated as after-thought
- Benefits Of Visual Content
- Why add visuals to a piece of writing?
- Increases sharability
- Photo tweets get 150% more engagement - BuzzSumo study
- Make the content more memorable
- Pictures increase memory retention - BrainRules research
- Makes the content more readable
- Types Of Visual Content
- What type of images can they add?
- Images with text/quotes
- Process diagrams/flowcharts
- Example: customer acquisition process
- Screenshots
- Sourcing Photos To Use In Content
- Where can they find relevant images to use?
- Google image search
- Free stock photo sites
- Take original photos
- What legal issues should they be aware of?
- Examples of photo licensing
- Graphic Design & Customization
- How can they customize pictures?
- Tools - Canva, Crello, DesignBold
- How should they align the images with their brand identity?
- Standard image dimensions
- Embedding Images In Content
- How many images are appropriate for a piece of content?
- BuzzSumo’s analysis of 1 million images
- Which is better: JPEG or PNG?
- How can they optimize the photos they use for SEO?
- Image naming, alt text and file compression
Recommended Reading: How to Emotionally Support Your Customers Through Content


