Getting Started With CoSchedule for Bloggers and Individuals
Drive Traffic To Your Blog & Save Time With Social Templates
Introduction to CoSchedule Social Templates
Writing social messages is annoying and time-consuming. Until social templates, that is. social templates put an end to all that time you waste scheduling social messages… all while driving even more traffic to your blog.
Social Template Benefits:
What is This Guide?
This guide offers an in-depth look at how social templates in CoSchedule can save you time and drive more traffic to your blog with less effort.
Who’s This Guide For?
This guide is specifically designed to help bloggers, solopreneurs and small businesses.
- Save time. Simply apply the social template and your social messages essentially write themselves.
- Drive more traffic. Social templates make it easy to promote your blogs on social media multiple times – which means more traffic to all those articles you’ve spent so much time writing.
Create Your Perfect Social Sharing Strategy
Let’s create your first social template in CoSchedule. One of the keys to getting more traffic is to share your blog post multiple times on social media. This is the job of your social campaign in CoSchedule. We’ll walk you through how to create one that consistently promotes your blog post over an entire month. Open up a blog post on your CoSchedule calendar and attach a social campaign. Start by adding a Twitter social message for the same day your blog post publishes. Start by typing a curly bracket { in the text field. The {title} and {permalink} default social helpers will appear automatically in a drop-down box. Click the social helper from the drop-down menu to add it to your social message.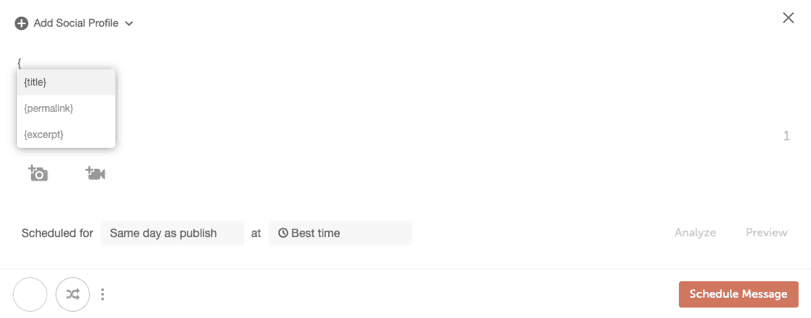
TIP: Default social helpers scrape your URL and help you quickly apply text and links across multiple messages in your social campaign.
You’ll see the title of your post, post image and link magically populate into your social message. (Note: This will only happen if you have the link field populated)
Keep adding additional social messages to your campaign following this social sharing strategy.
TIP: Instagram won’t allow you to add clickable links in your post text. Delete the {permalink} text on your Instagram post and add the text “Link in bio” in front of your {title} tag.
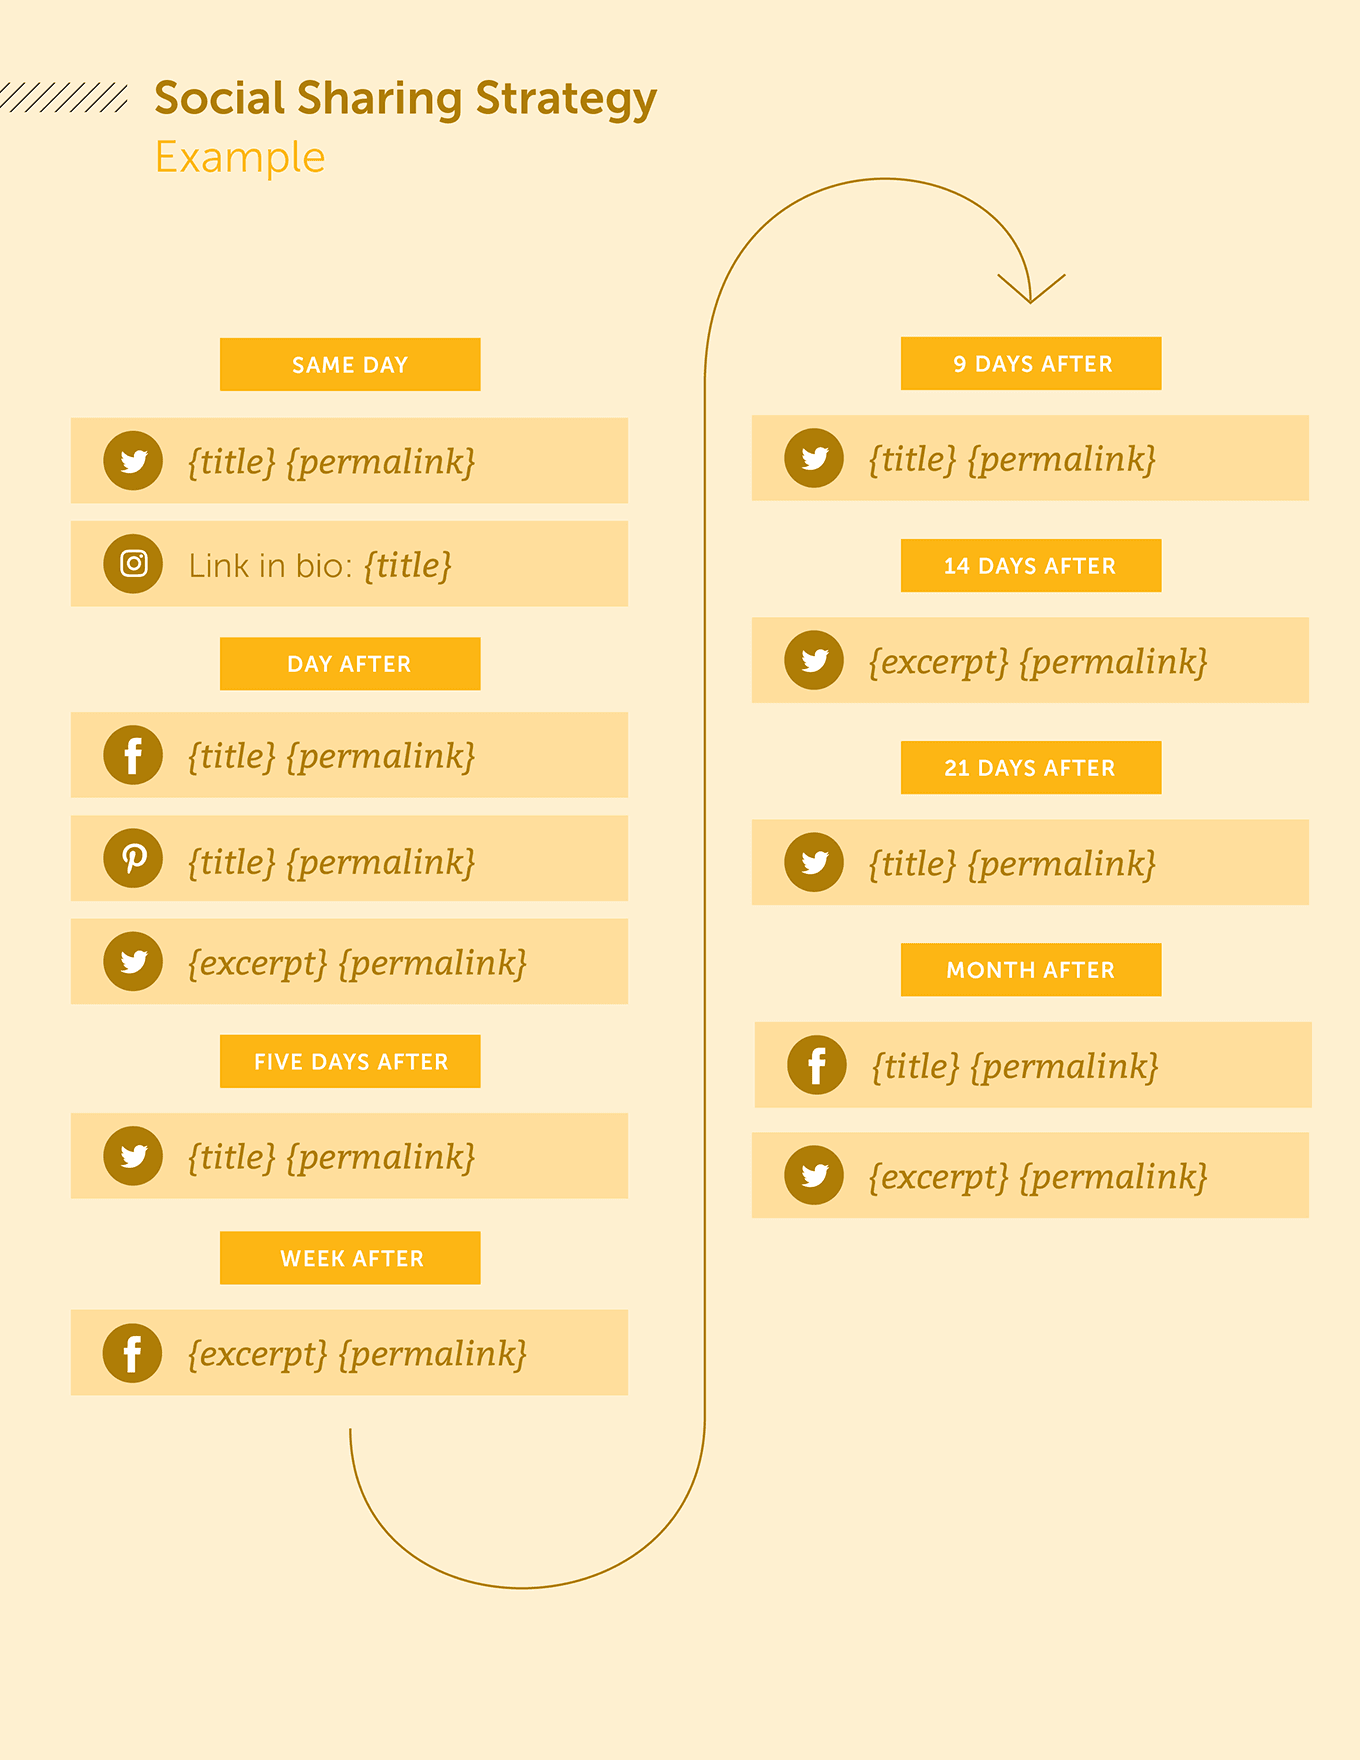
TIP: Toggle ReQueue on for the last Facebook and Twitter message in your social campaign. This automatically adds the social message to your ReQueue folder to get even more traffic to your blog post.
Save Your Campaign of Social Messages as a Template
Now that you’ve created your perfect social sharing strategy, save it as a template to use every time you write a blog post. Click the “Templates” icon in the top left and area. Choose the option that says “Save Existing”. Change the name to “Blog Post Promo - Default”.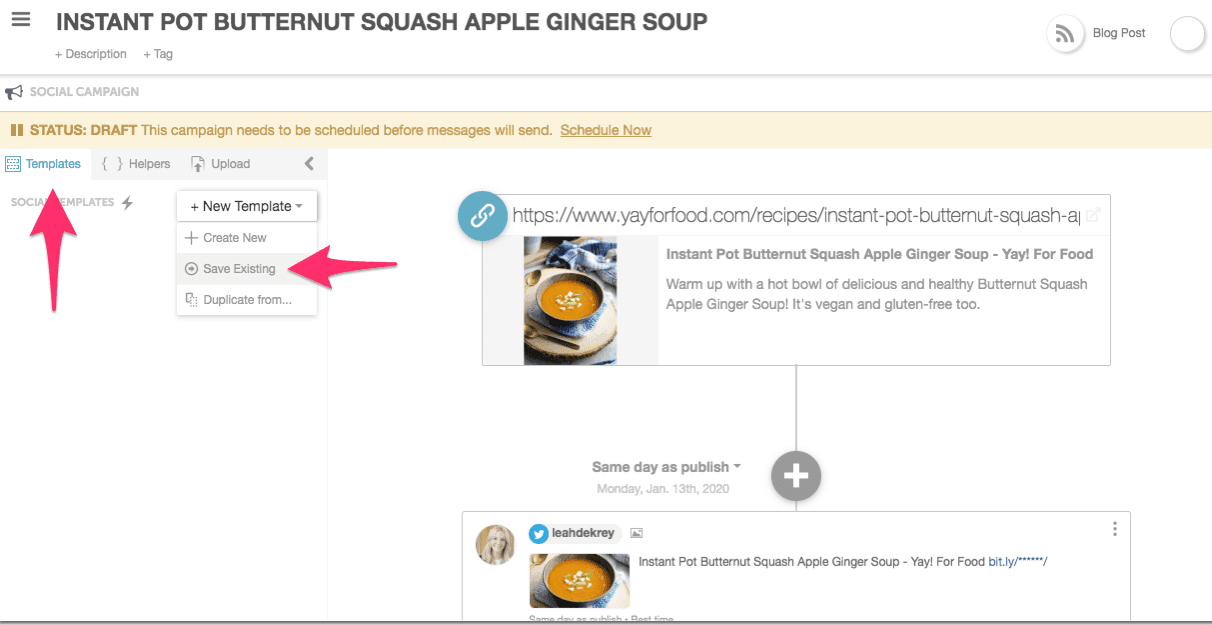
Apply Your Template of Social Messages to A Blog Post
Are you ready to see some real time saving magic? Open a different blog post on your calendar, click the social templates icon and apply the template you just created. All of your images, text, links, and social messages will automatically schedule with the click of a button. ?✨ This puts a permanent end to the tiresome manual work of scheduling your social messages… all while driving more traffic to your site.Create a Social Template Using Custom Social Helpers
The social template you just created using default social helpers is one of the best time saving features of CoSchedule, since it basically writes all your social messages for you. But... sometimes you want to use custom text in your social messages for additional flexibility. CoSchedule lets you create your own custom social helpers that function similar to the default ones we used in the previous example.TIP: The custom helpers give you ideas for drafting new social posts. They also help you quickly apply copy across multiple messages in a social campaign.
To start, open a blog post on your calendar, add a social campaign, and click on the template icon in the top left-hand corner.
Choose the option “Create New” and name your new social template “Blog Post - Custom”. Add the following social messages and helpers to your template:
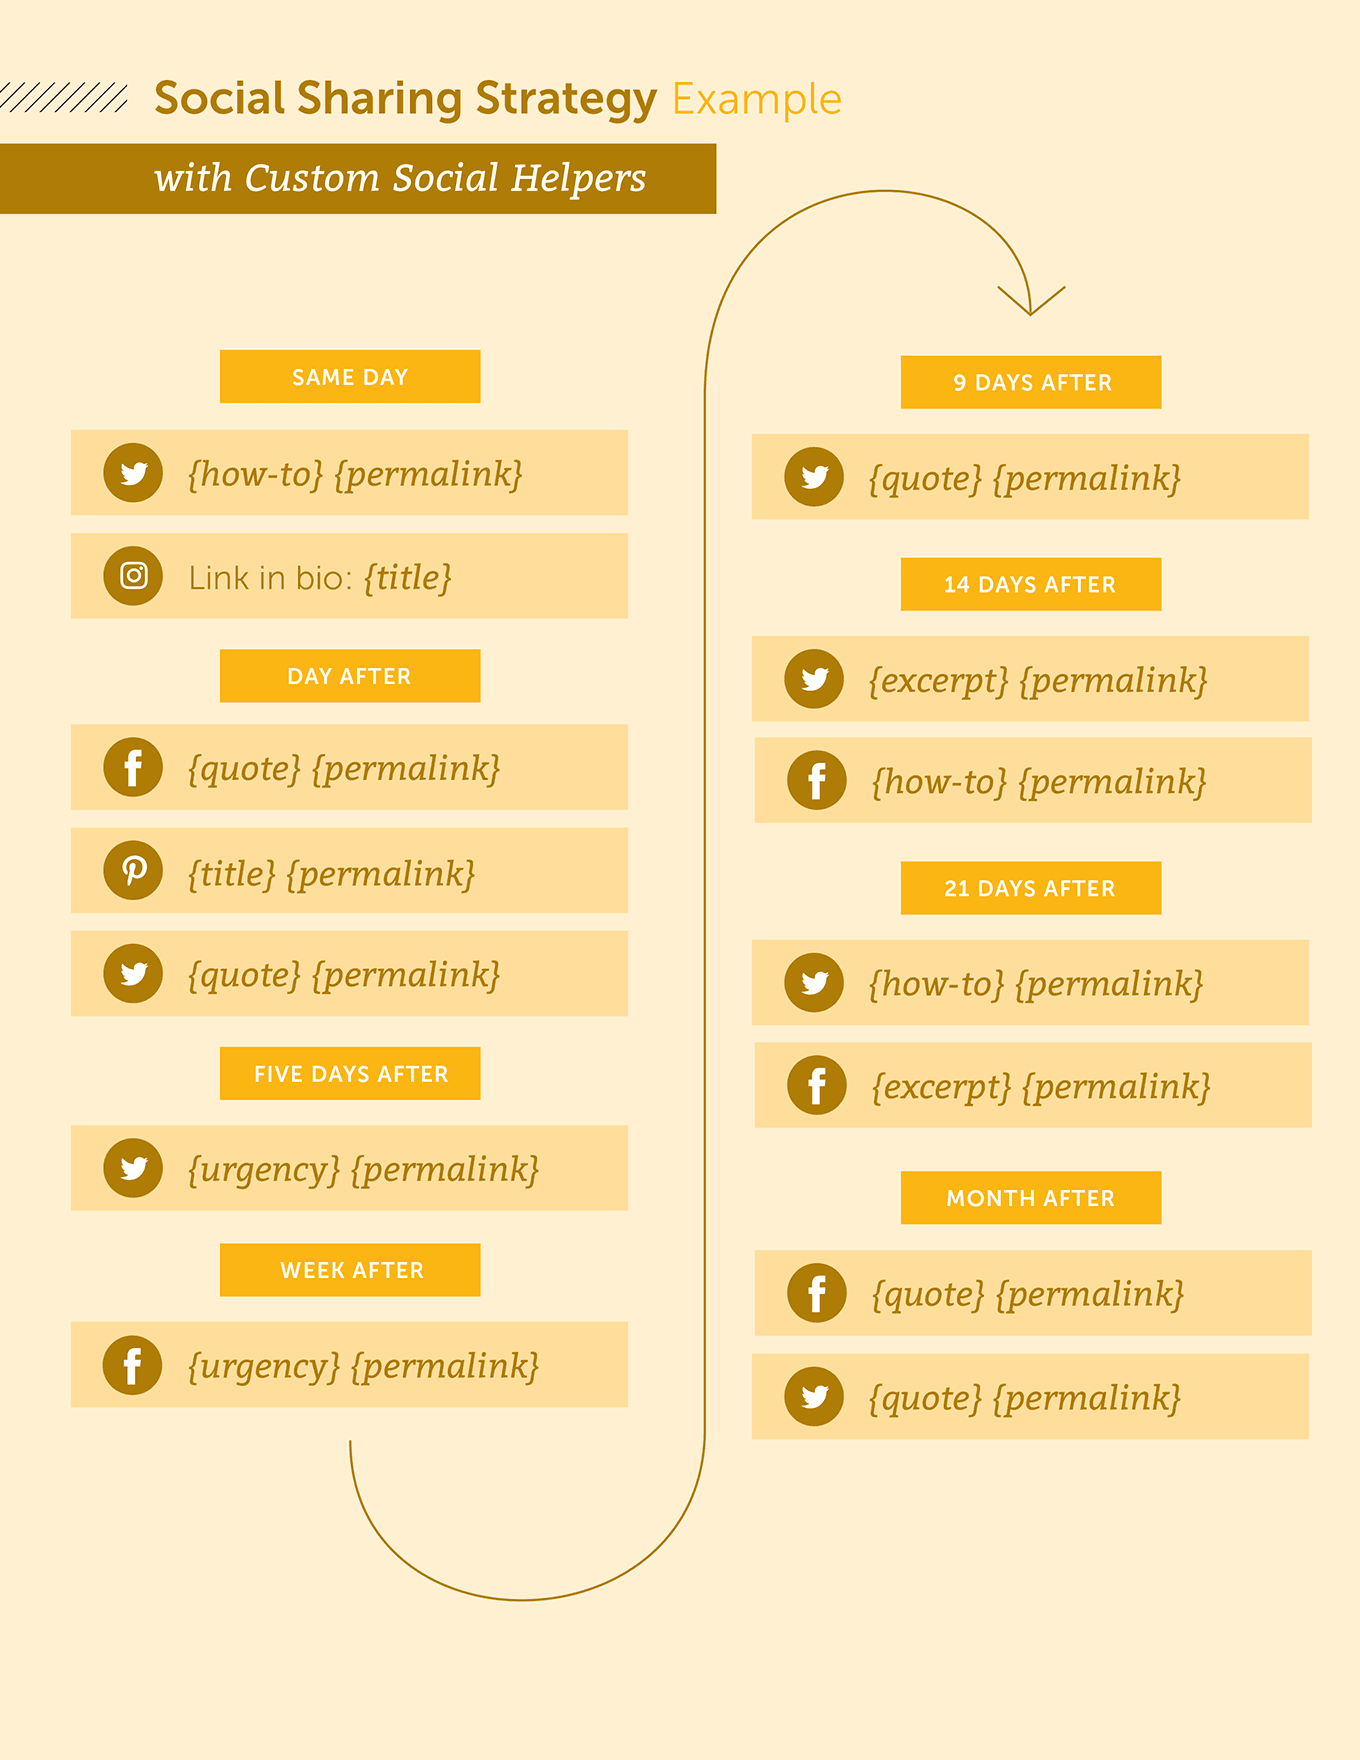 Save your template and apply it to your blog post.
Add Text to your Custom Social Helpers
Click on the “{ } Helpers” icon located next to Templates icon in the top left-hand corner. This is where you can add custom text that will be applied to your social messages. Add a quote from your blog post under the {quote} social helper. You’ll see the text automatically apply to all the social messages in the template that used the {quote} social helper. Similarly, add some text under the {urgency} social helper. Here’s an example: “You won’t want to miss out on these 21 fall trends that are fresh off the runway.”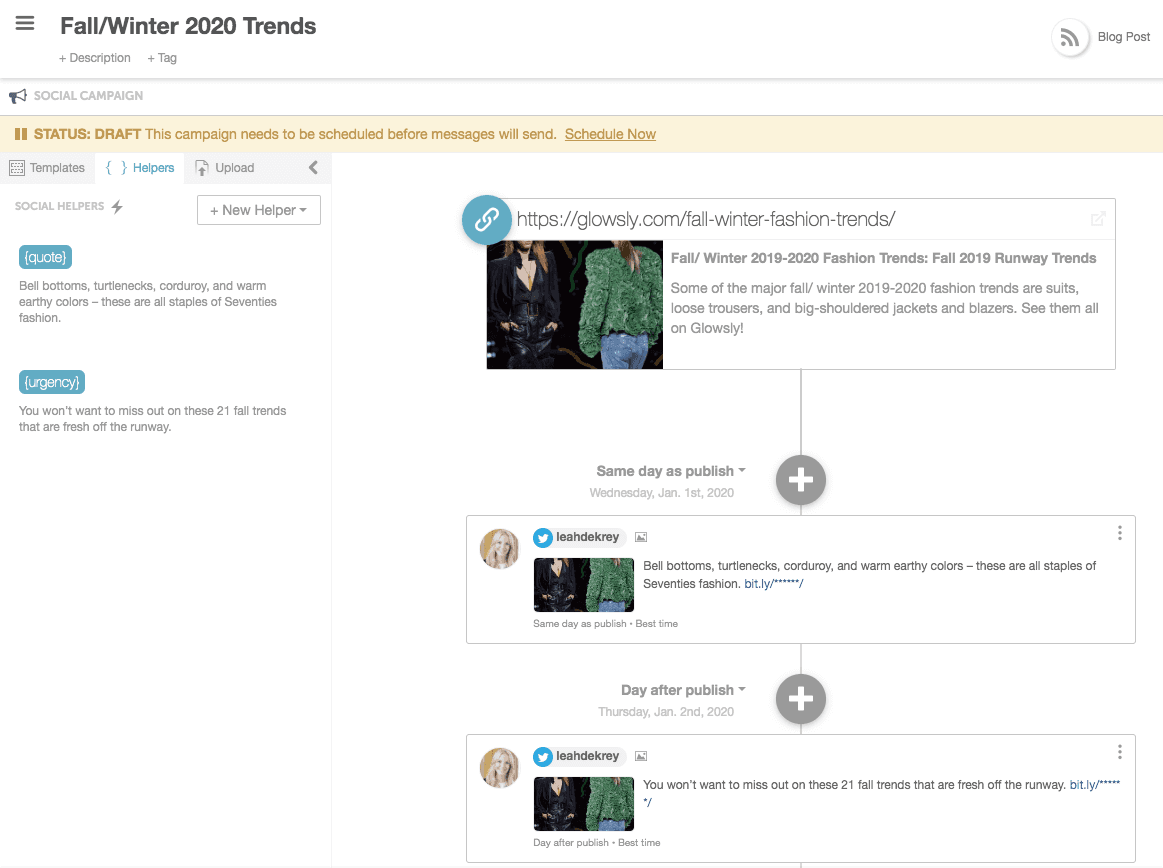 Using custom social helpers lets you easily add unique text to your social campaigns without having to create a ton of individual messages.
Looking for more inspiration? Here’s a list of some custom helpers and corresponding social messages that are commonly used. Feel free to copy and paste these examples directly into your social message:
{urgency}
- We’ve only got 15 seats left in our webinar. Claim yours before it’s too late.
- Don’t miss my newest weekly recipe on the blog now.
- Time’s almost up! Get your application in for Blogger of The Year.
{quote}
- Faux botanicals have come a long way since the days of garish silk florals. -Reichel Broussard
- When looking for blackberries, choose ripe ones that are plump (soft, not mushy, and rich blue-black all over). -Martha Stewart
- You don’t have to be great to start, but you have to start to be great. -Zig Ziglar
{announcement}
- We’ve updated our logo and changed our name. Check it out!
- Ready to connect with other bloggers after the long summer? Join us for our next Blogger’s Happy Hour on September 6th!
- Target announces new line of baby clothes and we got a sneak peek!
{how-to}
- Learn how to create infused olive oil in 5 easy steps.
- How to start couponing 101 - the ultimate guide!
- DIY project: How to wire a sconce without tearing apart your drywall and rewiring.
Check Out The Next phase of Getting Started With CoSchedule…Steal This ReQueue Strategy to Save Hours on Managing Your Social Media (+ Drive More Traffic to Your Blog)
