How to Build Social Media Branding Guidelines That Will Make Your Brand Memorable

 Have you ever noticed that sometimes brands will look and sound different on social media than they do on their blog or website?
Social media can sometimes be an afterthought that is tacked on to a company’s strategy long after their original brand guidelines have been built. Instead, brands should have forward-thinking social media guidelines that help create a cohesive voice and experience across all of their social channels.
In this post, you’re going to:
Have you ever noticed that sometimes brands will look and sound different on social media than they do on their blog or website?
Social media can sometimes be an afterthought that is tacked on to a company’s strategy long after their original brand guidelines have been built. Instead, brands should have forward-thinking social media guidelines that help create a cohesive voice and experience across all of their social channels.
In this post, you’re going to:
- Learn how to build out actionable social media branding guidelines. With our downloadable social media branding kit, you’ll be able to put the advice from this blog straight into use by creating actionable guidelines that will show you step-by-step how to create a more memorable social media presence.
- Learn to cohesively combine your social media presence with your overarching brand guidelines. You may already have your brand guidelines established, but how well do they really transfer over to your social media profiles?Often times, social media becomes an afterthought tacked on to a marketing strategy at the last minute. You’ll learn how to move those overarching guidelines seamlessly onto your social media profiles so that everything from your website to your Twitter profile creates the same experience for your customers.
- See examples of how brands are creating familiar experiences across their entire online presence. Learn from the best and make it yours. We’ll show you examples of how brands are making the most of their social media profiles by creating great, cohesive profiles.
How to Build Social Media Branding Guidelines That Will Make Your Brand Memorable
Click To TweetDownload Your Social Media Brand Style Guide + Voice And Tone Templates
Before you continue reading this post, download our social media branding kit. This kit has two different pieces that will allow you to flesh out your social media branding guidelines:- Social Media Image Style Guide to keep your visual content on-point and on-brand every time you post.
- Voice and Tone Brainstorming Document to ensure every post captures the voice of your brand.
Getting Started: Move Your Brand Voice And Tone Over To Your Social Media Channels
Aren’t voice and tone the same thing? Not exactly. Your social media voice refers to what you sound like on your social media sites. Are you funny or sarcastic? Witty or professional?
Your tone, on the other hand, refers to how you say things. For example, if I were to say I need an email sent, it doesn’t mean much; however, if I were to yell that same phrase, it would trigger a much different response because my tone changed.
Not exactly. Your social media voice refers to what you sound like on your social media sites. Are you funny or sarcastic? Witty or professional?
Your tone, on the other hand, refers to how you say things. For example, if I were to say I need an email sent, it doesn’t mean much; however, if I were to yell that same phrase, it would trigger a much different response because my tone changed.
Recommended Reading: The Best Social Media Copywriting Guide to Be A Social Work Ninja
Everything Good Comes In Threes, Right?
For the first part of this brainstorming process, I want you to think about three adjectives that could describe your business. Think about a popular brand like Under Armour. What three words would you use to describe that brand? Athletic, powerful, and dynamic are what I think of. For example, take a look at one of their recent Instagram posts. This campaign was directed at their audience reminding them that women can be so much more than a pretty face. The photo is incredibly dynamic, displaying the power of the woman in the photograph. In case you are really stumped, here is a list of descriptive adjectives to help you get started: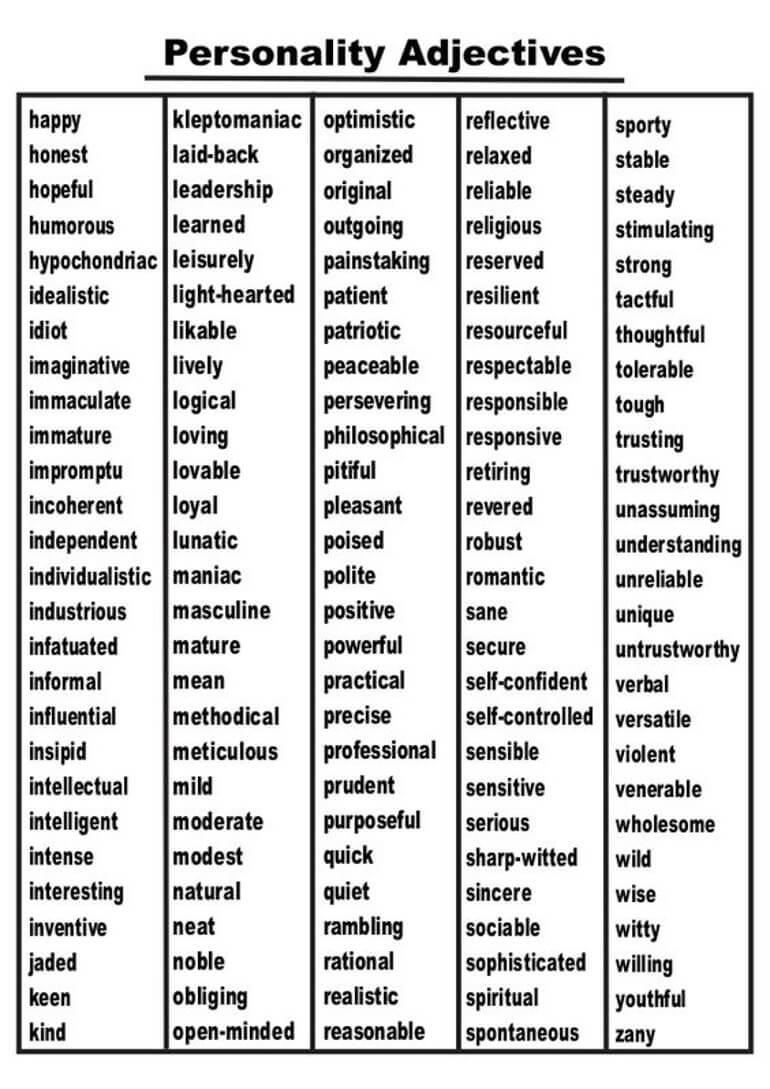 In your brainstorming document that you downloaded earlier is a spot where you can record all of those adjectives in one place. Once you pick a set of three, hold on to them, you’ll need them later.

Develop Your Voice
The second part of your brainstorming session is to think about how your brand sounds across the different points your customer accesses your company. How do you sound on your website? How about your blog? If you have a set of brand guidelines that your company operates by, I would pull those out. More often than not, a company will define their voice and tone within their branding guide. In that section, a general definition should appear of what the brand should sound like as a whole. If you don’t have brand guidelines developed, look at your website and blog. What do you sound like? Are you funny? Witty? Serious? Seeing how you already talk with your audience can help you develop your voice for social media. For example, MailChimp has published their content style guidelines online, which contains a short paragraph describing what the voice of MailChimp should sound like. MailChimp continues that development and begins to describe how that voice is going to come across online. They are:
- Fun but not silly
- Confident but not cocky
- Helpful but not overbearing

Develop Your Tone
The next step in your social media branding process is to create your social media tone. How do you want to come across to your followers? Sarcastic like Wendy’s?Feel-good like Disney? Or professional like Microsoft? There are unlimited options, which means that you’ll have a more cohesive presence and experience if the voice on all your channels are on the same page. The best thing to think about when you’re creating your tone is “how do you want your audience to read your social media messages”? Let’s continue looking at MailChimp. They break down their tone by saying that they are informal, meaning they're not afraid to share a joke every once in a while, but they should always be clear in their social media posts. So how do you create your tone in your social media branding guidelines? First answer the following questions, on a scratch paper or in your brainstorming document.Introducing Wendy’s new Strawberry Mango Salad. Because you probably don’t have a private garden with all kinds of fresh ingredients. pic.twitter.com/ZaH3pamfkO
— Wendy's (@Wendys) June 6, 2017
- How do we want our audience to read our social media messages?
- What is the tone of our typical message?
- What is the tone of our more infrequent messages?
- Are we going to include slang or popular jargon?
- What are the feelings we want our customers to have when they read our posts?
 We’ve also included a short example for a fictional company to help you get started.
 Before we continue on to the next step, it is important to mention a key factor when it comes to social media tone. The tone of your social messages is going to vary much more than voice. Your tone can change at a moments notice, whether you’re responding to an angry customer or a national disaster. Keep this in mind when you create your social guidelines document.
Define Your Voice and Tone
This is the last part of your voice and tone brainstorming exercise. Now that you know what your voice and tone sound like, it’s time to define them in one short, all-encompassing sentence. For example, MailChimp’s voice is defined by saying that it is human, friendly, and straightforward. Your sentence could contain the three adjectives you came up with earlier or summarize what you think are the most vital goals of your company. It’s all up to you. That’s all you need to do to transfer your original voice and tone guidelines to your social media accounts. That wasn’t too bad, was it? Let’s move on to images and videos.
Here's how to keep your voice and tone consistent on #social media:
Click To TweetCreate Visually Stunning Social Media Branding Guidelines
Images and videos are becoming a huge player in creating a successful social media presence. In fact, according to Socialbakers, tweets with photos receive 48% more views than those that don’t. And according to Adweek, Facebook videos garnered about 1,000 more reactions per post than photos. That information alone is enough to make you realize the vital role that media and images play in your social media branding guidelines. So how do you incorporate such a large part of your social media strategy into your social branding? It’s all about setting the expectations of what your images and videos should look like including things like:- Color palettes
- Filters
- Font
- Logos and logo placement
Recommended Reading: How to Make the Best Social Media Images the Easy Way (+84 Free Images)
Choose Your Color Palette
Though it may seem like a very small part of your social media presence, the color palette that you choose to use can have a significant impact on the cohesiveness of your brand's presence on social media. Think about your logo and company colors. Most brands will have 1 to 3 Pantone colors that are a part of their color palette. Take Cadbury chocolate for example. Their bright purple colors are a key theme across all of their photos and videos.So the first thing in your style guide that you need to fill out is your color palette selections. Talk to your designers, your CMO, anyone who may know the exact Pantone color codes for your brand.What would you do if someone stole the last Cadbury slab that you'd been saving? Check out the Martians TV ad here: https://t.co/8wr3E46kR4 pic.twitter.com/PuZZV4r4VZ
— Cadbury Dairy Milk (@Cadbury_SA) April 4, 2017
 Wait, what’s a Pantone color code? Pantone colors or the Pantone Matching System is a color system that is used across a variety of industries to replicate colors so they are exactly the same.
So, if you needed your graphic designer to create an image in the specific shade of orange you selected, you would send them the color code 3564 C. They would then be able to key in the code and that exact shade of orange would be in your image.
But how do you find the codes, or how do you find the color associated with the code? Pantone has a website that will allow you to either find your color based on your code or find a code based on a color. This space is where you can enter the code given to you by your graphic design team or find your codes based on the colors you select.
Wait, what’s a Pantone color code? Pantone colors or the Pantone Matching System is a color system that is used across a variety of industries to replicate colors so they are exactly the same.
So, if you needed your graphic designer to create an image in the specific shade of orange you selected, you would send them the color code 3564 C. They would then be able to key in the code and that exact shade of orange would be in your image.
But how do you find the codes, or how do you find the color associated with the code? Pantone has a website that will allow you to either find your color based on your code or find a code based on a color. This space is where you can enter the code given to you by your graphic design team or find your codes based on the colors you select.

Choose Your Filters
Filters can be a bit of a toss up. Once you pick one, do you have to stick with it? Can you use more than one? Which one is the best? There are so many options. Instagram alone has over 24 different filters, not to mention that Facebook and Twitter also have a smaller selection of filters for you to choose from. With so many options available what do you do? The answer is simpler than you might think. If you choose to filter your photos on a social channel, pick one or two filters and stick with them. Or you can go completely rogue and not filter them at all. Why is having the same filter across your photos so important? Because it helps create a smooth, eye-catching aesthetic that people will be able to associate with your brand. Do the filters you selected need to be applied every single time? No, especially if you’re trying to show off a certain color or aspect of a product that your selected filter downgrades or warps. In that case, just leave the filter off. In your design guide, there is a space to indicate which filters your brand will use on each channel. Each filter on these three channels is named, making it easy to indicate to your social media team which filters need to be applied when.
Select Your Fonts
Fonts play a big role when it comes to brand recognition and creating a cohesive brand appearance. For example, if you see a social media message from Disney, they usually have that same recognizable font. You don’t even need to have the word Disney in that type font. You recognize it because it’s been associated specifically with the Disney brand. How do you know what fonts to use? If your company has been around for awhile, there’s a good chance that your font or typography styles are listed within your brand guidelines. However, if you don’t have a set font yet, there are a few different ways you can set yours up. 1. If you have access to a graphic designer, you can design your font from scratch. Having a graphic designer create your font from scratch is great because you know that font is yours and yours alone. However, it can be costly depending on the designer and incredibly time-consuming. 2. You can search for fonts and download them from places like Dafont or Font Squirrel. Searching through fonts and downloading them from free sites like Dafont or Font Squirrel is a much easier process, and it’s free. However, there is no guarantee that someone else out there isn’t using the same font that you selected. Once you have your fonts selected, you also need to identify to your designers (and other members of your company) where and how these fonts can and can’t be used. Is your headline font supposed to be in all lowercase all the time? In terms of size, how much bigger does your header font need to be than your body font?
These are all questions that need to be answered in the use cases section of your design style guide.
If you haven’t answered or even asked these questions, it’s hard to know what exactly you should include in your design guide. I would suggest checking out the brand guidelines from Coca-Cola. They do a fantastic job outlining what their fonts should look like as well as identifying major do's and don’ts.
Once you have those major do’s and don’ts identified, record them in your design style book.
Once you have your fonts selected, you also need to identify to your designers (and other members of your company) where and how these fonts can and can’t be used. Is your headline font supposed to be in all lowercase all the time? In terms of size, how much bigger does your header font need to be than your body font?
These are all questions that need to be answered in the use cases section of your design style guide.
If you haven’t answered or even asked these questions, it’s hard to know what exactly you should include in your design guide. I would suggest checking out the brand guidelines from Coca-Cola. They do a fantastic job outlining what their fonts should look like as well as identifying major do's and don’ts.
Once you have those major do’s and don’ts identified, record them in your design style book.

Control Your Logo And It’s Placement
Your logo is one of the major ways that your brand will make your content online recognizable, which means that where and how it’s placed on your media is crucial. The next part of your design style guide is going to help you identify where your logo needs to go and how it needs to be placed on your images and photos. This is the part of the style guide that is going to get a little complicated. Again, if you’ve got your brand guidelines created, this information should be easy to transfer to your style guide. If you don’t, I’ll walk you through what to include. For the first part of your style guide, you need to identify to your designers where your logo needs to be placed on your photos and videos. The information that you need to convey in this first part of the logo section is:
- What are acceptable parameters for logo placement?
- How big does the logo need to be in photos and videos?
- If there are multiple versions of your logo which ones need to appear in photos and/or videos?
- How far in does the logo need to be from the edges of the photo or video?
- Where is the logo being placed?
- How big is the logo on each photo?
- Which version of the logo appears in photos?
- Is the logo centered, right side aligned or left side aligned?
- How far away from the edges must your logo be?
 In this photo, the main focus is going to be on the right hand corner of the photo since, for this example, is where the logo should sit in all photos. In the photo, we can see the logo needs to be at least 100x100 pixels wide and at least 50 pixels away from the edge of every photo.
In your style guide template, there is a space for you to identify which logo will be used and space to include the image layout example.
In this photo, the main focus is going to be on the right hand corner of the photo since, for this example, is where the logo should sit in all photos. In the photo, we can see the logo needs to be at least 100x100 pixels wide and at least 50 pixels away from the edge of every photo.
In your style guide template, there is a space for you to identify which logo will be used and space to include the image layout example.
- Where is the logo being placed?
- How big is the logo on each photo?
- Which version of the logo appears in photos?
- Is the logo centered, right side aligned or left side aligned?
- How far away from the edges must your logo be?
Determine Don’ts Of Your Logo
Now that you know where your logo goes on your photos and videos, you now need to indicate what can’t be done to your logo in terms of its placement on your images and videos. Determining what can’t be done is easy and can sometimes create a giant list of don’ts. So how do you narrow down that list? The following are examples of what to focus on:- How the logo or texted in positioned (sideways, upside down, off center etc)
- Color changes
- Different font types
- Backgrounds or different colored images and videos
Recommended Reading: How to Increase Visibility With Social Media Optimization
Create A Consistent Social Media Presence
The final aspect of your social media branding guidelines is creating a posting schedule that gives your brand a consistent presence on the social channels that you choose to utilize. We’ll also cover how to create cohesive social media profiles so that any point your potential customers interact with you creates a similar experience across all your channels.Maintain A Consistent Posting Schedule
The downfall of any brand is when they open a social media account, they’ll post a few times and then fall off the face of the earth. Don’t do that. You need to maintain a consistent schedule if you’ve committed to a certain social channel. This especially rings true if you are posting consistently on other platforms or outlets. If you ignore a channel, it no longer creates the same experience as some of your other outlets. How do you know how often to post to which channel though? Some platforms, like Twitter, may need five to seven posts per day (or more) while platforms like LinkedIn and Facebook need only two to three posts per week. We actually broke down how to build the best social media posting schedule already! You can read more in depth about that here, or you can follow this ultimate daily sharing recipe. Remember, you have to walk before you can run, so if the daily share number seems a bit high for your team, feel free to scale it back and work your way up.
Recommended Reading: How Often to Post on Social Media?
Create Consistent Social Profiles
The next step to create a consistent experience with your social media profiles is to make sure they look the same. It’s a huge pet peeve of mine when I'm looking for a company across various social media sites and their profiles are all different. So, what do you need to do to create consistent profiles? 1. Keep the same profile picture across all of your social media profiles. Having the same profile picture across all of your social media channels makes it easier for fans and customers to identify which account their looking for. For instance, take a look a Taco Bell. Their website and social media profiles all have the same look and feel, making it easy to spot their accounts on whichever social media site you’re on. Facebook: Twitter:
 Instagram:
 2. Make sure all your header photos are the same or within the same family of photos. Just like having the same profile picture is important across your social profiles, so is having the same header photo. It is important to note, however, header photos don’t need to be the exact same, but they should fit into the branding of the overall profile.
Nike mostly follows the rules of keeping the same header photos, but they break the rules on Linkedin, showcasing the Nike campus (but a little bit of rule breaking is okay). Since LinkedIn is all about jobs and professional connections, it makes sense that they would showcase their campus.
Facebook:
2. Make sure all your header photos are the same or within the same family of photos. Just like having the same profile picture is important across your social profiles, so is having the same header photo. It is important to note, however, header photos don’t need to be the exact same, but they should fit into the branding of the overall profile.
Nike mostly follows the rules of keeping the same header photos, but they break the rules on Linkedin, showcasing the Nike campus (but a little bit of rule breaking is okay). Since LinkedIn is all about jobs and professional connections, it makes sense that they would showcase their campus.
Facebook:
 Twitter:
 LinkedIn:
3. Make sure you have the same username across all your social channels. The next step in creating a visually cohesive social media profile is making sure that your channel usernames are all the same. If your customer follows you on Twitter and wants to follow you on Instagram, but they can’t find you because you’re username is different, you just missed a chance to reach out to them with new content.
This means you will need to be proactive in looking for up and coming social media sites. Even if they’re not part of your strategy right away, create an account, fill in your basic information and claim your username before someone else does.
Let's talk about CoSchedule’s social media handles for a second. Every single one of our handles is @CoSchedule. Anyone who types that into the social media networks we’re on will immediately find us with no trouble at all. It makes it a lot easier to connect with our audience if they know how to find us.
Facebook:
LinkedIn:
3. Make sure you have the same username across all your social channels. The next step in creating a visually cohesive social media profile is making sure that your channel usernames are all the same. If your customer follows you on Twitter and wants to follow you on Instagram, but they can’t find you because you’re username is different, you just missed a chance to reach out to them with new content.
This means you will need to be proactive in looking for up and coming social media sites. Even if they’re not part of your strategy right away, create an account, fill in your basic information and claim your username before someone else does.
Let's talk about CoSchedule’s social media handles for a second. Every single one of our handles is @CoSchedule. Anyone who types that into the social media networks we’re on will immediately find us with no trouble at all. It makes it a lot easier to connect with our audience if they know how to find us.
Facebook:
 Twitter:
 Instagram:
 4. Keep your bios consistent. The final step in creating a cohesive social media profile involves making sure that your online bios are completely filled out and contain the same information. This small task is easy to miss but is a critical part of your profile. This is a chance for you to introduce your company to your potential audience. If that information is blank or worse, incorrect, how will they be able to see who you are? By keeping your bio updated and
This is a chance for you to introduce your company to your potential audience. If that information is blank or worse, incorrect, how will they be able to see who you are? By keeping your bio updated and brand-centric, you’re grabbing onto another opportunity to reinforce your brand message.
One company that is great at keeping a consistent bio is Bobcat. From a fully loaded Facebook bio to a short and sweet Twitter bio, Bobcat does a great job incorporating their three descriptive adjectives into every one of their social bios, as well as their #OneToughAnimal, and #BobcatTough hashtags.
Facebook:
4. Keep your bios consistent. The final step in creating a cohesive social media profile involves making sure that your online bios are completely filled out and contain the same information. This small task is easy to miss but is a critical part of your profile. This is a chance for you to introduce your company to your potential audience. If that information is blank or worse, incorrect, how will they be able to see who you are? By keeping your bio updated and
This is a chance for you to introduce your company to your potential audience. If that information is blank or worse, incorrect, how will they be able to see who you are? By keeping your bio updated and brand-centric, you’re grabbing onto another opportunity to reinforce your brand message.
One company that is great at keeping a consistent bio is Bobcat. From a fully loaded Facebook bio to a short and sweet Twitter bio, Bobcat does a great job incorporating their three descriptive adjectives into every one of their social bios, as well as their #OneToughAnimal, and #BobcatTough hashtags.
Facebook:
 Twitter:
 Instagram:

And We’re Done
You did it! You now have a basic outline of your social media branding guidelines! When you’re ready to move on to the execution phase of your social media plan, check out CoSchedule. We can help you organize, plan and execute your campaigns all in one place with tools like ... Social Media Campaigns: Plan every piece of your campaigns, all within CoSchedule. ReQueue: Automatically reshare your best evergreen content.
 And Best Time Scheduling. Automatically publish social media posts at the most optimal times with zero manual effort.
 Think you’re ready to get started? Sign up for a demo today.


