Website Content Template: How to Get Content Right the First Time, Every Time

 You’ve checked your backlog and suddenly you see it. You need to craft content for a new web page. For some marketers this marks the beginning of endless back and forths with developers, upper management or even clients over what content you need to create.
Wouldn’t it be easier to simplify this process?
That’s where a website content template comes into play.
What are some benefits to using them? Let's count three:
You’ve checked your backlog and suddenly you see it. You need to craft content for a new web page. For some marketers this marks the beginning of endless back and forths with developers, upper management or even clients over what content you need to create.
Wouldn’t it be easier to simplify this process?
That’s where a website content template comes into play.
What are some benefits to using them? Let's count three:
- They make it easier to take a content-first approach with everything written and ready to hand off to a developer.
- Templates help provide the clarity your developers need to insert the content you’ve created to the webpage without them having to endlessly ask for it. T
- hey also help you and your marketing team remain consistent which leads to more pages being published on time.
Website Content Template: How to Get Content Right the First Time, Every Time
Click To TweetWhy Should You Have A Website Content Template?
Website content templates ensure three critical things happen whenever you’re creating new content for your web page.- They can help you organize all the content that is going on to your web page is in one place.
- Using a template can help ensure that you don’t miss anything when it comes to creating your web pages. Templates allow you to check every box and ensure every piece of information is where it needs to be.
- Finally, they make it easy to hand off your content to your developers. The chances of a marketer being able to place content on a web page are pretty slim. So instead of developers having to ask for information, they’ll have everything they need in one place.
Download Your Website Content Template To Get Started
Filling in a template the right way can make it easy for your developers to transfer approved content on to a web page and not have to guess where it should go. Instead of taking the time to format and create your template, download this one. It’s got everything you need plus editable sections that you can customize for each web page you create. So what are you waiting for? Download this template and start reading!Why Should Content Come Before Design?
There are three reasons to put content before design:- You need to know what purpose a page will serve before it can be designed.
- Your developers need to have everything completed so they can accurately enter your copy into your content management system.
- Content needs to be reviewed and approved before publishing. Completing content in a Word doc first helps save time making edits to live pages later.
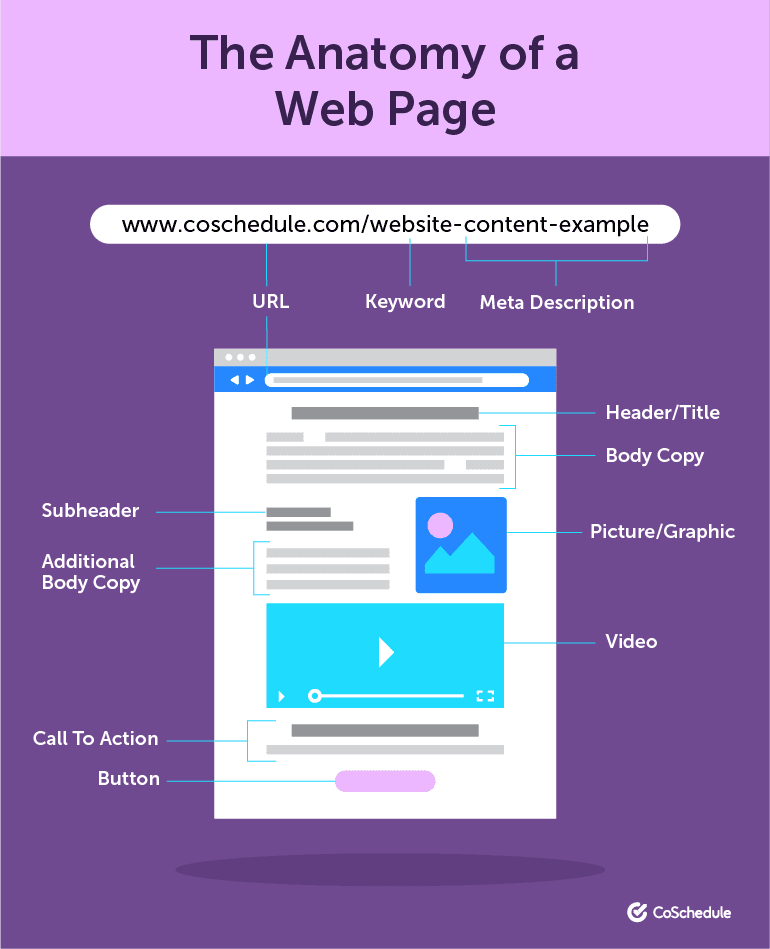
The Anatomy Of A Web Page
Step One: Plan Your Work
The first step of creating content for your new web page is to develop a plan. If you run into your content writing process blind, you’re going to miss your target every time. Instead, answer the following questions before you write:- What type of content are you writing? A product page, a help doc, etc.
- Where is it publishing? Are you writing for your company website or a client’s?
- When is it publishing? Use the date your page goes live to backtrack and determine when you need to start writing content to finish the page by its publish date.
- Who are you targeting? Who do you want to reach and what message do you need to share with them that will capture their attention?
- What is the purpose of this page? How does the content on this page affect the overall experience on your website?
- What questions does this page need to answer for your audience? You’re creating this page and this content for a reason. Your audience is looking for answers. What are they and what do you need to tell them?
Action Item: At the top of your template, there are six questions. Fill out the answers to each one, so you and your content editors have a clear idea of what this page needs to communicate.
Step Two: Research Your Topic and Keywords
The next step in your web page content writing process is doing your keyword research. Keywords are the terms or phrases that your potential customers are typing into search engines, or your website to find what they are looking for. Both of these searches play an essential role in how you create your messaging.Start With General Topic Research
Once you know the topic of your new web page you can begin to start your initial research. What happens if the topic of your webpage is unfamiliar to you? This can happen even if you’re creating content for your website. Maybe you’re launching a new product line, and you don’t know much about it. Either way, you need to turn to a search engine or an expert on the subject matter to figure out the information you need and ensure your content is as up to date as possible. One way to start your research is to find someone in your company (or your client’s company) that is an expert on the subject matter you are writing about. This is especially important if you are talking about a new product that is going to launch. Here are a few other research tips to keep in mind:- Talk to the people around you. You never know who might have the information you’re looking for.
- Visit online forums in your industry. See what other people are discussing.
- Run an audience survey. Get more of a gage as to what’s going on in the minds of your audience.
- Research your competitors. Have they launched a similar product? Check out their pages to see what kind of language and information they are using.
Recommended Reading: The 30 Best Content Research Tips That Will Make You More Influential
Research The Keywords Used To Find Your Website
Once you’re confident, you have enough knowledge to accurately write your content you can move on to researching the keywords that are being used to find your website. Why would this information be relevant to writing content for your web page? Because you need to be able to see what people are referring to your product as. For example, let’s say that you’re writing content for a Nike web page, about a new set of running shoes. These shoes are supposed to help cushion your joints as you run, and their bottoms are extra tacky to prevent slips and falls on an indoor track. So you would use a tool like Ahrefs or Moz to find the keywords that people are using to search for running shoes. For example, let’s say we wanted to search for keywords related to “Running shoes for bad joints.”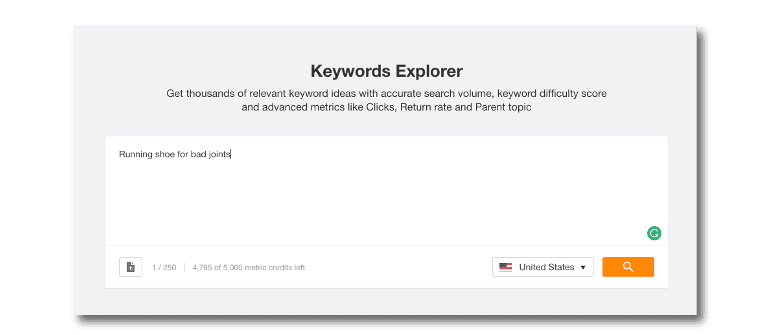 In this example, there is a keyword that this phrase ranks for that is considered a parent topic:
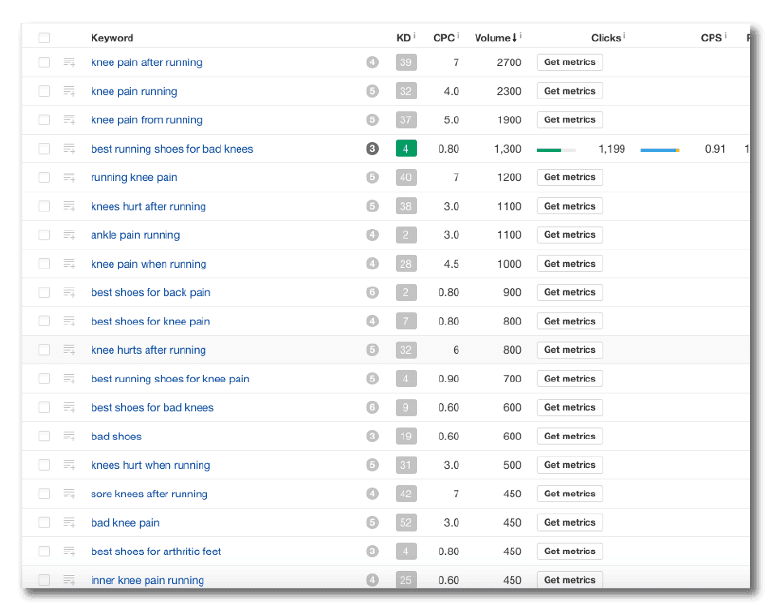
 Under the parent topic are a bunch of different keywords that you can work into the copy of your web page:
 List the keywords and secondary terms you may want your webpage to include information on.
Look At Internal Search Term Usage
The last step in your keyword search adventure is going to look at the internal keywords that are used in your website’s search bar. If you go back to the Nike example, you would be looking for the keywords that someone types into the search bar of the Nike website to look for a product. So how do you find this search data? First, go to Google Analytics and select Behavior > Site Search > Search Terms. In the window, there will be a list of terms that users are typing directly into the search bar of your site.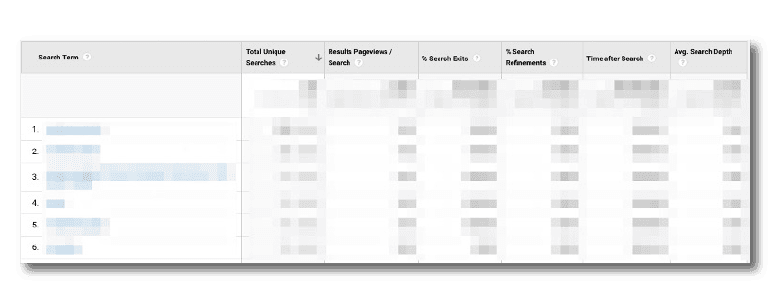 If you don’t have data being pulled into your site terms, you may need to enable the system first. Follow this Google Help Doc to see more on how to start that process.
Make a list of terms that relate back to the product or service that you are writing your content about and try to naturally work them in wherever possible. These terms can also give you ideas for new pages you should create.
If you don’t have data being pulled into your site terms, you may need to enable the system first. Follow this Google Help Doc to see more on how to start that process.
Make a list of terms that relate back to the product or service that you are writing your content about and try to naturally work them in wherever possible. These terms can also give you ideas for new pages you should create.
Action Items:
- Conduct any initial research necessary so that you feel confident writing about the topic your web page is covering.
- Use a keyword tool to identify one primary keyword and several secondary keywords that relate back to your topic. Record them in the keywords section of your template.
- Use Google Analytics to find search terms that are being entered into the search bar of your website. Record related terms in your template.
Step Three: Write Your Webpage Content
You’re finally ready to write your web page content. However, each message that you write will be used in a different section of your website.Headline/Page Header
Your headline or page header is one of the most important pieces of copy that you’ll write for your new web page. Why? Because this is the first thing that your audience will see. It needs to capture their attention and tell them exactly what they’ll find on this web page. Your headline or page header should be located at the very top of your page.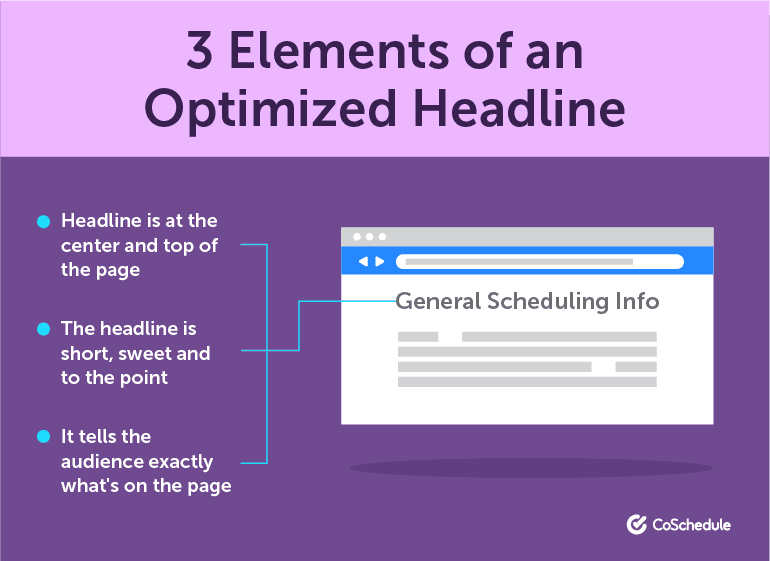 A few best practices for writing good headlines are:
- Aim for six to seven words per headline.
- Use the main keyword that you recorded in your template as part of your headline.
- Inform your reader how they'll benefit from reading your page.
Action Item: Record the headline or page header that you will use for your web page in your template under the headline section.
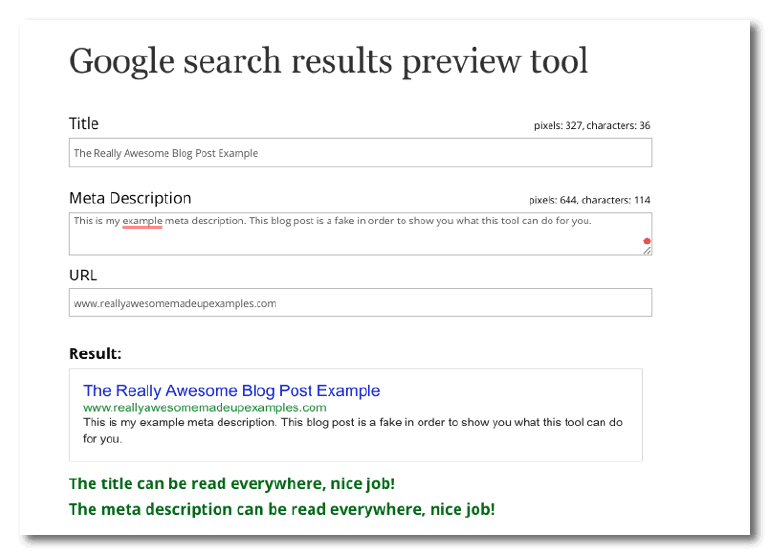
Search Friendly URLs
The next part of your content development is your URL. Your URL is the specific address for your web page that your content lives on. It’s like your content’s home address in the internet world. Your URL is located at the very top of your webpage in the address bar.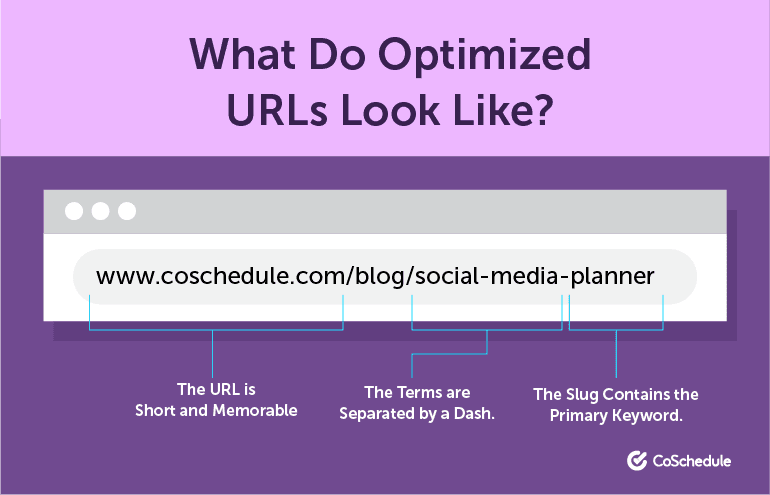 They play an important role especially for SEO purposes. Your main keyword or the topic that your web page covers should be included in your URL. Those keywords make up the tail end of your URL and should be separated by a dash.
It should look something like this: https://coschedule.com/blog/social-media-audit-template
The social media audit template is the keyword for this post. So anytime someone types “social media audit template” into a search engine, our URL will surface (hopefully).
According to Small Business Search Marketing some other best practices to keep in mind when creating your URLs are:
They play an important role especially for SEO purposes. Your main keyword or the topic that your web page covers should be included in your URL. Those keywords make up the tail end of your URL and should be separated by a dash.
It should look something like this: https://coschedule.com/blog/social-media-audit-template
The social media audit template is the keyword for this post. So anytime someone types “social media audit template” into a search engine, our URL will surface (hopefully).
According to Small Business Search Marketing some other best practices to keep in mind when creating your URLs are:
- Keep them short.
- Use your keywords.
- Words should always be separated by a dash.
- Use 301s when directing an old URL to a new one.
Action Item: Enter the URL you want your web page to have in your template.
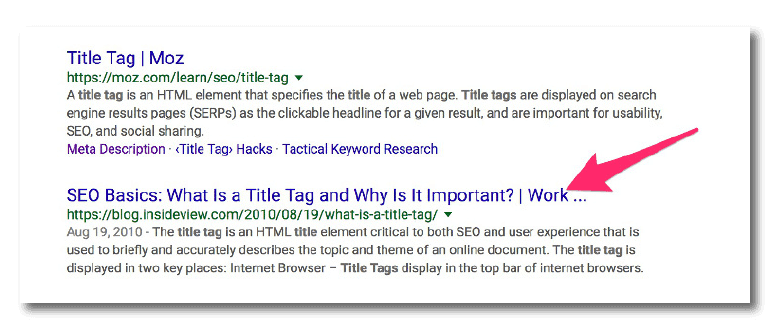
Title Tag
What exactly is a title tag? According to Search Engine Watch, a title tag is:Title tags are used to tell search engines and visitors what any given page on your site is about in the most concise and accurate way possible.Title tags appear on every page of your website, but you may recognize them as the blue link that appears in your search engine results:
 Some best practices to remember when writing your title tags, according to Moz:
- Write your title tags like [Primary Keyword - Secondary Keyword | Brand name.]
- Keep them about 70 characters.
- Avoid using all caps in your titles.
- Be unique.
- Put your essential keywords first (if possible and appropriate).
Action Item: Enter your title tag into your content template under the title tag section.
Meta Description
The next part of your content template is going to include filling out your meta-description. A meta description is a brief summary that can be up to 320 characters that tell readers what your post is about. If done correctly, a meta description can help pull your webpage into search results, especially if a string of terms in your description appears in the search query. So where is the meta description located? It is the small amount of text that appears below the title tag in your search engine results list.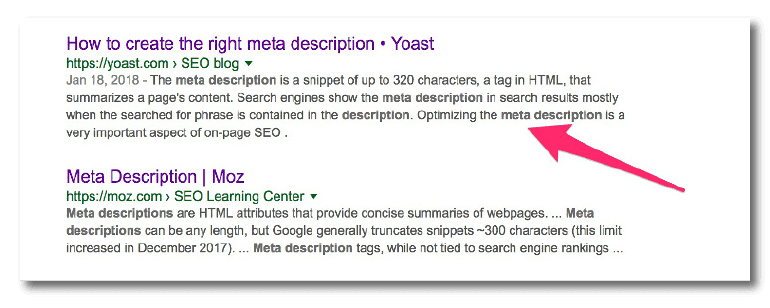 So how do you write a good meta description? According to Yoast, there are seven things that create a good meta description:
- It’s under 320 characters.
- It should be actionable and tell your audience what to do.
- It should have a call to action.
- It should include your primary keyword.
- It should match the content of your webpage.
- It should be unique.
Action Items:
- Write your meta description.
- Edit for clarity.
- Enter the final version in the template.
Body Copy
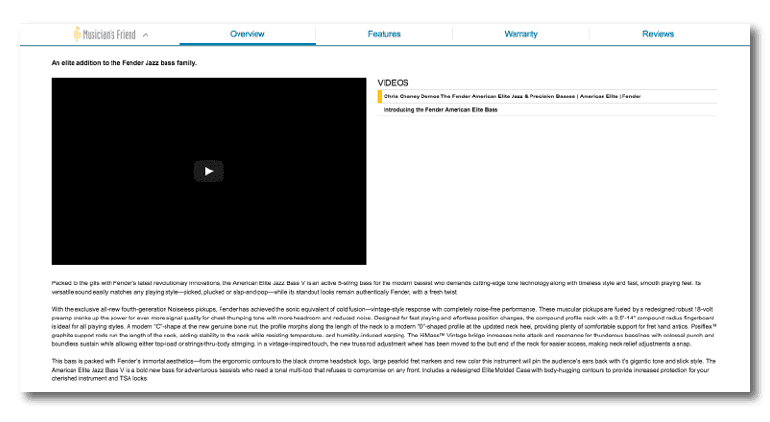
The next part of your content creation template is writing your body copy. What your body copy looks like will depend on what type of web page you are creating. Body copy refers to the main pieces of text on a web page. It is usually located in the center of the webpage, but it can move depending on the type of web page that is being created. This could be things like:- Product descriptions like this one from Musician’s Friend:
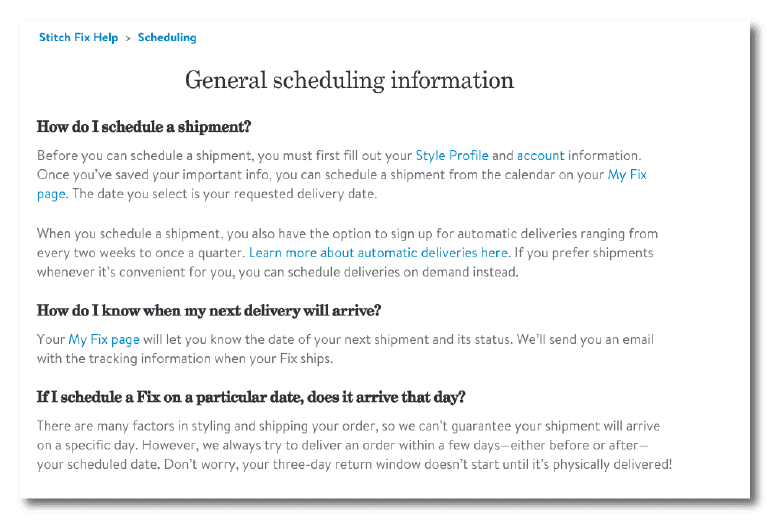
- Answers in a help doc like this one from Stitch Fix:
- The core content of a blog post like this one from CoSchedule.
 It can also include other pieces of text that are core to helping get your message across to your reader. Depending on the type of pages you’re creating content for, your body copy could be one giant section or multiple smaller ones.
Some general writing tips to keep in mind when you’re developing your body copy are:
It can also include other pieces of text that are core to helping get your message across to your reader. Depending on the type of pages you’re creating content for, your body copy could be one giant section or multiple smaller ones.
Some general writing tips to keep in mind when you’re developing your body copy are:
- Keep your paragraphs to a three-sentence maximum.
- Keep your sentences under 25 words.
- Break up information with lists and bullet points.
- Use subheaders to break down points in the text to make it skimmable.
Action Items:
- Craft your body copy.
- Run it through a text editor.
- Manually check for edits.
- Put into template under body copy section.
- Repeat for every piece of body copy that needs to be created for a webpage.
- If multiple body copy text pieces are requested, be sure to label each one and where it goes.
Sub-Headers
The next part of your template is going to focus on subheaders. Subheaders are used to break up long body copy and indicate to the reader that there is a new idea (H2 headers) or a subpoint of the previous idea (H3 headers).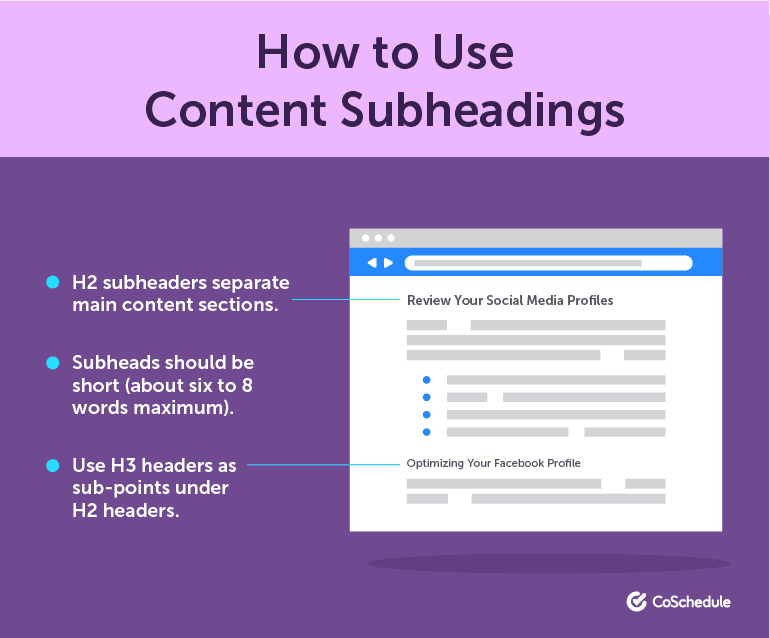 Subheaders may not always be used in body copy especially if it is concise like a product description. However, it can be used in FAQ pages or blog posts to help break up text and make it easier for readers to, well read.
Sub-headers follow the same guidelines as headlines in the fact that they should be:
Subheaders may not always be used in body copy especially if it is concise like a product description. However, it can be used in FAQ pages or blog posts to help break up text and make it easier for readers to, well read.
Sub-headers follow the same guidelines as headlines in the fact that they should be:
- Keyword-driven (usually secondary terms are great for subheaders).
- Six to eight words long.
Action Items:
- Write out any necessary subheaders under the subheader section.
- Indicate where they should be placed in body copy.
Buttons
Buttons are another essential part of the content that you’ll need to write before you web page is developed. Buttons can make or break the effectiveness of web page. So even though they are short little phrases of text, they need your attention. Where are buttons located? Buttons can be located anywhere on your webpage, but ultimately a designer or developer will most likely be responsible for finding their best location (based on user experience research). After your body copy, in the body copy, off to the side maybe? As a writer, you should:- Be aware of where buttons on placed on your site’s pages.
- Understand the button’s purpose.
- Write button micro-copy that drives your desired action.
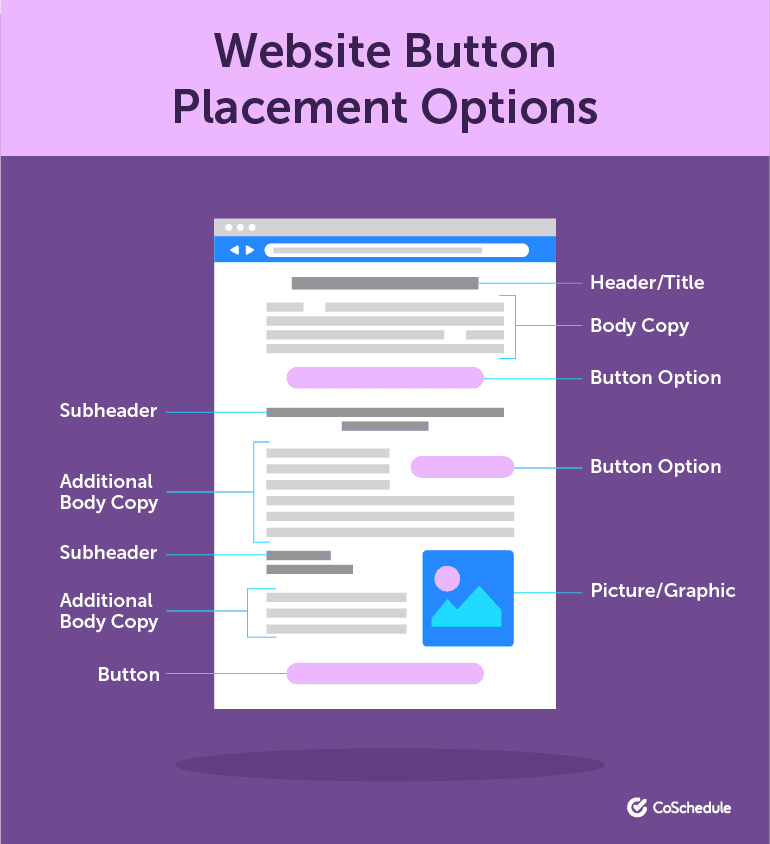 It’s not just where the button is located that’s important. The text that is in the button is important too. After all, you need to reassure and tell your audience what they’re going to get when they click that button.
According to Crazy Egg, there are six things that help create a great button.
It’s not just where the button is located that’s important. The text that is in the button is important too. After all, you need to reassure and tell your audience what they’re going to get when they click that button.
According to Crazy Egg, there are six things that help create a great button.
- They are actually buttons. Don’t get creative here and make it a random squiggle. Let your audience recognize your button for what it is.
- They have compelling copy. Tell your audience what they’re going to get when they click your button.
- You placed them in a logical spot. Your buttons shouldn't be in the upper left corner of your webpage near your menu. (Unless that makes sense for your webpage.)
- Their color makes them easy to spot. You want your button to scream click me, so don’t make it bland and blend in.
- They follow the visual line of site or action of your reader. As you scroll through a page, your button should be in a logical place.
- Don’t make your button compete for attention. Put it somewhere on its own.
Action Items:
- Decide where you want your button to be.
- Indicate where the button needs to go in your template.
- Create your copy.
- Proof your copy.
- Add it to the button text section of your template.
Call To Action
The next step of your content writing process is creating a killer call to action or CTA. CTAs tell your audience what to do. They are that final push that gives them the courage they need to do an action on your website whether that’s signing up for a trial or purchasing a product. What makes a good CTA? At CoSchedule we’ve found that starting with a verb, going easy on filler text, keeping it brief and making one simple request are all elements of great CTAs. As a bonus here’s 54 proven words to include in your next CTA: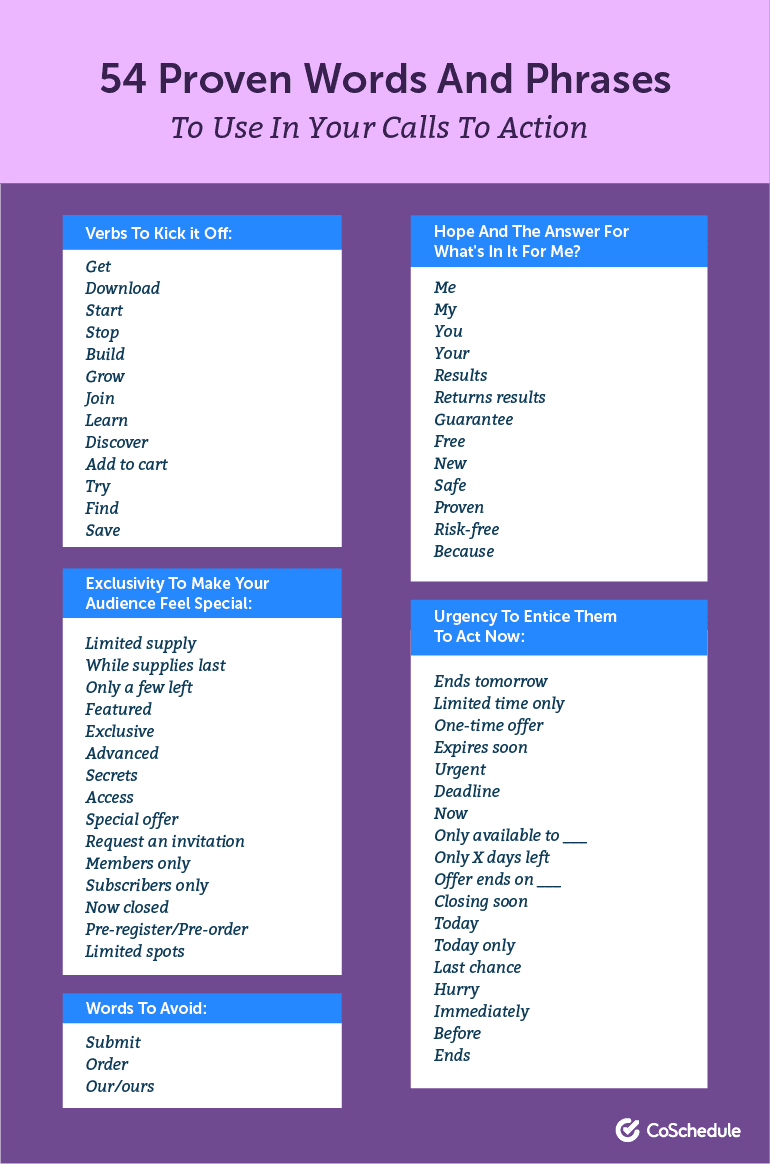
Action Item: Write your CTA and add it to your template.
Images
You’ve reached the end of the writing portion of your template, but you’re not quite ready to hand it off to your developers just yet. The next part of the web page that you need to figure out is where your images are going to go. Images can help tell the story of your web page and based on the type of page you’re creating content for, the number of images you have may be higher than 20 or none at all. Photos can be scattered all over your web page and need to be used strategically to gain the most impact. To use photos for your webpage answer the following:- What types of photos are going to be on your webpage? This could be anything from designed images to logos.
- Decide where each photo is going to be on your webpage. You can indicate this in your template with simple instructions like upper left-hand corner by the first CTA.
- Include the dimensions that you want each one to be. For example, every image on the CoSchedule blog is 770px wide.
- If your images are included in a cloud system, include the link to their location. This can make it easy for developers to find what images they need to add without having to crawl through an endless number of files.
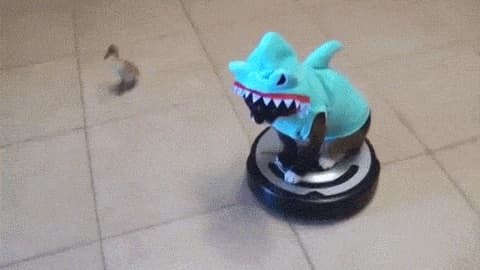 The image name could be “duck-chasing-cat-on-roomba”, but the alt text could be something like, “A duck chases a cat in a shark sweatshirt on a Roomba.”
According to Moz, your alt tag should be specific and short. You should avoid keyword stuffing as well, ie, putting your keywords into places to trick search engines into ranking your content higher.
The image name could be “duck-chasing-cat-on-roomba”, but the alt text could be something like, “A duck chases a cat in a shark sweatshirt on a Roomba.”
According to Moz, your alt tag should be specific and short. You should avoid keyword stuffing as well, ie, putting your keywords into places to trick search engines into ranking your content higher.
Action Items:
- Choose and title your images.
- Include a link to image location in the template.
- Create and add the alt text.
- Include the location of where you want the image placed.
Videos
The last step in your content creation process is adding and reviewing any videos that need to be on your new webpage. Much like images, videos are not always a necessary part of your webpage but if you decide to add one in your need to call this out to your developer. Videos should be used sparingly and only when it adds to the knowledge of your reader, like this video that was added on to Musician's Friend to demonstrate a product:
One simple solution for video hosting is Wistia. It's what we use at CoSchedule, and their service works well.
Action Items:
- Select the video and add a link where the video is stored in the template.
- Title your video.
- Add any necessary video description.
- Indicate where the video needs to be placed.
Step Four: Review
The very last step in your webpage content creation process is going to be a final review. By this point, your copy should be approved, and your developer should have inserted all of your content on the page. This last review is to make sure that everything you’ve created is working the way you intended. You and your marketing team should check things like:- Do all your links work?
- Is your copy grammar and spelling error free?
- Do all your images and videos load?
- Are the downloadable elements the correct ones?
- Page load time?
- Is there any feedback from upper management or your client?


