How to Create Projects
Projects inside of CoSchedule are where everything happens. There are multiple kinds of projects each with many functionalities. The Project Types available to you will vary depending on your plan.
Back To Top
Create Projects on the Calendar
Steps to Create Projects on your CoSchedule Calendar:- Click the plus sign on the date you want to schedule this project or click +Create
- Select Project
- Enter a title, add labels, select an owner, and schedule the project (this information can be changed after the Project is created)
- Click Create and the project will open
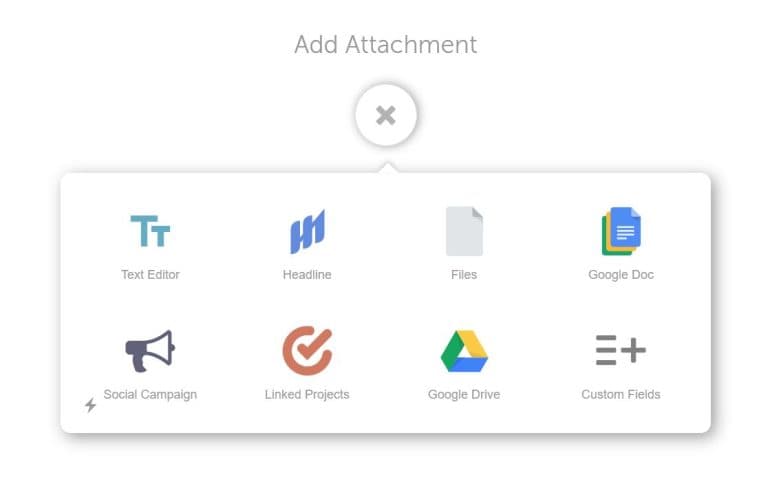
Add Project Attachments
Once you have started a new project, work with project attachments to create content or add files. Simply select the attachments you want to add to your project.
Text Editor
The Text Editor allows you to create copy with formatting and upload images and videos. It will also give you access to other content converting options.File
Upload a file inside the attachment. After uploading a file you will be able to preview, download, or upload a new version of the file. File versions will be tracked.Google Doc
Attach a Google Doc, Sheet, or Slide to the Project. After attaching a Google Doc you will be able to open it within the project or open it in Google Drive.Social Campaign
Add a Social Campaign to your Project. Please note that only one Social Campaign can be added to each Project.Marketing Assistant
Marketing Assistant is only available in Marketing Calendar Pro and Marketing Suite. Use CoSchedule's AI-powered Marketing Intelligence Assistant to write first-draft copy, generate new ideas, and more.Linked Projects
Link another Project to the Project you are working on to make jumping between Projects easier. You can link multiple projects from within this type of Attachment.Note: If you are working with integration projects, you must create the integration project during the creation step. These are not available to add to a project later as an attachment. If you are working with WordPress and have already created a post’s copy inside of the text editor option, you can convert it to WordPress.
Custom Fields
Custom Fields are only available in Marketing Suite.
Custom Fields let you create points for specific data using drop downs, dates, text fields, and more. You can add a custom field to your project to get additional information or add it to your request forms to get further context from submitted requests.
Back To Top
Manage Project Attachments
After you have attached more than one Attachment to a Project you can rearrange them by following the steps below.- Minimize the attachment by clicking the up arrow on the right side
- Drag and drop them into any order
- To view the attachments again, click the up arrow again.
- Hover over the name bar of the attachment
- Click the X