Article Writing Template: How to Craft Great Content Consistently

 When the time to write an article comes, do you struggle with getting started? You have a solid idea, but getting it from concept to a draft is challenging. The blank page is intimidating.
The possibility for your idea to take dozens of different shapes can paralyze you and make you a slow, frustrated writer. Missing deadlines and not hitting goals doesn’t help, either.
There’s a better way to write your article: by using a tried-and-tested article writing templates. It brings consistency and focus to every writing session and allows you to ship quality content every time.
Recommended: Article Summary Generator
As John Rogers, an American screenwriter, put it: “You can’t think yourself out of a writing block; you have to write yourself out of a thinking block.” This article writing template and guide will help remove blank page paralysis and give you an easy place to start thinking—and writing.
When the time to write an article comes, do you struggle with getting started? You have a solid idea, but getting it from concept to a draft is challenging. The blank page is intimidating.
The possibility for your idea to take dozens of different shapes can paralyze you and make you a slow, frustrated writer. Missing deadlines and not hitting goals doesn’t help, either.
There’s a better way to write your article: by using a tried-and-tested article writing templates. It brings consistency and focus to every writing session and allows you to ship quality content every time.
Recommended: Article Summary Generator
As John Rogers, an American screenwriter, put it: “You can’t think yourself out of a writing block; you have to write yourself out of a thinking block.” This article writing template and guide will help remove blank page paralysis and give you an easy place to start thinking—and writing.
This article writing template and guide will help remove blank page paralysis and give you an easy place to start thinking—and writing.
Click To TweetDownload Your Article Writing Template
Before we dive into a streamlined article writing process, you’ll need a template to work from. It’s the key to focused, efficient writing and never starting from scratch again. Grab it and start using it today!Why Follow a Template When Writing Articles?
Here are three key benefits that make an article writing template a valuable asset in your toolkit.1. You’ll Be More Efficient
When you first sit down to write with an idea in mind, it’s easy to spend hours in a research rabbit hole. This leads you to a mountain of tabs, screenshots, downloads, and notes you now need to sift through to find the ones worth using. If you have unlimited time available to write your article, that’s not inherently a bad thing. But you’re a marketer in a busy team—you definitely don’t have all the time in the world for one article. Harvard Business Review shared some research that suggests innovation and creativity thrive when there are constraints in place—a concept also known as creative limitation. This is where using a template comes in. The structure of an article writing template allows you to braindump your initial thoughts on a topic and use them to map out an outline. Then, you can research more intentionally and build your article based on points from your outline you want to support—rather than researching everything there is to know about a topic.2. You’ll Gain Clarity
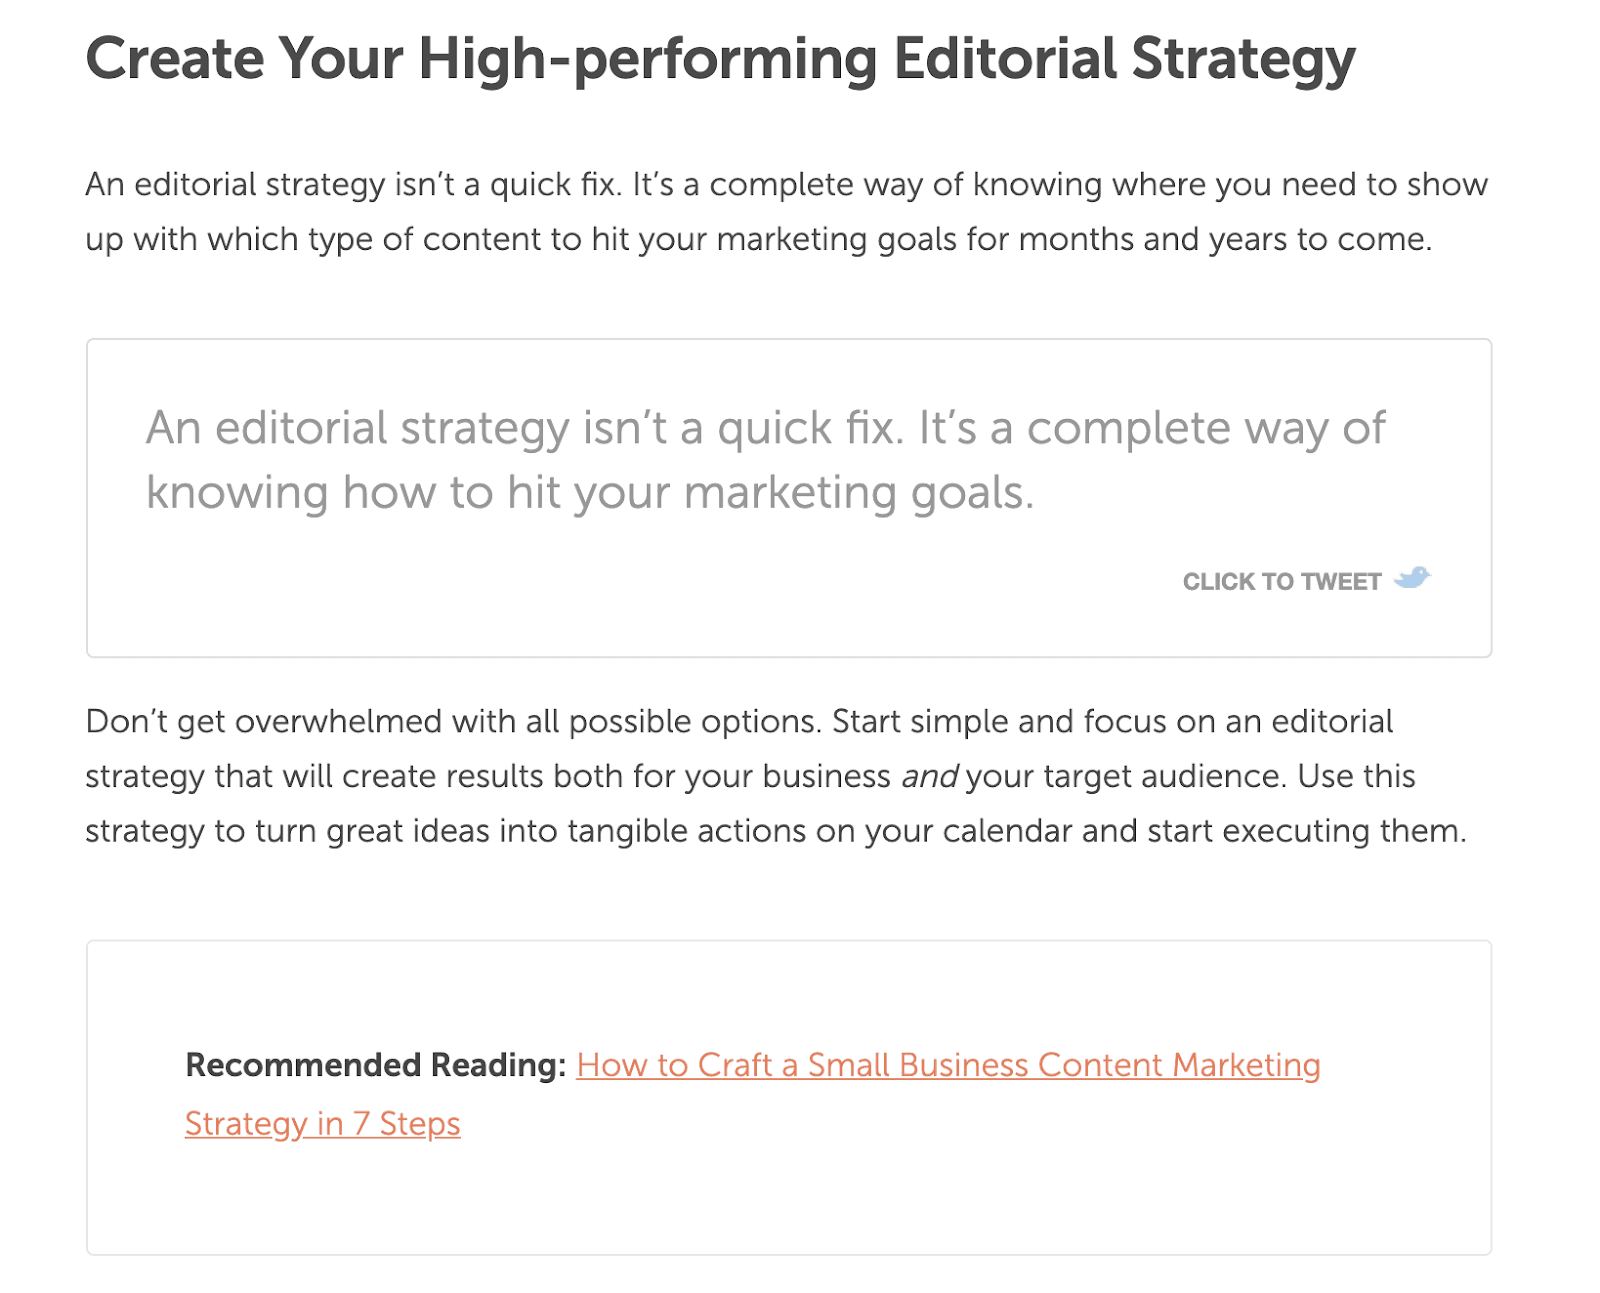
A template will give you a writing action plan. Without it, you’ll end up with lots of blurry lines around your topic and a vague sense of what you’re aiming for with your article. You’ll spend lots of time wondering what to write instead of actually writing. Karen Martin, president of TKMG and author of Clarity First, said in an interview on our Actionable Marketing Podcast that you should “limit how many things you’re working on at any given time. You’ll get more done per unit of time.” This applies to every facet of work, and writing is no different. At CoSchedule, we often remind our readers to focus on a target audience statement in their editorial strategy because it brings clarity and focus to the process. An article writing template does the same — just on a more granular level.3. You’ll Publish Better Content More Consistently
Publishing quality content is the means to an end: your marketing goals. Website traffic, email subscribers, conversion rates, social media engagement… Consistent content will get you closer to almost any marketing goal you can dream of. With an article writing template, you’ll have a process in place for your research and writing so you can hit those goals every month, quarter, and year. And if you don’t have clear marketing goals yet, remember: marketers who set goals are 376% more likely to report success than those who don’t. It’s never too late to start.Recommended Reading: How to Create a Content Publishing Strategy That Gets Results
The 4 Basic Elements of an Article
Work from a template that is both simple and impactful. The one we recommend consists of four basic article elements: a headline, an introduction, article body, and conclusion.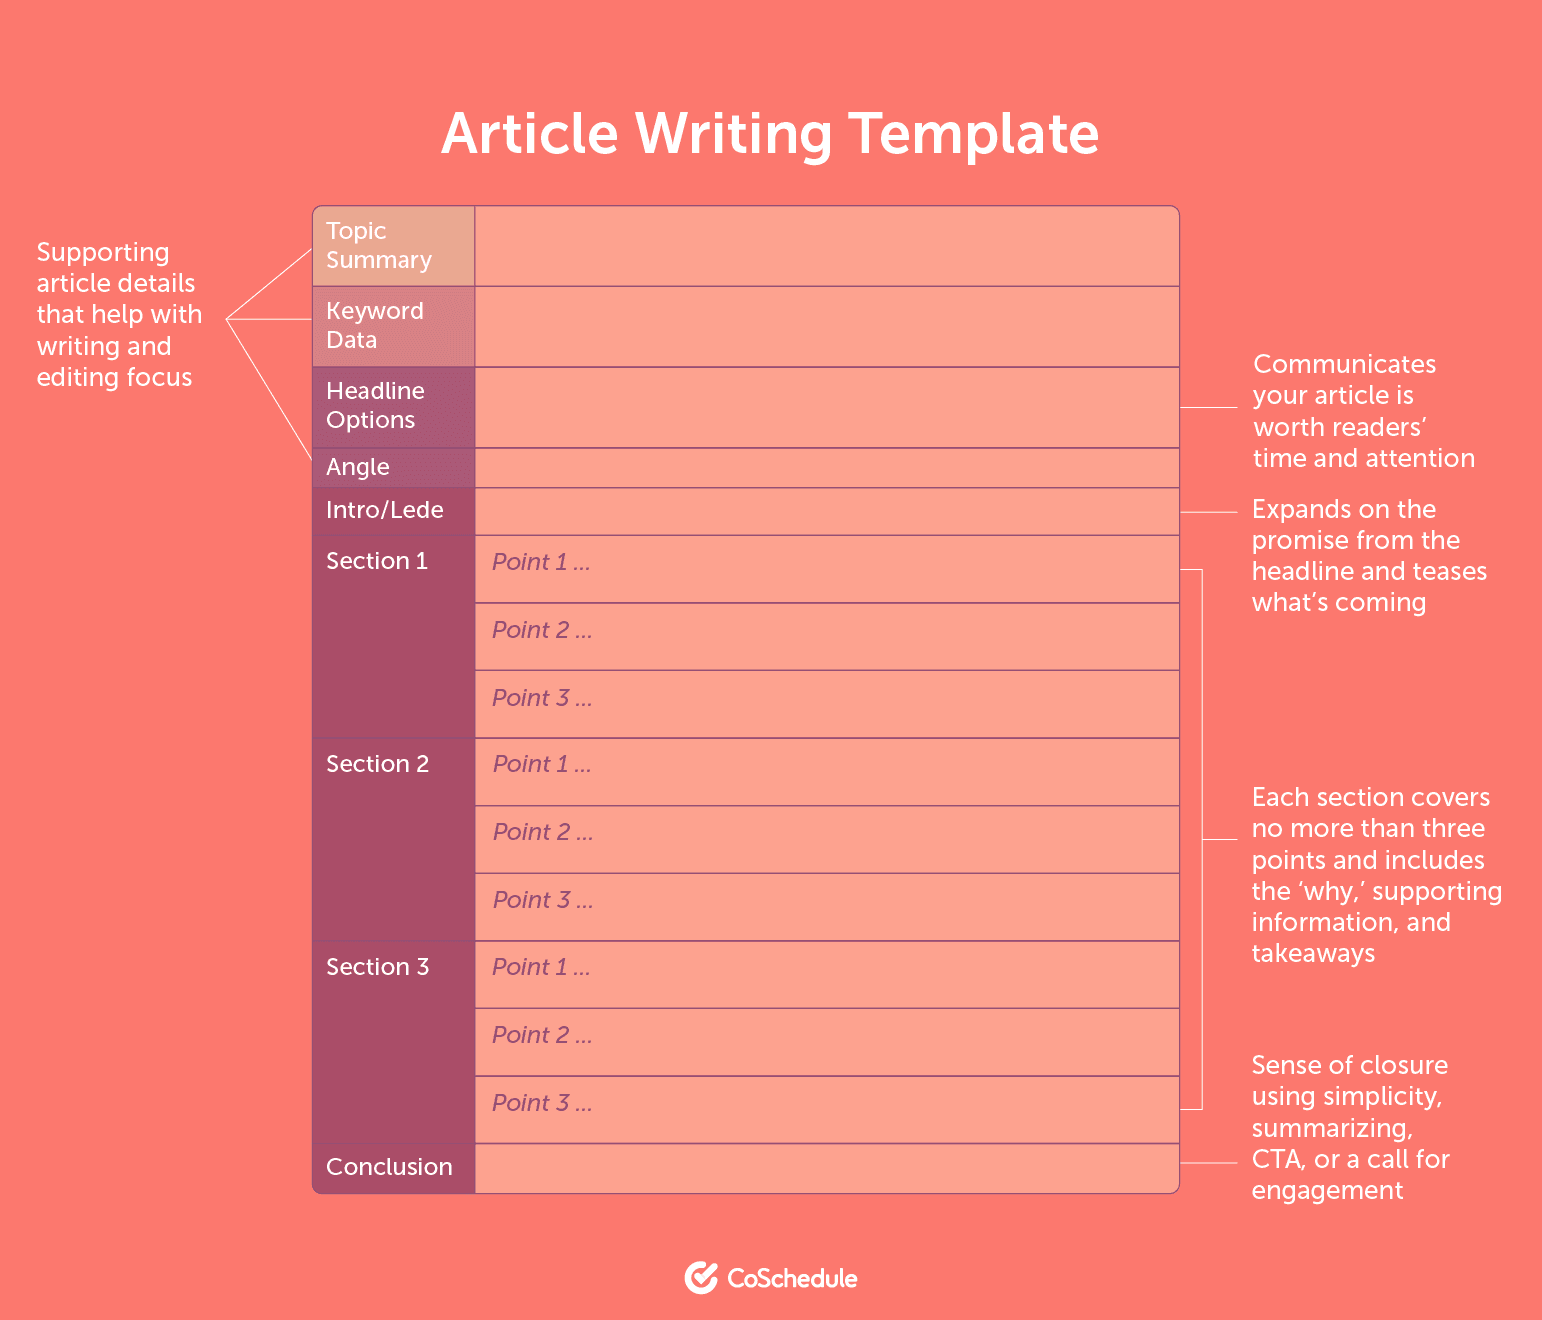
1. Headline
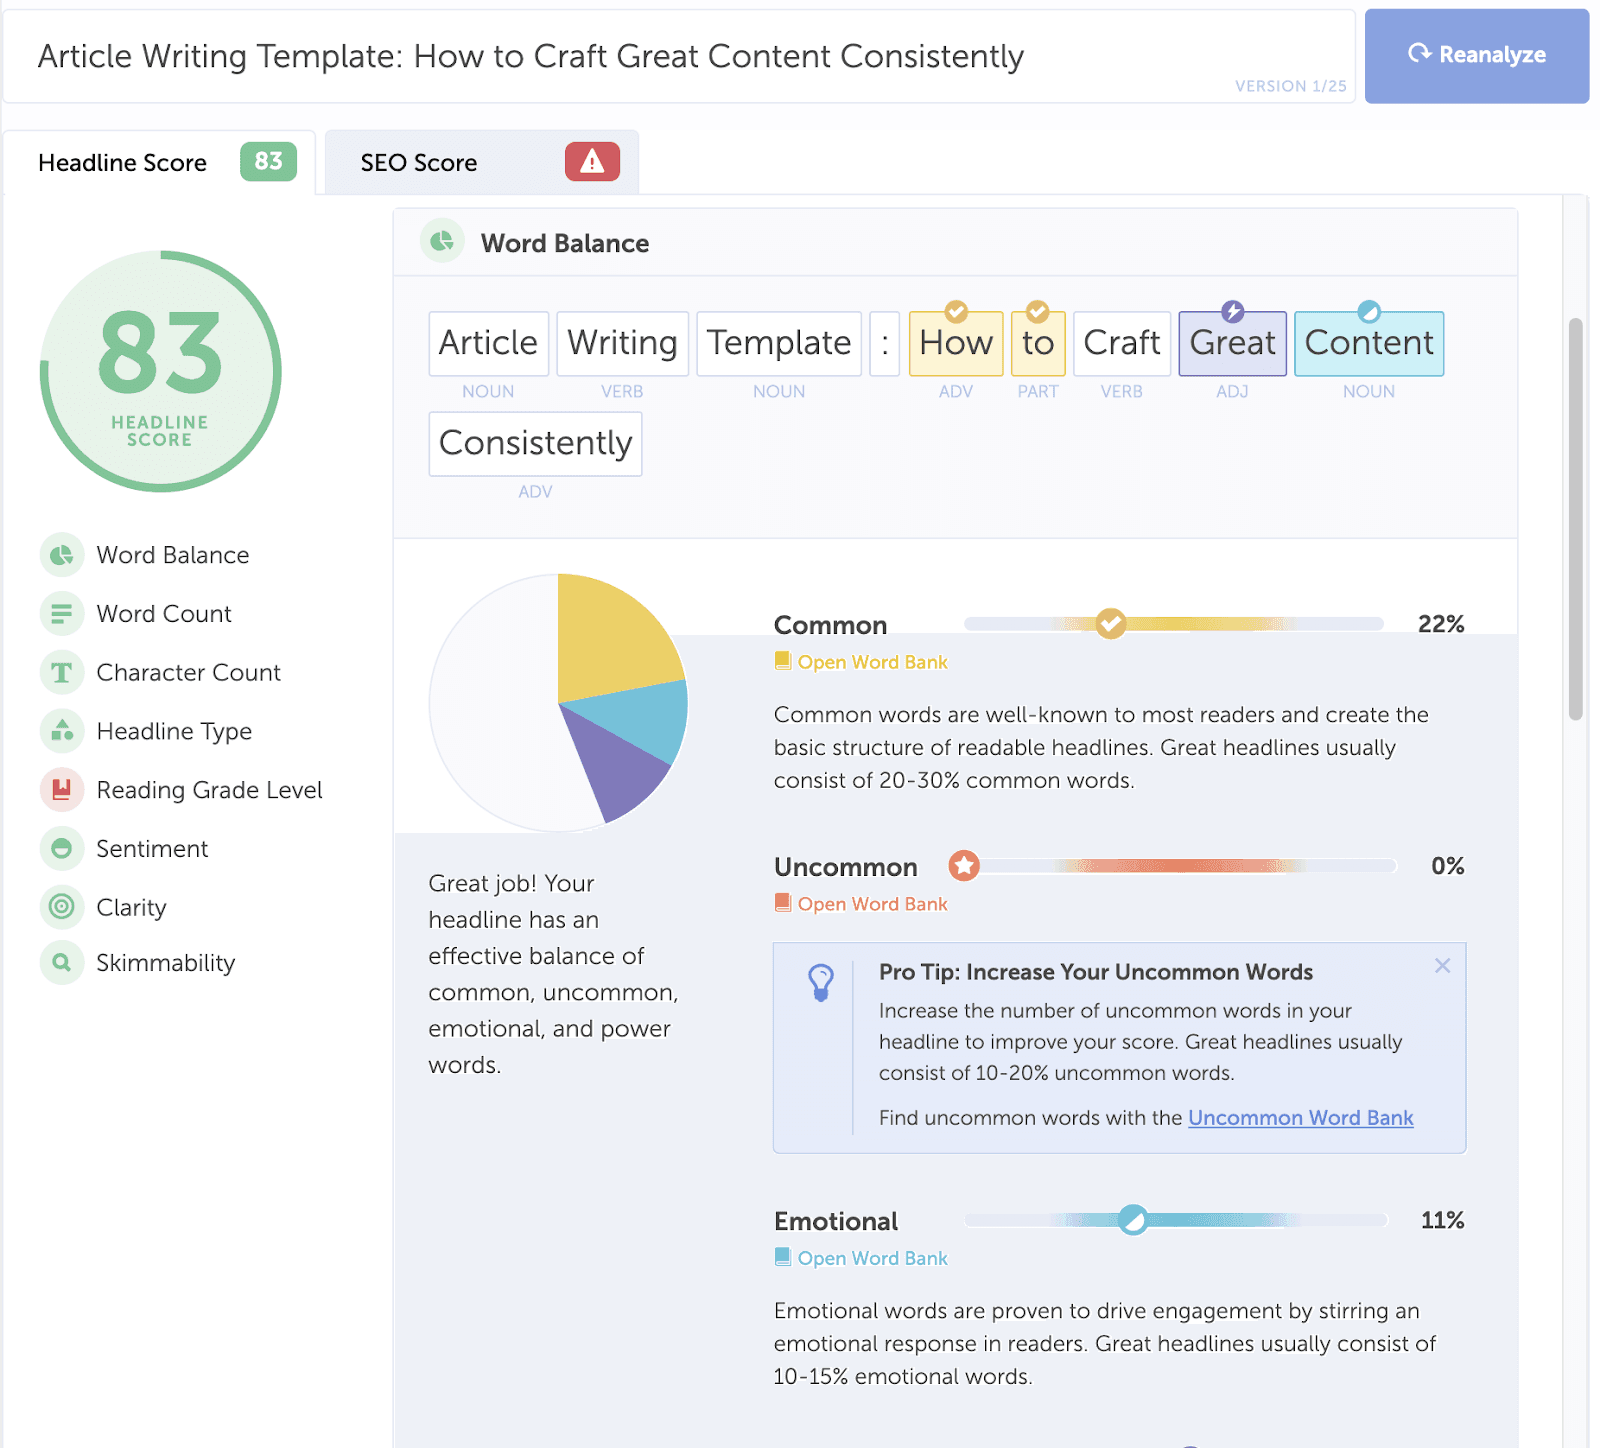
Your headline summarizes your article’s substance. Effective headlines encourage people to click through to your article and share it with their network. They also help you reach your audience organically through search engines. Think of your headline like a storefront on a busy street. The job of a storefront is to attract people into the store as they walk by. It has to appeal to what a passerby wants, needs, or is curious about. Your headline is no different: it has to convince a potential reader that the investment of their time and attention to read your article will be worth it and that you wrote it with them in mind.Elements of a powerful headline:
-
-
- Word balance: a mix of common, uncommon, emotional, and power words
- Length: optimized for visibility and click-throughs on search engines and social media
- Type of headline: experiment with types of headlines like ‘“why” headlines, how-to, and question headlines
- Clarity and skimmability: simplified for easy reading and understanding at a glance
-
Recommended Reading: 50+ Headline Formulas and Templates to Make Writing Your Next Title Easy
2. Introduction (The Lede)
Your introduction, also known in journalism as the lede, is the bridge between your headline and the core of your article.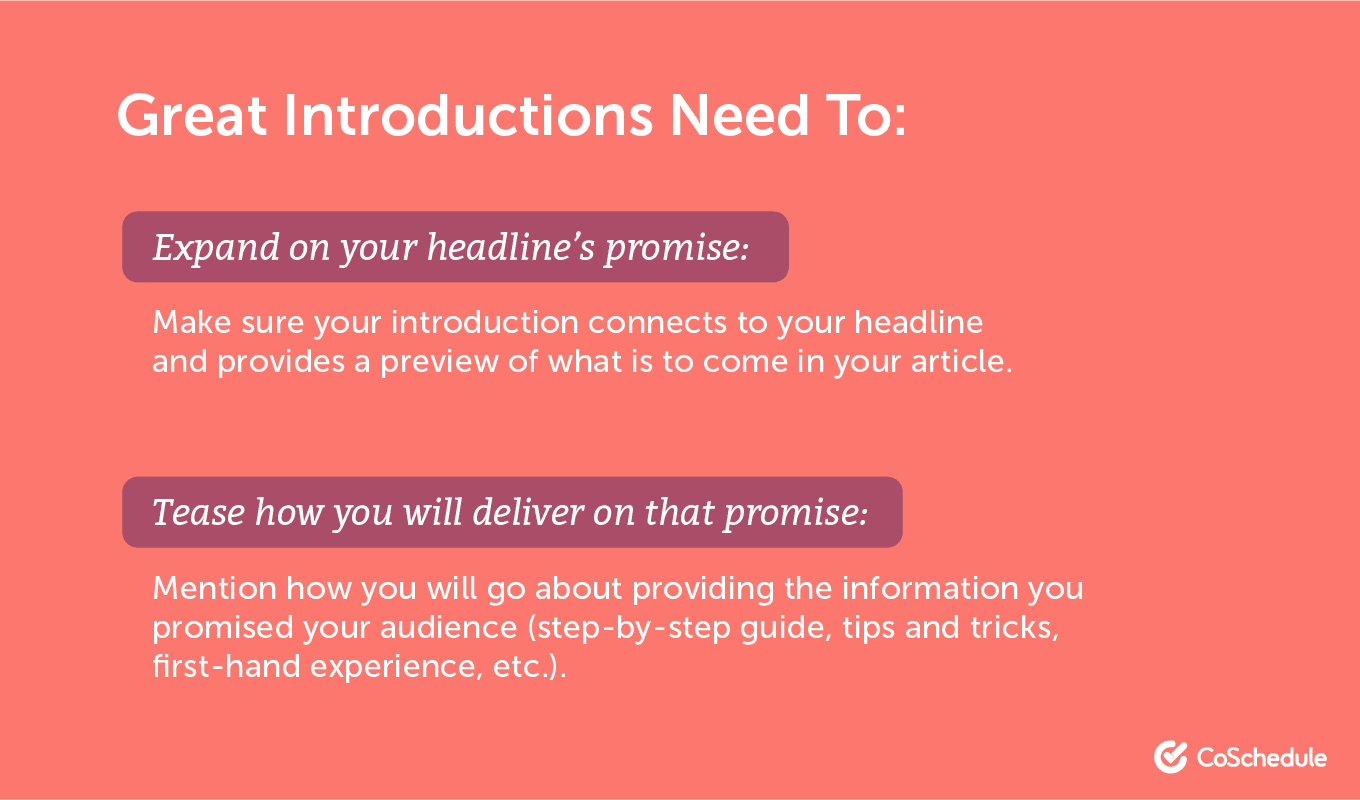
Your introduction, also known in journalism as the lede, is the bridge between your headline and the core of your article.
Click To Tweet-
-
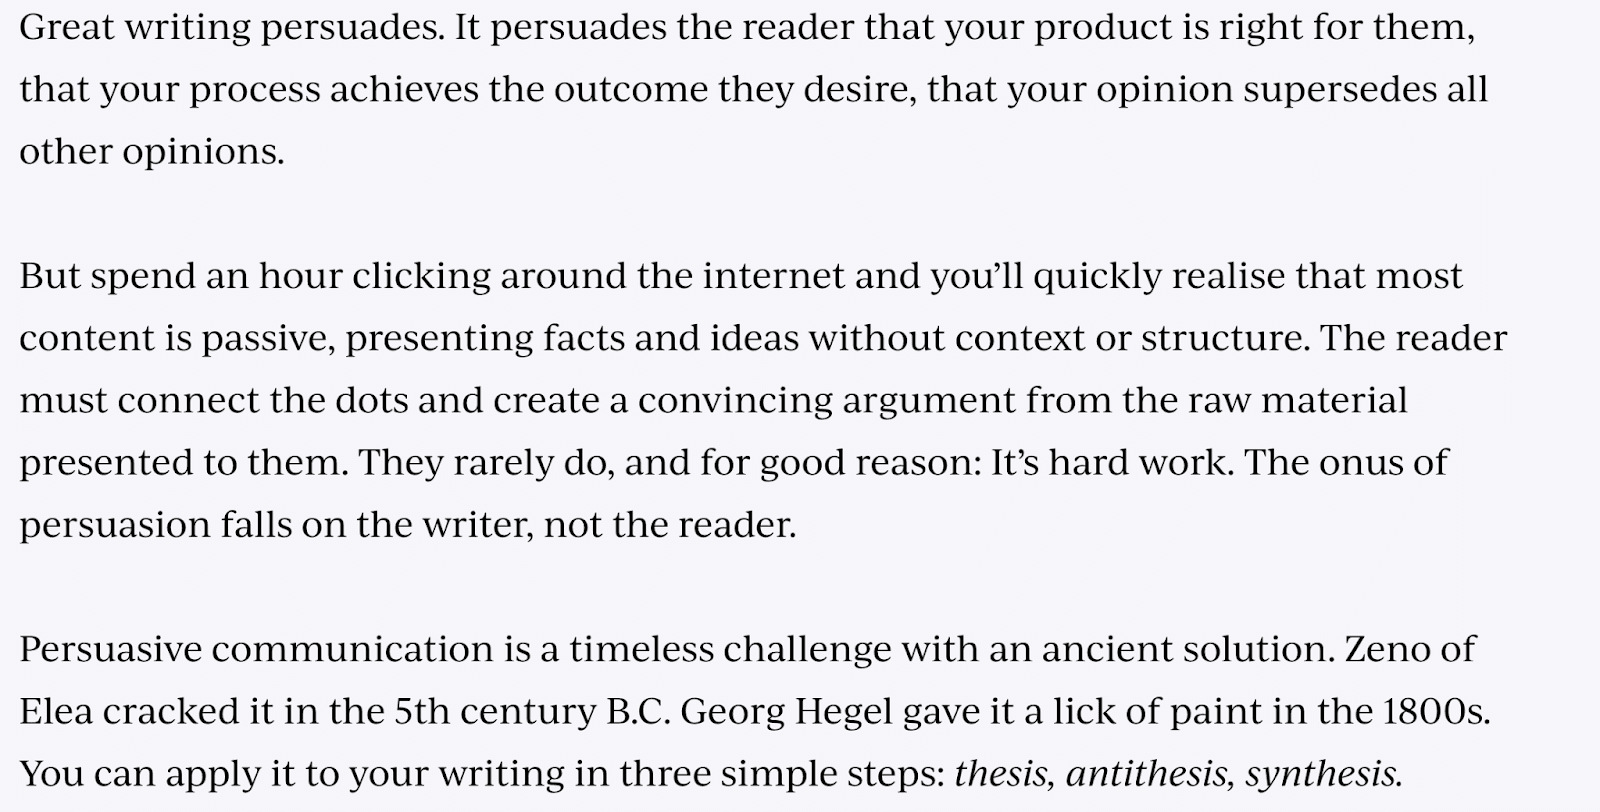
- Thesis: present the status quo, the idea that’s currently accepted and widely held
- Antithesis: articulate the problems with the thesis
- Synthesis: share a new viewpoint, a modified thesis, that resolves the problems and reconciles the two previous paragraphs
-
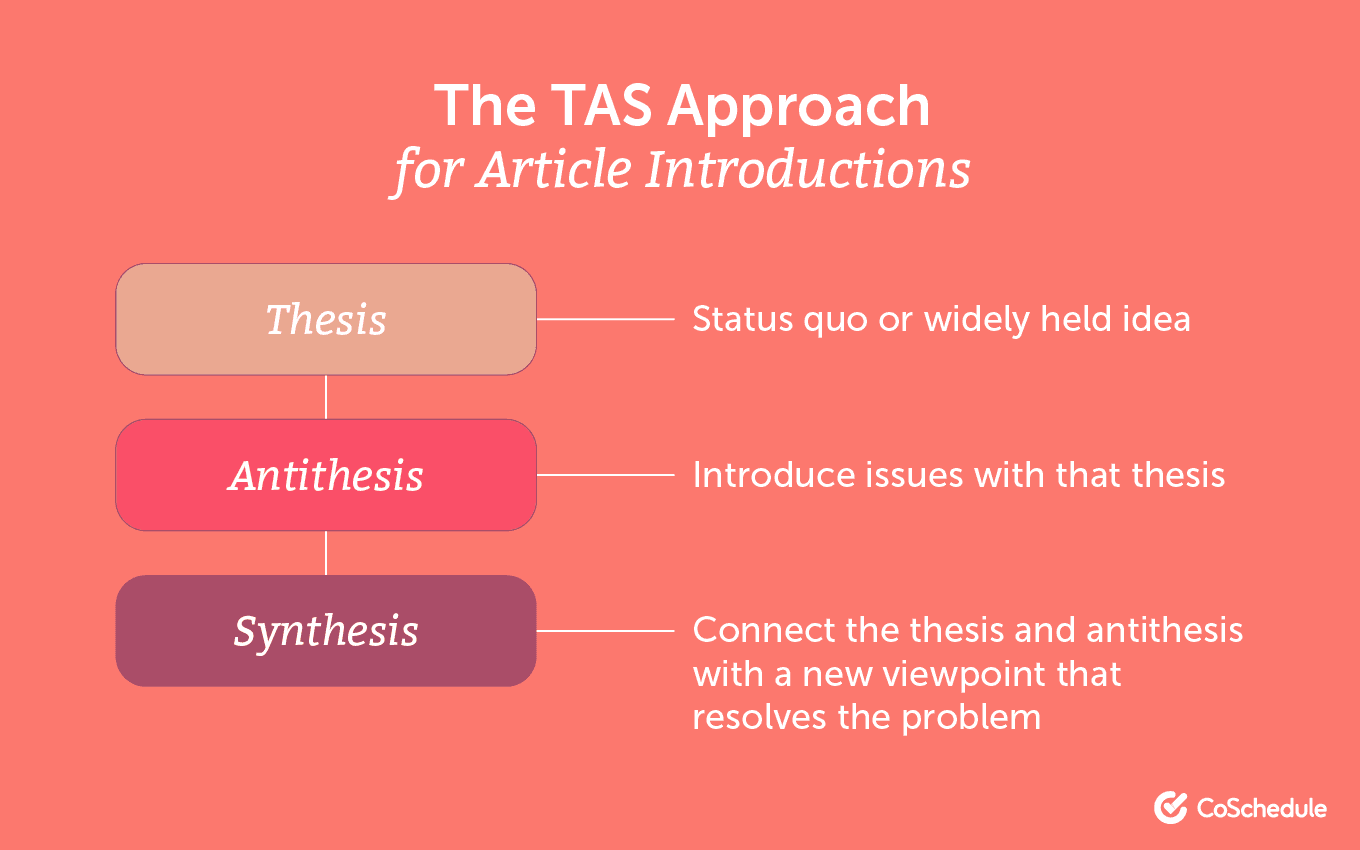 Here’s a meta example of a thesis, antithesis, synthesis introduction in action directly from Ryan’s article:
 Here’s how Laura Bosco, a B2B and ecommerce writer, analyzed a strong article introduction:
Elements she called out fit the TAS approach, too, and they include:Ya know, intros are hard, and I'm still learning how to write 'em well every time. ?
That's why I like picking good intros apart and thinking about how they drew me in. ? Here's one from @TaylorHoliday and why it snared me.? What're some good ones you've seen recently? pic.twitter.com/Sbal9oSVh8 — Laura Bosco (@lauraebosco) February 17, 2021
-
-
- Drawing the reader in the middle of a story with specificity
- Engaging reader’s (uncomfortable) feelings
- Addressing the “what’s in it for me” (WIIFM)
- Backing up bold claims with industry news and data
- Announcing a table of contents
-

3. Body Content
Your article body is what your reader came for; it’s how you deliver on your promise from the headline and introduction. The best way to do this is by using sections, each of which should tie back to something you teased in the introduction, whether in your copy or in the table of contents.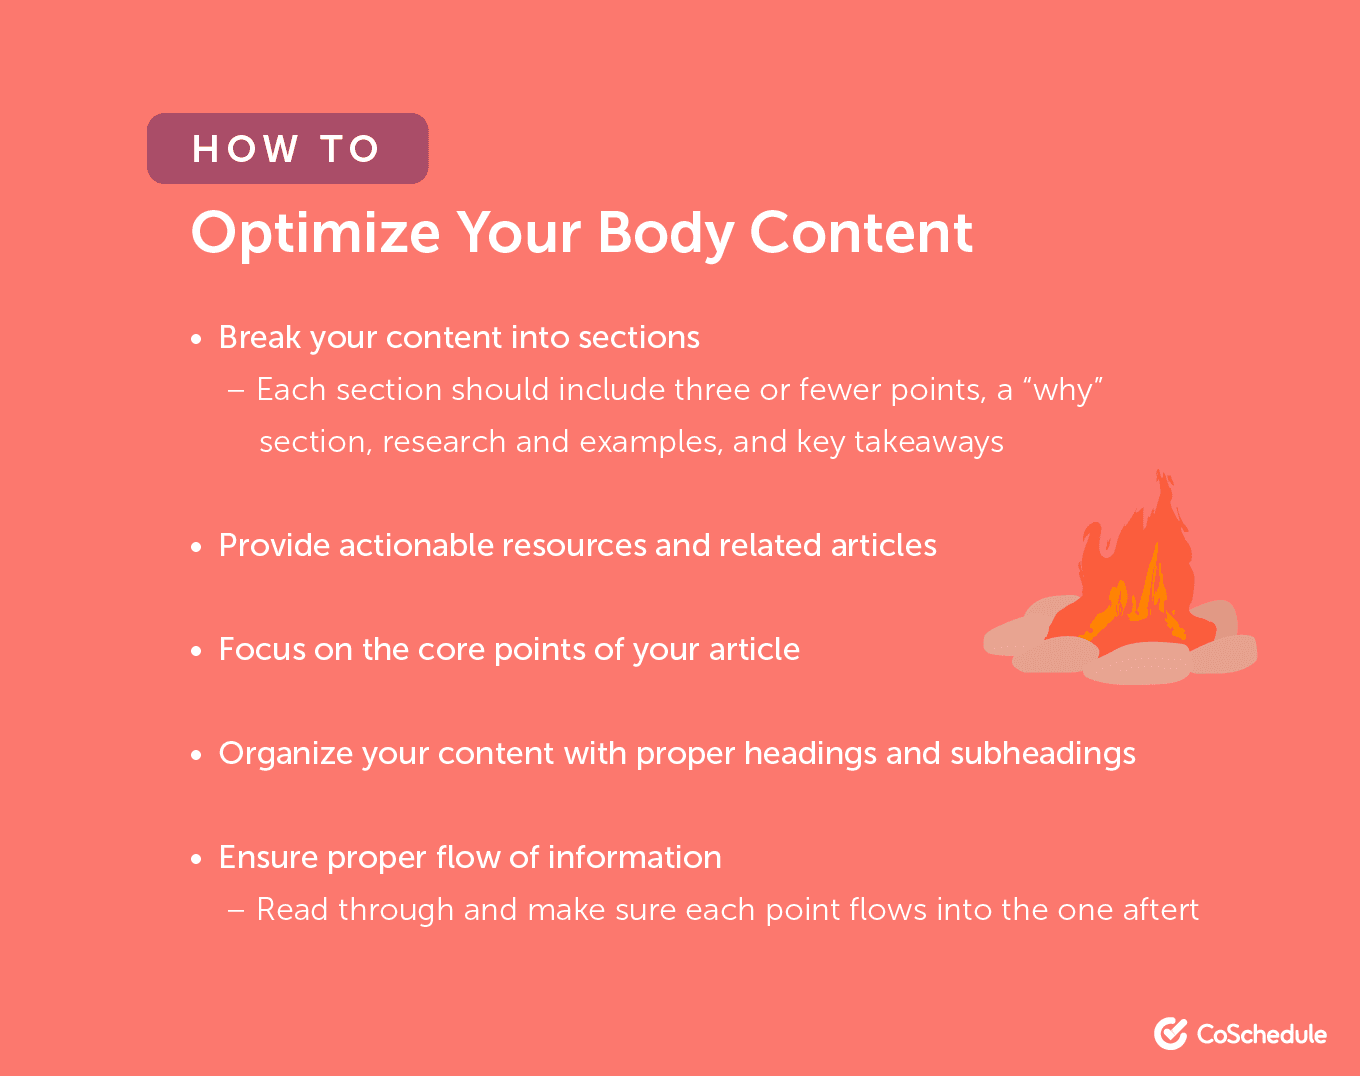 Sections are defined with subheadings. Each section should be a standalone idea that naturally flows from the previous one and sets the stage for the one after it.
Each article section should include:
Sections are defined with subheadings. Each section should be a standalone idea that naturally flows from the previous one and sets the stage for the one after it.
Each article section should include:
-
-
- No more than three key points; if there are more, you can create a new section
- The ‘why’ of the section and how it relates to the topic as a whole
- Research and examples that support your points
- Takeaways for the reader; knowledge they can use or actions they can take
-
-
-
- Screenshots
- Custom images
- Statistics and links to research
- Original examples
- Quotes from relevant people
- Resources like books, videos, talks, podcasts, and more
-
4. Conclusion
Your article conclusion gives your reader a sense of closure. It reinforces the main objective of the article and helps the reader decide what to do next.Your conclusion reinforces the main objective of the article and helps the reader decide what to do next.
Click To Tweet-
-
- Simplicity: nudge the reader to implement what they learned in the article
-
 Conclusion example from Pipedrive
-
-
- Summary: list the takeaways (as bullet points, for example) as a reminder of main points your article made
-
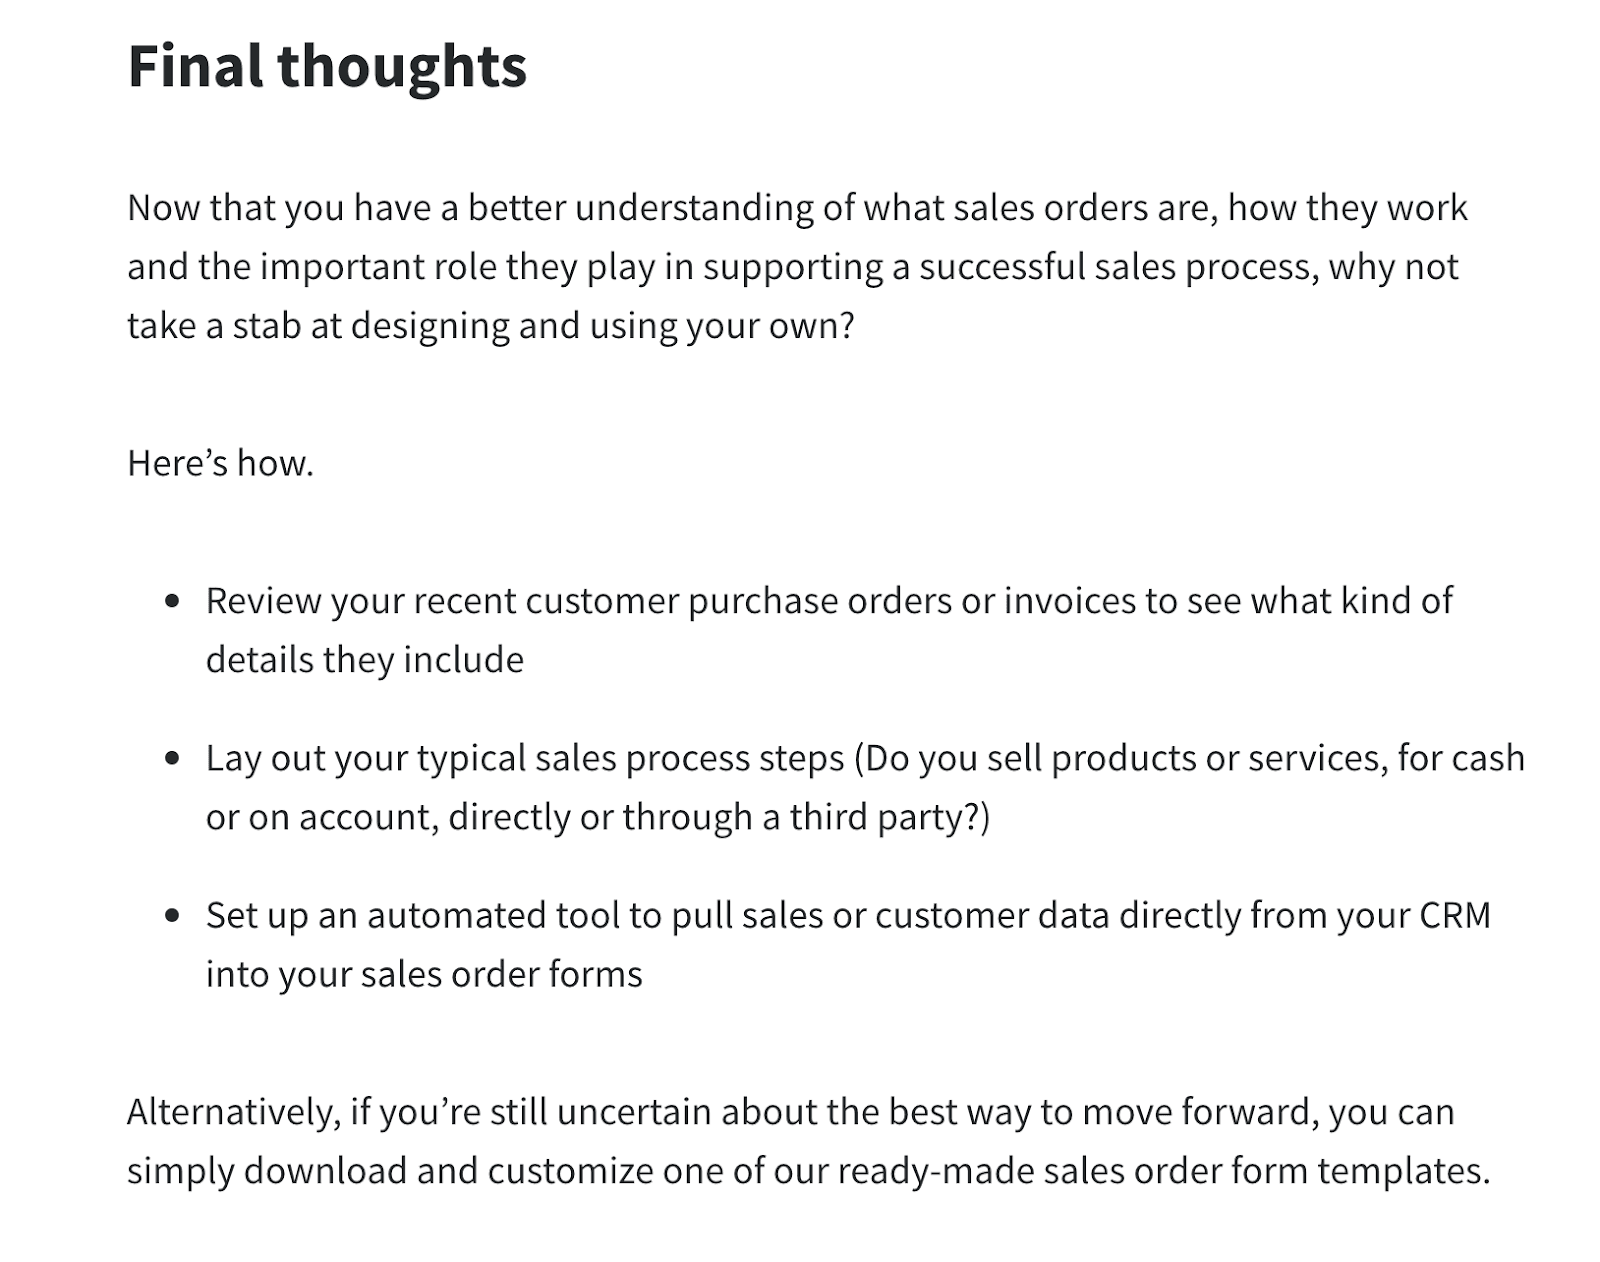 Conclusion example from Pipedrive
-
-
- CTA: drive attention to a high-value CTA, like signing up for a trial or an email list
-
 Conclusion example from Wise
-
-
- Engagement: point to your other relevant resources and/or encourage sharing on social media
-
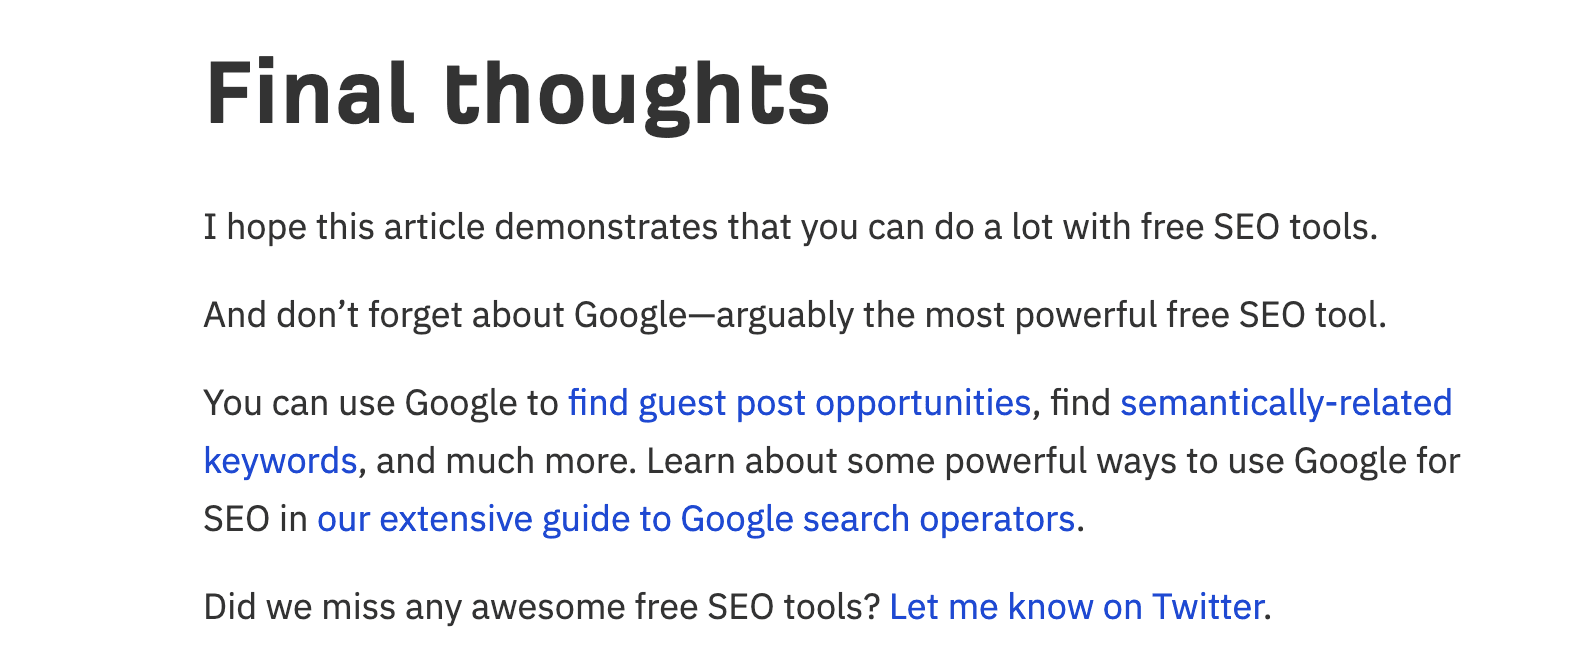 Conclusion example from Ahrefs
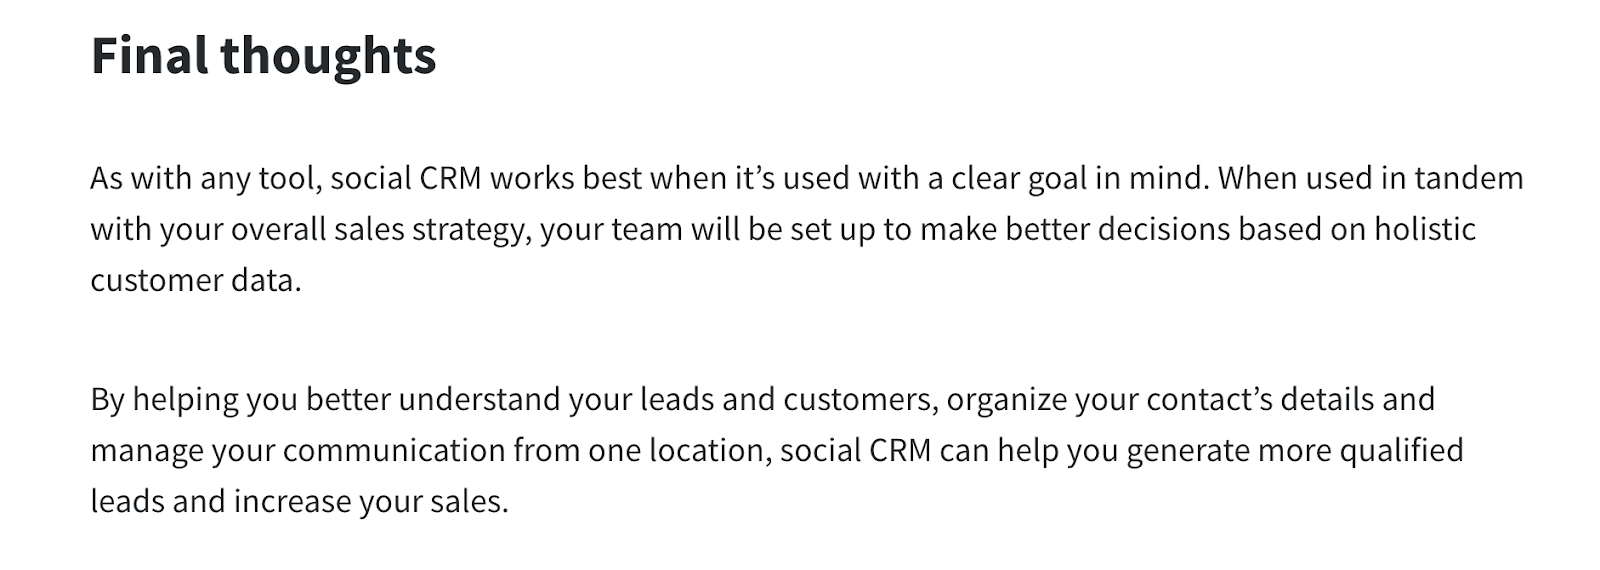
 Conclusion example from CoSchedule’s blog
Your conclusion should leave your reader with a sense of accomplishment and tie back to the promise you made in your headline and introduction.
Conclusion example from CoSchedule’s blog
Your conclusion should leave your reader with a sense of accomplishment and tie back to the promise you made in your headline and introduction.
The Article Writing Template You Need to Write Clearly and Efficiently
When you grab your copy of the article writing template, you’ll have a head start when writing your next article. Here’s how to use its first section to define your article:-
-
- Topic summary: Describe your topic in one or two sentences. This is your starting point for everything you’ll do for this article. For example: “This blog post will show users how to achieve [goal] using [downloadable resource].
- Keyword data: What do your readers type into a search engine when looking for an article like yours? List these keyword variations here and add data like search volume and keyword difficulty if you can.
- Headline options: Remember that the more headlines you write, the better options you’ll end up with. List your best options here.
- Angle: You can tackle the same topic from dozens of angles, for example: beginner or advanced, list of tips, step-by-step, case study, product-focused, interviews, comparisons, a different take on a widely accepted stance, etc. Use this field to choose what you’ll focus on.
-
3 Additional Tips to Increase Content Writing Efficiency
Here are three more tips for maximum focus and efficiency in your content creation.Plan Every Piece on an Editorial Calendar
In the words of our very own Garrett Moon, creating content consistently without a calendar is like driving a car without a steering wheel. An editorial calendar will give you tangible deadlines for creating impactful content, instead of just relying on “whenever you get the chance.” It will also allow you to:-
-
- Plan and run coordinated content campaigns and themes so you can support your company’s marketing and business goals
- Manage and balance your team’s workload for maximum efficiency
- Share your content marketing efforts and progress with higher-ups
-
Conduct Basic Keyword and Topical Research
Spend some time understanding the words and phrases your ideal readers use to search for topics you’re writing about. If you don’t know where to start with keyword research, here are some pointers:-
-
- Define your core term (like Austin restaurants) and modifiers (like vegan, Italian, downtown)
- Use a tool like Serpstat to find keywords with high search volume and low competition
- Analyze if a keyword ranks for articles or home/product pages (home/product pages are harder to compete with)
- Analyze if the search results are packed with huge websites like Wikipedia, BuzzFeed and similar as they are hard to outrank
- Analyze keyword intent: informational, transactional, or navigational
-
Use an Editing Checklist to Make Editing Fast and Efficient
Make it easy to edit and proofread your articles with an editing checklist. This way, anyone on your team or any future hire can take care of editing—not just you. Here are some editing tips to add to your checklist:-
-
- Remove passive voice
- Read your article out loud to check your flow, syntax, and the authenticity in your writing voice
- Remove unnecessary words
- Shorten paragraphs and experiment with various sentence lengths
- Remove unnecessary adverbs
- Replace jargon with specific and simple words
-


