How to Create Amazing Content Upgrades for Your Blog

 If you know anything about online marketing, you are aware of the power of email.
After all, email has a 3800% ROI.
Yes, email is that powerful. But in order to use email to grow your business, you first need to have an email list. And to get one, you need to acquire subscribers.
There are many tactics you can use to get more subscribers for your email list, but there's one that has been the darling of the online marketing world for the past few years.
I'm talking about content upgrades.
If you don't know what they are, I will explain you everything you need to know about them.
Let's get started.
If you know anything about online marketing, you are aware of the power of email.
After all, email has a 3800% ROI.
Yes, email is that powerful. But in order to use email to grow your business, you first need to have an email list. And to get one, you need to acquire subscribers.
There are many tactics you can use to get more subscribers for your email list, but there's one that has been the darling of the online marketing world for the past few years.
I'm talking about content upgrades.
If you don't know what they are, I will explain you everything you need to know about them.
Let's get started.
How to Create Amazing Content Upgrades for Your Blog
Click To TweetWhat Content Upgrades Really Are
A content upgrade is any kind of extra content that your blog's visitors can get access to in exchange for their email address. In a way, they resemble to lead magnets, in the sense you send them something for their email address. But what sets them apart is what makes content upgrades so effective. First of all, a content upgrade needs to be relevant to the content piece that visitors are already consuming. Then, they need to add extra value to the reader for free.Content upgrades need to add extra value to the reader
Click To Tweet- Brian Dean from Backlinko increased his conversion rate from 0.54%. to 4.82%.
- Clay Collins, co-founder of LeadPages, said that content upgrades were the number one factor in growing their email list.
- James Scherrer from Wishpond, found content upgrades convert their visitors 575% better compared to the articles that don't feature one.
 This is how CoSchedule uses content upgrades, and they do it great.
Now you know what they are and well they work, I will show you how you can create one to start getting these same results.
This is how CoSchedule uses content upgrades, and they do it great.
Now you know what they are and well they work, I will show you how you can create one to start getting these same results.
Recommended Reading: 113 Content Types to Organize With Your Marketing Calendar
How to Create Content Upgrades for Your Blog
Step #1: Define the Problem Your Content Is Solving
As you already know by now, content upgrades have to be relevant to your visitors' problems. As a consequence, before you create your content upgrades, you need to make sure you know what these problems are. You may think you know, but you need to be 100% sure to be able to improve your conversion rate and make your visitors happy. In order to find your visitors' problems, you need to ask yourself a few questions that will help you dig deeper on the problem at hand:- What is the content piece about?
- What is the audience?
- What problem is your content trying to solve?
- What are you trying to teach them?
- What can you teach them?
- This article is about what content upgrades are and how to use them to get more email subscribers.
- The audience is made up of bloggers, content marketers, and marketing managers that are trying to grow their email list.
- Your problem is you want to grow your email but you can't or don't know. You may also want to grow it faster than you currently are.
- I'm trying to teach you how to grow your email list with a technique called content upgrades.
- I can teach you why they are so powerful because I have case studies to show, and also how to implement them because I have done it many times in the past.
Creating content upgrades? Ask, "How can I deliver extra value?
Click To TweetStep #2: Develop the Content Piece
In this step, you only need to do what you normally would: you create your content. Since you already know the problem you are trying to solve, you only need to deliver that solution within your content piece. In the case of this article, it took me over 2k words to deliver all the value I could to help you solve your problem: growing your email list. Now, it's time to see how we can expand this value through the content upgrade.Step #3: Expand the Value
You may know what problems your audience have, and you have already created the solution to that problem in the form of an article. Now it's time to expand on its value. First of all, remember there's a finite amount of problems you can solve for your audience, mainly because your audience is (and should be) finite as well. If you have ever created buyer personas for your blog, you know you need to target your content towards a small group of people with a clear set of problems. With that said, you need to ask yourself, how will overdeliver on your value? Just giving them a PDF without adding anything extra won't make much of a difference on your visitors' life. Always focus on adding more value, so it's a no-brainer for your visitors to download your content upgrade. The easiest way to expand on the value of your content piece is by taking the biggest lessons and insights, and make them better. There are plenty of ways you can do that:
- Expand on the insight
- Make it more actionable
- Make it easier to understand
- Show a step-by-step process of how you can implement it
- Show pictures of how it's done
- Show videos of how it's done
- Provide templates
- Provide transcriptions
- Provide a mind map with all the insights or concepts
- Create a graphic explaining them
Recommended Reading: The 6 Types of Social Media Content That Will Give You the Greatest Value
Step #4: Define the Type of Content Upgrade
Before we move on to the creation of the content upgrade, which is the one that most people focus on first, you need to define what kind of content upgrade you will create. Here's the thing, there are many types of content upgrades you can use. There's no right or wrong content upgrade per se, as it depends on your content piece, your style, and the value you are giving away. The most common ones are:- Article in PDF
- Audio version
- Cheat sheet
- Checklist
- Resource list
- Templates
- Transcription
- Video
- Worksheets
Optin Monster
 Type: Cheat Sheat
Article: 700+ Power Words That Will Boost Your Conversions
Value: Get the each of the 700 words in one simple list, organized by type.
Type: Cheat Sheat
Article: 700+ Power Words That Will Boost Your Conversions
Value: Get the each of the 700 words in one simple list, organized by type.
Backlinko
 Type: Checklist
Article: SEO Strategy Case Study (#1 Ranking & 963% More Traffic)
Value: Take a step-by-step look of the specific actions you need to implement to get more inbound links with guesto-graphics.
Type: Checklist
Article: SEO Strategy Case Study (#1 Ranking & 963% More Traffic)
Value: Take a step-by-step look of the specific actions you need to implement to get more inbound links with guesto-graphics.
Video Fruit
 Type: Video training
Article: Expanded Guest Post: How to 100x the effectiveness of your next guest post
Value: See a video screencast with Bryan Harris implementing the steps mentioned in the article to expand the value of the guest posts.
Type: Video training
Article: Expanded Guest Post: How to 100x the effectiveness of your next guest post
Value: See a video screencast with Bryan Harris implementing the steps mentioned in the article to expand the value of the guest posts.
Nerd Marketing
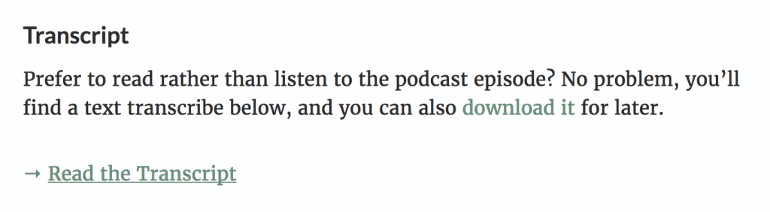 Type: Audio transcription
Article: Podcast 27: A “One-Two Punch” Email Campaign to Increase Order Frequency
Value: If you can't listen to the podcast, or prefer to read and not listen (like I do), read a word-by-word transcription of the email campaign Drew Sanocki uses to increase order frequency.
Type: Audio transcription
Article: Podcast 27: A “One-Two Punch” Email Campaign to Increase Order Frequency
Value: If you can't listen to the podcast, or prefer to read and not listen (like I do), read a word-by-word transcription of the email campaign Drew Sanocki uses to increase order frequency.
LeadPages
 Type: Worksheet
Article: The Unique Content Process: How To Write What No One Has Ever Written
Value: Find the most important insights of the unique content process explained in the article without having to sift back through the post later.
Type: Worksheet
Article: The Unique Content Process: How To Write What No One Has Ever Written
Value: Find the most important insights of the unique content process explained in the article without having to sift back through the post later.
Recommended Reading: How to Generate and Nurture Leads With Brittany Berger from Mention
Step #5: Create Content Upgrade
Now that you have everything in place, it's time to (finally!) create your content upgrade. Here's when you want to take some time to make sure you make your content upgrade as awesome as possible. After all, if you are giving away a lot of extra value, you can't do it while you are multitasking or in between calls. When creating your content upgrade, there are a few different roads you can take, from the best and most expensive to the cheapest (and probably worst quality).Hire a Designer
This is probably the best way to go. Unless you are a designer yourself, you don't have the skills nor time to create a good-looking content upgrade. However, if you are going to hire a designer, make sure to get a good one. Remember that you always get what you pay for. If you have a designer in-house, then this is a no-brainer for you. But if you don't, it may end up being a bit expensive for you. Still, it may be worth the investment.If you are going to hire a designer, make sure to get a good one.
Click To TweetUse Beacon
One tool that was created just to create content upgrades and lead magnets is called Beacon. It's probably one of the best-hidden marketing tools out there, so I highly recommend you take a look at it. It's a bit buggy, but it does its job at a good price. It has everything you need for any kind of content upgrade you want to create. They let you import your content, pick a template, customize it, and once you have it finished, you only need to click "Save" and "Export PDF" and you are done. If you end up downloading my content upgrade at the bottom of the article, you will see how their content upgrades look like.
Use Canva
Canva is like Photoshop for amateurs (like me). You can make some pretty neat designs, and if you are creative enough, you may end up with a cool simple design. This is best for small checklists and the like, not for long or complex ones.
Do It Yourself
You can always fall into the common DIY trend and try to do something with Word, Pages, iBooks Author or Photoshop. Depending on your skills, this may be a good idea or not. If you are like me, it's probably not. I used iBooks Authorfor a while, and it worked pretty well. But they didn't look very professional, so I stopped using it once I started with Beacon. You can still use these tools for simple resource lists and PDF versions, not for checklists and worksheets, or any other more complex kind of content upgrade.Step #6: Create Landing Page
If you remember what I said in the beginning, you give out content upgrades in exchange for someone else's email. But where do you make this exchange? It's not that your visitors will send you a postcard with their email address so you can add them to your list in 3 to 5 business days. That's a bit old-fashioned, don't you think? You need to do it in a convenient and seamless way. That's what landing pages are for. You create a page just for people to visit, put their email information, and download the content upgrade. My favorite tool to do this is by far LeadPages. You only need to pick a template, put the copy where it belongs, add your content upgrade, create a simple autoresponder email sequence, and publish it. This is how you do it: First, open an account with them. They don't have a free trial, rather they offer a 30-day money back guarantee. Either way, I highly recommend you spend the money on their tool, as it's one of the best and most fundamental pieces of any online marketing campaign. Once you have opened your account, you will be taken to My Page, which is kind of a dashboard for your account. Before creating the LeadPage, we need to add the content upgrade. To do that, click on your username on the right, and click "Lead Magnets". Click on "Create New Lead Magnet" button on the right. Then, give your lead magnet a name, upload it, choose a sender email and name. Finally, add a simple message that the recipients of the email will see when they get the content upgrade on their email account. Don't overcomplicate this, because you can change it later.
Once you are done with this, go back to the LeadPages page and click on the "Create New Page" button.
Click on "Create New Lead Magnet" button on the right. Then, give your lead magnet a name, upload it, choose a sender email and name. Finally, add a simple message that the recipients of the email will see when they get the content upgrade on their email account. Don't overcomplicate this, because you can change it later.
Once you are done with this, go back to the LeadPages page and click on the "Create New Page" button.
 Then, pick any of the dozens of free templates they show you. Filter by "Opt In" and sort by "Highest Converting". Pick one of the first ones you see.
 For the sake of this example, I will use this article to create the landing page. As you can see below, I simply added the name of this article in the landing page's title, and nothing else. Before clicking the "Publish" button, we need to integrate the content upgrade.
To do so, click the CTA button and then the little link icon that shows up below it. Then, click the "View/Edit" button as you can see below.
For the sake of this example, I will use this article to create the landing page. As you can see below, I simply added the name of this article in the landing page's title, and nothing else. Before clicking the "Publish" button, we need to integrate the content upgrade.
To do so, click the CTA button and then the little link icon that shows up below it. Then, click the "View/Edit" button as you can see below.
 Then, click once again the big CTA button, and when the "Edit Your Form" sidebar shows up to your left, click the "Follow-up" tab. In there, below the "Add a File", choose the content upgrade you previously uploaded. Then, click "Save & Close Form".
 Then I clicked "Publish".
 Just remember people are already sold to your content upgrade, so you don't have to overcomplicate this. Look at my landing page below and you will see. It's uber-minimalistic. Just the name of the article, the download button, and nothing more.
Just remember people are already sold to your content upgrade, so you don't have to overcomplicate this. Look at my landing page below and you will see. It's uber-minimalistic. Just the name of the article, the download button, and nothing more.
Just remember people are already sold to your content upgrade, so you don't have to overcomplicate this. Look at my landing page below and you will see. It's uber-minimalistic. Just the name of the article, the download button, and nothing more.

Step #7: Promote Within Your Post
Now it's time to put the content upgrade where it belongs: in your articles. You need to make sure people know there's something valuable waiting for them. Otherwise, they will most likely ignore it when they see it. You have a few options to do so.Create a Knowledge Gap
This is something I learned from Bryan Harris. He recommends opening what he calls a "knowledge gap", like the one you found at the intro of this article, and then close it at the end, as you can see below. This creates a "gap" in the mind of your visitors that makes them want to scroll down and see what's the article about, and how they can get that extra value.
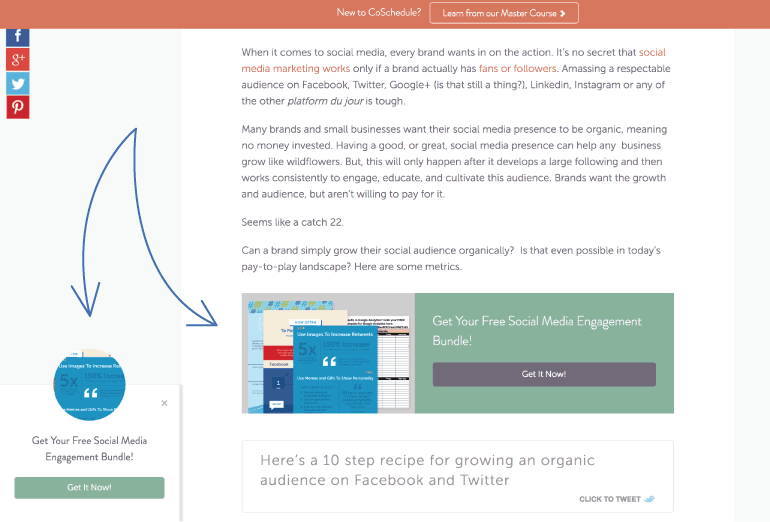
Add Banners and Slide-Ins
Another way is to add a static banner or a slide-in within your article so people "bump" into it as they read. This is what CoSchedule usually does, as I showed you before.Put It at the End (and Hope for the Best)
This is what many people (or most?) do. They just put the content upgrade at the end with just a link, and hope people will find it. Apparently, these people think since they already took the time to create the content, they don't have the time to actually promote it correctly. Don't make this mistake. Make sure everyone finds and click on the link that leads to the content upgrade. Using the awesome Pareto Principle, 80% of your results will come from 20% of your time. This is your 20%, so make sure you use it right. Promote your content upgrade. Grow your list.Promote your content upgrade. Grow your list.
Click To Tweet


