
The CoSchedule mobile app lets you check your tasks, see your calendar one day at a time, update projects and create social messages from your phone. Available on Starter, Professional and Suite.
Set up your calendar on a computer first. If you log in to the app before you have a calendar, it shows “You currently have no calendars.”
Download the app and log in
- Download the CoSchedule mobile app from the Apple App Store or Google Play Store.
- Log in with the email address and password for your CoSchedule account.
The bar at the bottom of the app has three tabs, shown as icons without labels: a checkmark for My Upcoming, a calendar for the calendar, and an Instagram icon on the right for Ready to Post.
Manage your tasks in My Upcoming
My Upcoming is the app's home screen. It lists your tasks. To open it, tap the checkmark at the bottom of the screen.
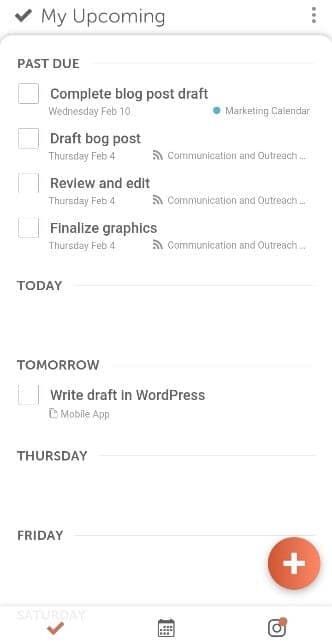
Mark a task complete
Tap the check box next to the task.
Create a personal task
- Tap the orange plus sign.
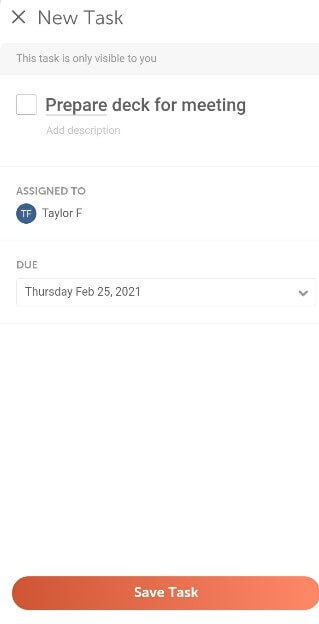
- Enter a name or description for the task.
- Add a due date if you want one.
- Tap Save Task.
Tasks you create in My Upcoming are assigned to you.
Edit or delete a task
- Tap the task's description.
- Change the name, description or due date.
- Tap Save Task.
To delete a task, open it and tap the trash can icon in the upper right.
Use the calendar
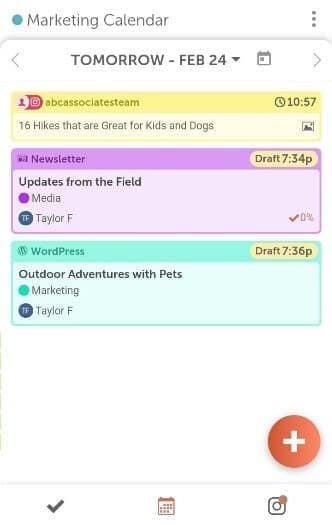
To open the calendar, tap the calendar icon at the bottom of the screen. The app shows one day at a time. Tap the date at the top to pick a day, or use the arrows to move one day forward or back.
Create a social message
- On the calendar, tap the orange plus sign.
- Choose Social Message.
- Write your message.
- Choose when it publishes, as you would on the web.
- To add a color label or add the message to a ReQueue group, tap the dot menu.
- Choose Color Label or Add To ReQueue Group.
Create a standalone task
- On the calendar, tap the orange plus sign.
- Choose Task.
- Enter a title for the task.
- Assign it to a team member.
- Add a due date if you want one.
- Tap Save Task in the bar at the bottom of the New Task screen.
Save Task is hidden while the keyboard is open, so close the keyboard to see it. You can't tap it until the task has a title.
Tasks you create on the calendar are standalone tasks. To add a task to a project, open the project instead.
Work on a project
Tap a project card on the calendar to open it. You can change these details:
- Title: tap the title.
- Description: tap the description, or tap Show Details to add one.
- Tags: tap Show Details under the project title.
- Project type: tap the project type icon in the upper right corner.
- Color label: tap the color label.
- Owner: tap the owner's initials in the upper right corner.
- Status, date and time: tap the calendar icon in the upper right corner.
Social messages in a project
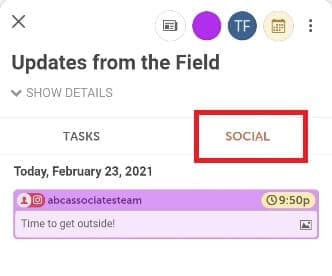
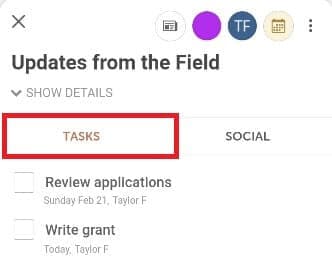
Tap Social to see the project's social messages. Tap a message to edit or reschedule it, or tap the orange plus sign to create one in the project.
Tasks in a project
Tap Tasks to see the project's tasks. Tap a task to edit it, or tap the orange plus sign to create one. You can assign project tasks to yourself or to team members.
Project attachments
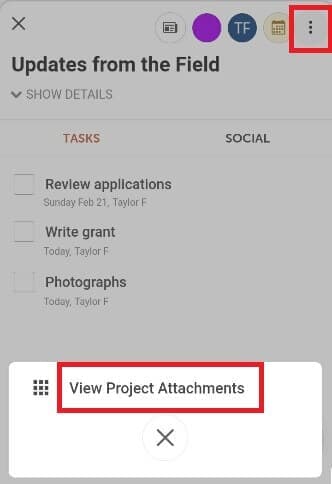
- Tap the dot menu in the upper right corner.
- Tap View Project Attachments.
You can view attachments in the app, but not edit them.
Publish Instagram posts from Ready to Post
Ready to Post lists the Instagram messages you scheduled for push notification publishing, so you can finish each one in the Instagram app. To open it, tap the Instagram icon on the right of the bar at the bottom of the screen. A dot on the icon means something new is waiting. Ready to Post shows only on plans with social publishing.
To turn on notifications and publish, see Publish to Instagram with mobile push notifications.
What you can't do in the app
Use CoSchedule in a web browser to:
- Approve social messages. If your role is Approver, the app shows nothing, so approve messages in a browser.
- Connect or reconnect social profiles.
- Change your plan, update billing or cancel your subscription.
- Search your calendar.
- Comment on tasks.
- Create social messages for YouTube Shorts, Google Business Profile, TikTok or Mastodon.
The app also needs an internet connection; it doesn't work offline.
Fix common problems
Push notifications don't arrive
- Check that your phone allows notifications from the CoSchedule app. Apple explains how in Change notification settings on iPhone, and Google in Control notifications on Android.
- In the app, open Ready to Post.
- Tap the gear at the top of the Ready to Post screen to open Notification Settings.
- Check that the box next to your Instagram profile is checked.
- Log out of the app and log back in.
- If notifications still don't arrive, delete the app, install it again and log in.
Photos or videos won't upload
Give the CoSchedule app access to all your photos, not only selected ones, in your phone's settings. Apple explains how in Control access to information in apps on iPhone, and Google in Change app permissions on your Android phone.