16 Video Marketing Tips That Will Skyrocket Your Traffic

 What’s the one thing people want aside from love and acceptance?
More web traffic, of course!
Okay, maybe that’s overstating the case. But what marketers don’t covet more qualified traffic to their blogs, landing pages, and websites?
None that I know.
Increasing blog traffic is something we CoSchedulers are always working on, as well. And we’ve shared some strategies that work extremely well like nailing your personas and taking data-driven approaches.
Today, I’ll share another angle to attract the right folks at the right time: video marketing.
Why?
Well, some pretty big claims have been made about its effectiveness and future relevance.
For instance, research shows that:
What’s the one thing people want aside from love and acceptance?
More web traffic, of course!
Okay, maybe that’s overstating the case. But what marketers don’t covet more qualified traffic to their blogs, landing pages, and websites?
None that I know.
Increasing blog traffic is something we CoSchedulers are always working on, as well. And we’ve shared some strategies that work extremely well like nailing your personas and taking data-driven approaches.
Today, I’ll share another angle to attract the right folks at the right time: video marketing.
Why?
Well, some pretty big claims have been made about its effectiveness and future relevance.
For instance, research shows that:
- Video will be responsible for 80 percent of the world’s internet traffic by 2019.
- 75 percent of mobile web traffic will be video by 2020.
- And today, 33 percent of all online activity is… you guessed it… watching video.
- How to skyrocket qualified traffic with your video marketing.
- How to extract every ounce of value from your video marketing efforts.
- How to ensure you don’t miss a single tactic available to the savvy video marketer.
16 Video Marketing Tips That Will Skyrocket Your Traffic
Click To TweetFirst, Make Sure to Download Your Free, 7-Resource Video Marketing Kit
There are loads of details, tactics, and how-tos in the tips below. To make sure you get the most out of them, we bundled together some essential tools. Your video marketing kit includes:-
- Video Marketing Checklist Infographic: A rundown for implementing the tactics in this action-packed post!
- 180+ Power Words for Emotional Headlines: Harness the power of emotions to drive traffic and viewers with your video marketing.
- Catchy Blog Titles: Want clicks? Write headlines—and video titles—that stick.
- Content Calendar Template: Stay organized with all written, video, and visual content.
- Social Media Editorial Calendar Template: Keep your social media post organized so you know exactly how—and when—video marketing should take center stage.
- Best Times To Post Infographic: Timing is everything! Learn to post during the “rush hour” times when you’ll have your audience’s attention.
- Micro-Influencer Marketing Checklist: Reach out to thought leaders in your industry to promote your videos with authority.
YouTube Video Marketing Tips
Alright, let’s kick this off with the video juggernaut even our grandmas use: YouTube. If you’re reading this, you’ve probably heard the stat that YouTube is the second-largest search engine on the web. With our collective Google SERP obsession, YouTube is an obvious choice for video marketing. While you can take a deeper dive with YouTube’s Creator Academy, we’ll cut to the chase with seven actionable tips to help you grab views and generate web traffic with your video content.1) Create Awesome YouTube Thumbnails
Even though they’re a seemingly small detail, YouTube thumbnails can make or break your chances at getting clicks. My favorite analogy comes from writer Maria Jose: “The YouTube thumbnail is the 21st century’s book cover.” Thumbnails are the small, clickable pics that visually represent each video.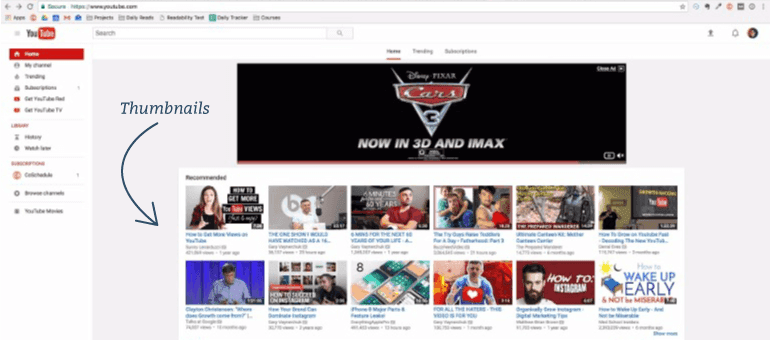 They also have a job to do: click and stick.
Thumbnails need to attract people to click and then stick around to watch it.
Here are five rules of what makes a quality thumbnail:
They also have a job to do: click and stick.
Thumbnails need to attract people to click and then stick around to watch it.
Here are five rules of what makes a quality thumbnail:
- Pair well with the first 10–15 seconds of your video content. People’s attention spans are tiny. So, your thumbnail should closely pair with the beginning of your video for a seamless experience that avoids disorienting viewers.Put simply, you don’t want people scratching their heads wondering, “Is this the right video?”For example, I love this thumbnail from Grant Cardone:
 Not only does it show exactly who the viewer will see within the first four seconds of the video, it also evokes an emotional response with the pair facing off.Which leads us well into rule number two.Exception: If you have a super-duper interesting image from later on in your video, take a chance on using it. In that case, it could act as a teaser and/or reward to keep people watching. Just make sure it’s actually a frame from your video.
 - Use people—especially closeups of their faces—whenever possible. Because people are emotional, they’re affected by emotions. Admit it, you’ve teared up at least once watching a video of a soldier reuniting with his or her family (like this one ?).Psychological research shows that people will mirror both the emotional states and behavior of people they’re positively engaged with.So take this opportunity to put human psychology to work for you by using appropriate, and compelling, close-ups from your video that showcase emotion.
 Video Credit: Actualized.org
 - Think twice about using the same background for a video series and its thumbnails. Take this tip with a grain of salt and use them wisely.Using the same background in your videos—and thumbnails—can occasionally make viewers mistakenly think they’re seeing the same video pop up in a feed or sidebar.Make sure your thumbnails look different enough to avoid missing valuable traffic from such a simple oversight.
- Be brand consistent. Like all of your content, video marketing is another opportunity to build brand awareness through consistent visuals.The Mental_Floss YouTube channel is an excellent example of this.
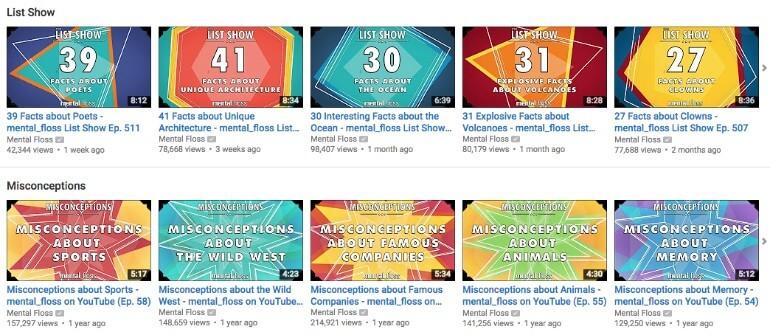 They use similar graphics with text treatments that tell you exactly what to expect in the video. Then, their incredible host, John Green, hangs out in the same eclectic mishmash-of-a-set for every video.This is a conscience brand decision that delivers consistency without feeling played out.
 - Have no text in the bottom right-hand corner. Lastly, avoid adding any text to the bottom right-hand corner of your thumbnail. That’s where YouTube overlays your video’s time stamp, which would obscure any text/info you put there!

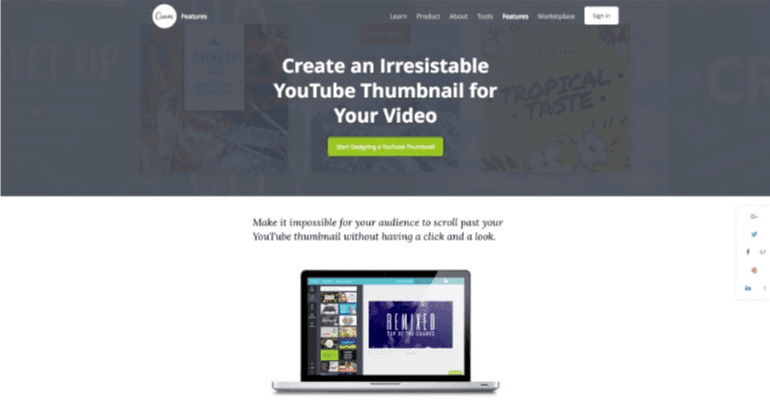
 To begin, go to Canva’s custom YouTube thumbnail creator, which will land you at this screen:
 Next, click the big green button to get started by creating a new account or signing in.
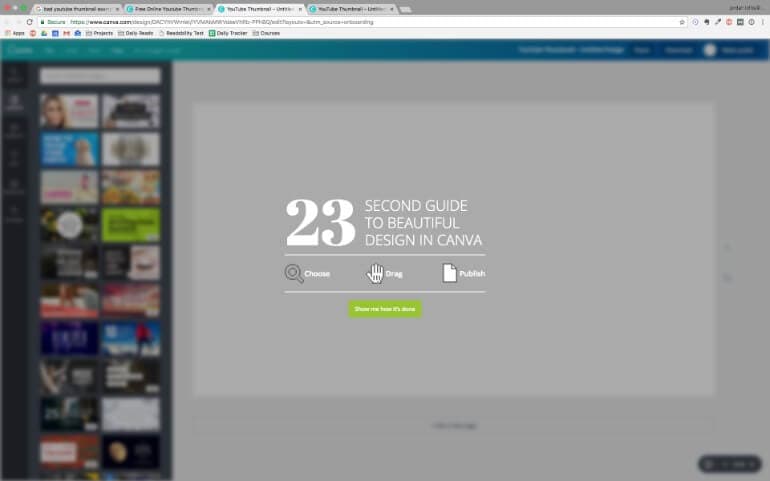 If it’s your first time using this tool, you’ll be prompted to take a quick tour—which I highly recommend. It shows you the ins-and-outs of using their drag-and-drop editor.
After you’ve seen how it works, it’s time to get started.
From here, there are two paths to take:
If it’s your first time using this tool, you’ll be prompted to take a quick tour—which I highly recommend. It shows you the ins-and-outs of using their drag-and-drop editor.
After you’ve seen how it works, it’s time to get started.
From here, there are two paths to take:
- Create a thumbnail image from a blank canvas,
- Or, customize one of their pre-designed templates.
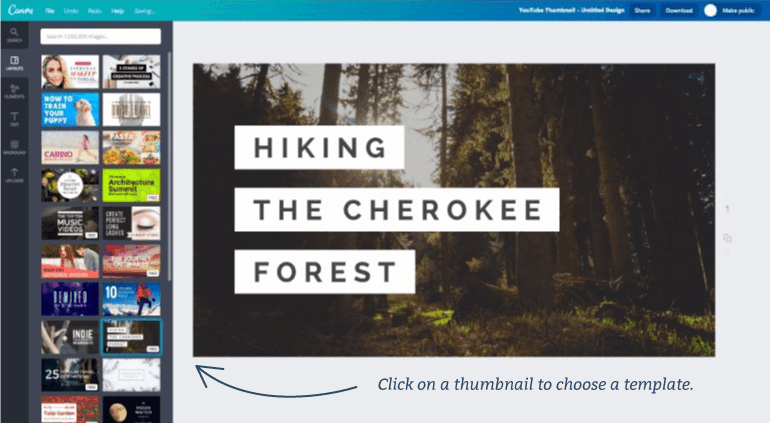 Choose a template from one of the left-hand columns.
As you hover over the options, you’ll notice some are free, while others cost a dollar or two. Find the design that best represents your brand and video, then click on it.
This will auto-populate the template on your design canvas.
Choose a template from one of the left-hand columns.
As you hover over the options, you’ll notice some are free, while others cost a dollar or two. Find the design that best represents your brand and video, then click on it.
This will auto-populate the template on your design canvas.
 Next, double-click on the title text to add your video’s title and subtitle.
If you need more text, you can add it by clicking on the text icon at the far left. Just make sure your thumbnail isn’t too busy—you don’t have much real estate to work with, after all.
Next, double-click on the title text to add your video’s title and subtitle.
If you need more text, you can add it by clicking on the text icon at the far left. Just make sure your thumbnail isn’t too busy—you don’t have much real estate to work with, after all.
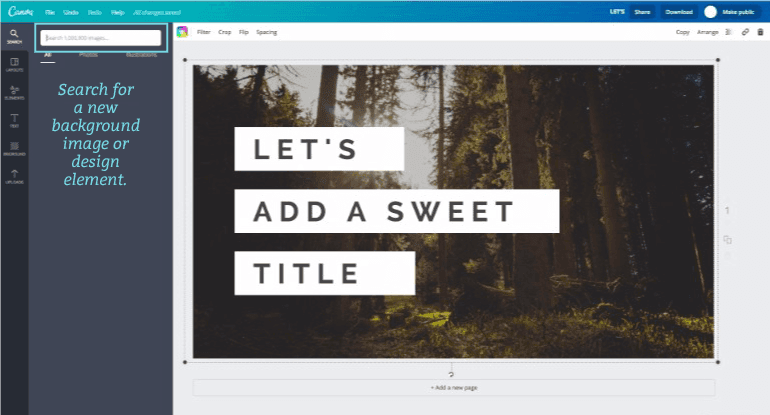 Now you will change the all-important background image. There are two ways to go about this.
First, you can click in the search field at the upper left-hand corner. There you can search through myriad stock photos that run the gamut of free to paid.
If you go the stock photo route, click on the image you like and it’ll populate on your design canvas.
Now you will change the all-important background image. There are two ways to go about this.
First, you can click in the search field at the upper left-hand corner. There you can search through myriad stock photos that run the gamut of free to paid.
If you go the stock photo route, click on the image you like and it’ll populate on your design canvas.
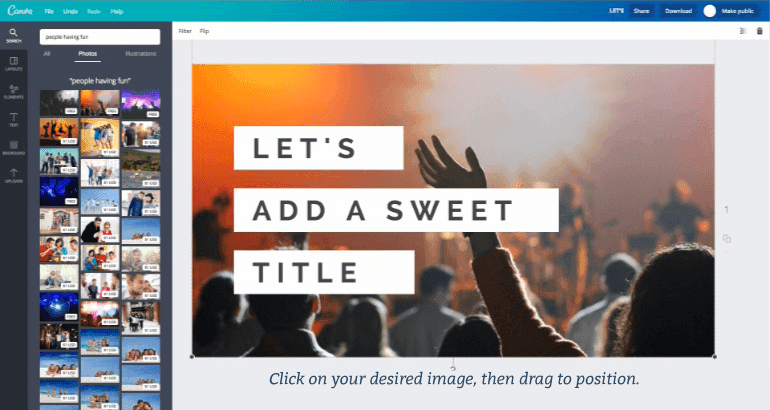 Once it does, drag it into place.
You may need to choose the “arrange” option in the upper right-hand corner if you want to send your image behind other layers—like your title text, for instance.
Once it does, drag it into place.
You may need to choose the “arrange” option in the upper right-hand corner if you want to send your image behind other layers—like your title text, for instance.
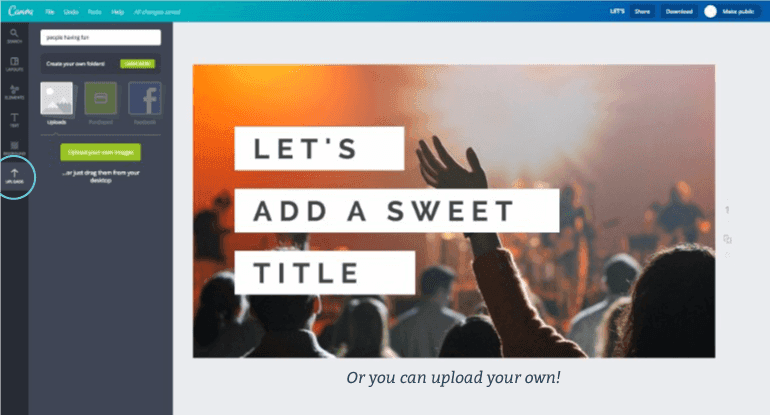 The other way to set your background image is to use your own—which I recommend.
Instead of searching through stock photos, you’ll click on the “upload” icon at the bottom of the tools column at the far left.
Simply choose the image you’d like to use and upload it. Just make sure it’s sized at 1280x720 pixels—or a 16:9 ratio. That’s YouTube’s preferred thumbnail size.
(If you need help resizing a still image from your video, you can use an app like picresize or ResizeImage.net for free.)
The other way to set your background image is to use your own—which I recommend.
Instead of searching through stock photos, you’ll click on the “upload” icon at the bottom of the tools column at the far left.
Simply choose the image you’d like to use and upload it. Just make sure it’s sized at 1280x720 pixels—or a 16:9 ratio. That’s YouTube’s preferred thumbnail size.
(If you need help resizing a still image from your video, you can use an app like picresize or ResizeImage.net for free.)
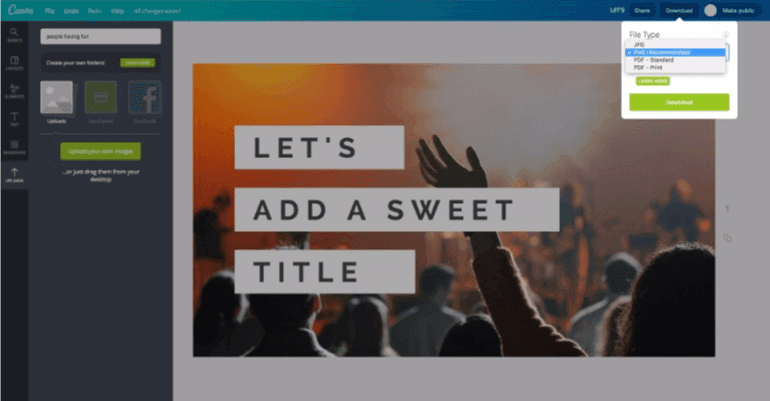 Finally, the moment we’ve all been waiting for... It’s time to download your freshly-created YouTube thumbnail.
Do this by clicking on the “Download” button on the top bar. Then, choose whether you’d like a JPG or PNG.
(Note that PDFs won’t work in this instance, as YouTube doesn’t accept that file type for thumbnails.)
And voila—you’re all set!
Now it’s time to upload your custom thumbnail to YouTube.
Finally, the moment we’ve all been waiting for... It’s time to download your freshly-created YouTube thumbnail.
Do this by clicking on the “Download” button on the top bar. Then, choose whether you’d like a JPG or PNG.
(Note that PDFs won’t work in this instance, as YouTube doesn’t accept that file type for thumbnails.)
And voila—you’re all set!
Now it’s time to upload your custom thumbnail to YouTube.This is an easy process that you can follow step-by-step via YouTube’s video below:
#YouTube marketing tip: create awesome thumbnails to get clicks that stick
Click To Tweet2) Write Compelling Titles/Headlines
Yes, killer titles and headlines are a thing for video marketing, too. As marketing legend, David Ogilvy, said: “On the average, five times as many people read the headline as read the body copy. When you have written your headline, you have spent eighty cents out of your dollar.” Titles—like headlines—have big shoes to fill. But whenever you’re looking for advice, you’ll find tons of generic tips like: “Make it memorable and catchy!” Advice like that usually leaves me thinking: <sarcasm> “Gee, thanks… I never woulda’ thought of that on my own.” </sarcasm> Instead, let’s chat about some less-obvious tips and tricks of writing traffic-driving headlines and emotionally-charged titles.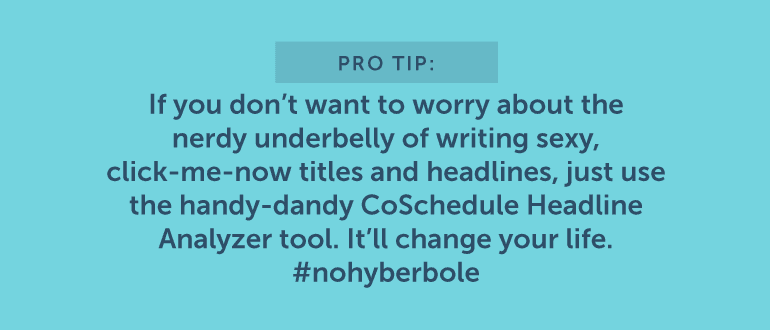 Be searchable: What keywords relate directly to your video content? To write freakin’ awesome titles, they must:
- Make a promise: What problem will your content help your viewer solve?
- Tickle the emotions: Are you connecting intellectually, empathetically, or spiritually?
- Be the cream of the crop: Have you written at least 20–30 headlines and chosen the best one?
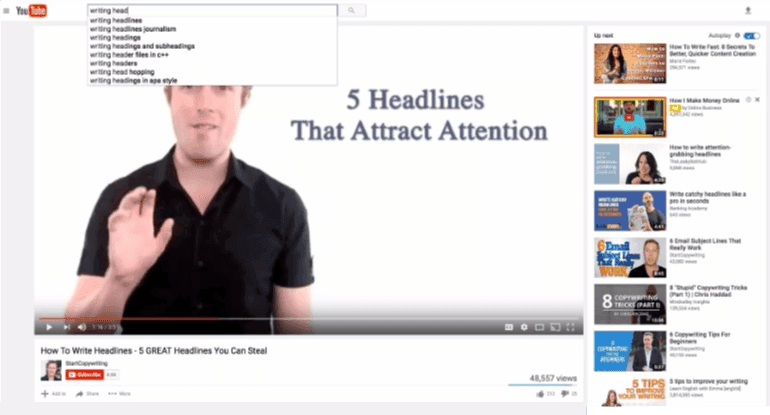 Sometimes this little trick will surprise you. For instance, I didn’t immediately think of a journalism angle or tie in.
Now that I see the related search, though, it makes sense. Journalists are writing headlines all of the time.
For our imaginary video, then, I’m going to choose the following title, then unpack a few other reasons why:
Sometimes this little trick will surprise you. For instance, I didn’t immediately think of a journalism angle or tie in.
Now that I see the related search, though, it makes sense. Journalists are writing headlines all of the time.
For our imaginary video, then, I’m going to choose the following title, then unpack a few other reasons why:
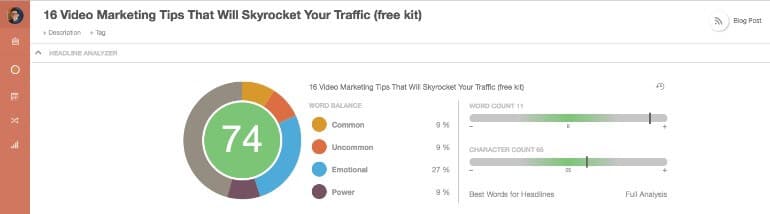
“How to Write Headlines That Will Make Journalists Jealous”Now that I know I’m capitalizing on searchability without keyword-stuffing the daylights out of the title—I need to ensure it makes a promise. While there are plenty of ways to do this well, one of my favorites is to use the “How to… That Will…” formula. If we break down the headline I wrote, it’s exactly that. Here’s the skeleton:
“How to [subject] That Will [promise made + pain solved]” (“How to Write Headlines That Will Make Journalists Jealous”)The predictable success of this headline is further backed up by the Headline Analyzer Studio tool I mentioned above. (<<< Seriously, I use the peanuts outta’ this thing.) This title clocks in with a score of 81.
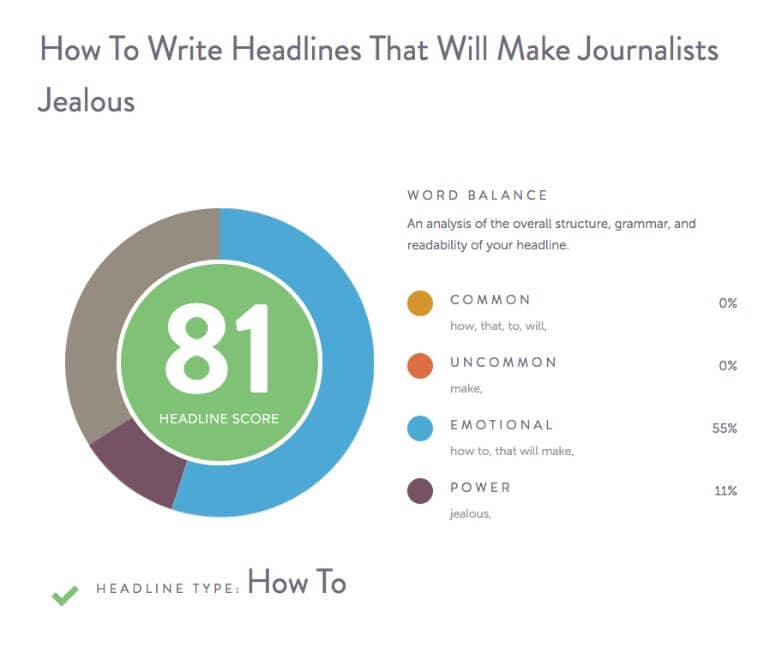 Notice also that it tickles the emotions with both the promise and the power word “jealous.”
However, in the spirit of full disclosure, I could arguably strengthen this headline by using more Emotional Marketing Value (EMV) words. But for the purposes of our video, I’m satisfied with combining the “how to + that will” angle with the searchability hook of journalism.
Notice also that it tickles the emotions with both the promise and the power word “jealous.”
However, in the spirit of full disclosure, I could arguably strengthen this headline by using more Emotional Marketing Value (EMV) words. But for the purposes of our video, I’m satisfied with combining the “how to + that will” angle with the searchability hook of journalism.
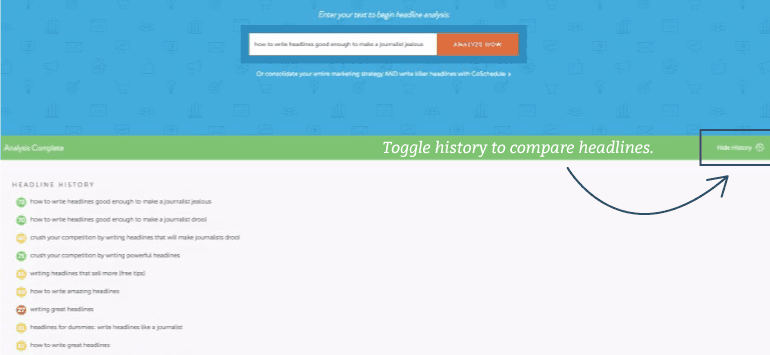 For example, if you read some of my headline examples in the screenshot above, you’ll notice I thought better of using a phrase like “beat a journalist.”
I happen to like journalists and would hate to be misunderstood :)
There you have it! If you follow the tips and use the tools above, you’re well on your way to writing titles that drive traffic all day long.
What’s also cool is that the Headline Analyzer Studio is a baked in part of CoSchedule. So every headline you write is scored inside the tool like magic.
I use it for every post I write—even this one!
For example, if you read some of my headline examples in the screenshot above, you’ll notice I thought better of using a phrase like “beat a journalist.”
I happen to like journalists and would hate to be misunderstood :)
There you have it! If you follow the tips and use the tools above, you’re well on your way to writing titles that drive traffic all day long.
What’s also cool is that the Headline Analyzer Studio is a baked in part of CoSchedule. So every headline you write is scored inside the tool like magic.
I use it for every post I write—even this one!
 You can get started free to try including it in your content marketing workflow.
#YouTube marketing tip: Make sure your video title is catchy and compelling
Click To Tweet3) Use YouTube Cards to Increase Engagement (R.I.P. Annotations)
If you’ve spent any time on YouTube, you’ve seen annotations littered across videos aplenty. They’re the clickable boxes, bubbles, and blurbs that float above videos as they play. However, to the dismay of some content creators—but the joy of many viewers—YouTube recently announced that annotations are a dying breed and destined for extinction. The annotation is dead; long live the… “Card”? Yep. There’s a new sheriff in town. And this one is far less obnoxious. Here’s what you need to know about YouTube Cards how to start using them straight away. The Cards feature shines while a video is playing. Especially because they can be launched on either desktop or mobile (which was a limitation to annotations). To interact, the viewer will see a card indicated by a small “i” icon at the top right of the video.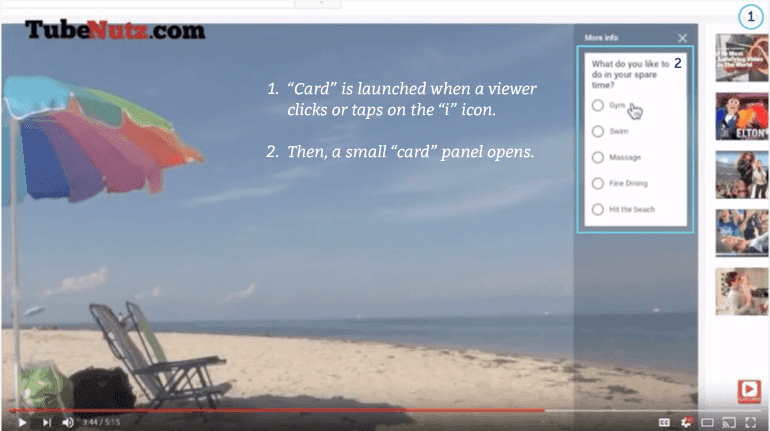 To date, there are five types of YouTube cards you can use to enhance your videos on both desktop and mobile.
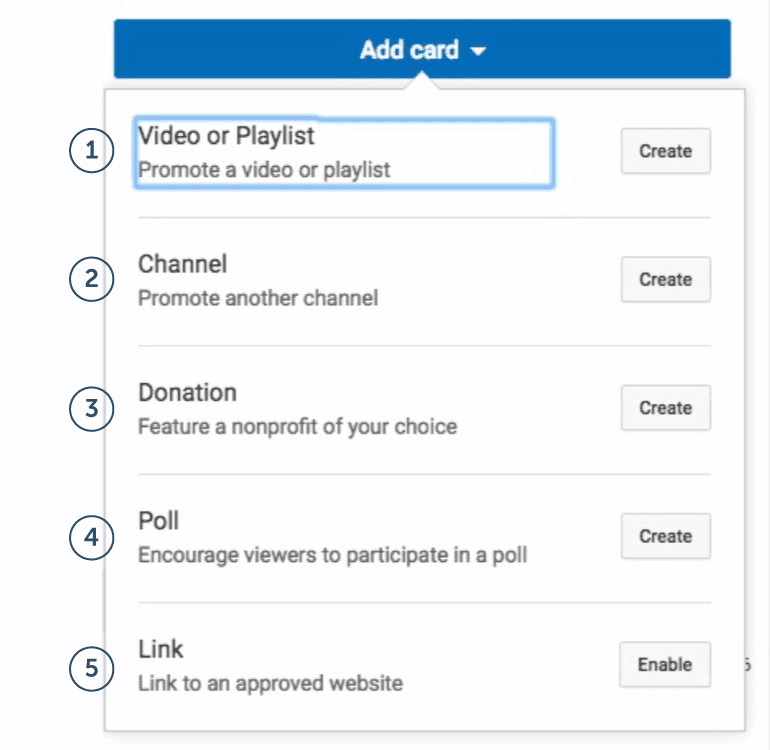
- Video or playlist to promote your other videos.
- Channel to send traffic to another channel.
- Donation for encouraging donations to nonprofit organizations.
- Poll to ask your viewers a question, get their responses, and then provide the results instantly.
- Links to approved websites.
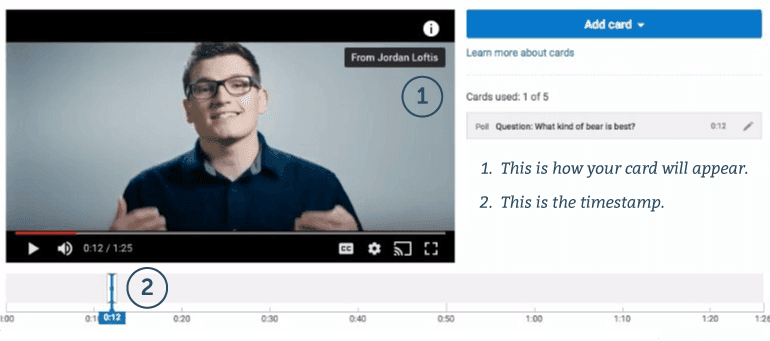
 From here, you can choose both the timestamp for when you’d like the card to appear and the type of card you’d like to use.
Let’s say we wanted to add a “Poll” card to our video to discover answers to the most important question of all: What kind of bear does your audience think is best?
First, we click on the blue “Add card” button and then select “Poll” as the type of card we’d like to add. Then we type in our question along with the answers—of which you can have up to five.
From here, you can choose both the timestamp for when you’d like the card to appear and the type of card you’d like to use.
Let’s say we wanted to add a “Poll” card to our video to discover answers to the most important question of all: What kind of bear does your audience think is best?
First, we click on the blue “Add card” button and then select “Poll” as the type of card we’d like to add. Then we type in our question along with the answers—of which you can have up to five.
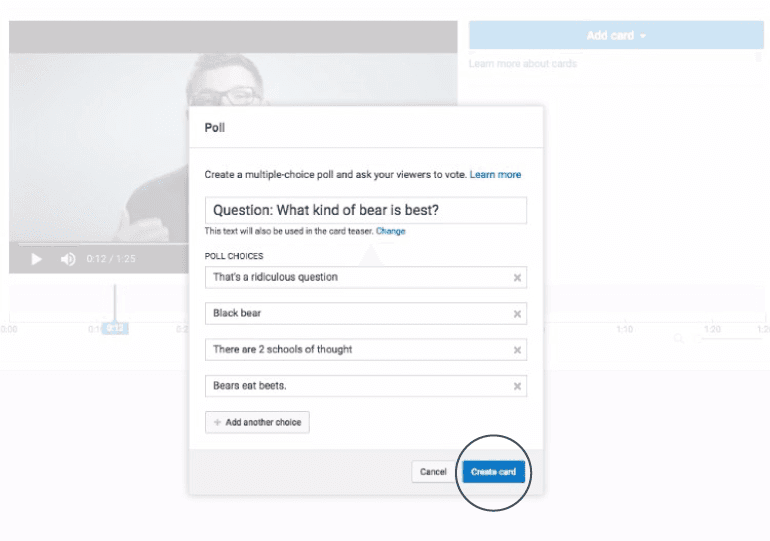 Once you’ve filled out your poll questions and answers, click on the blue “Create card” button at the bottom right.
Now you’ve got yourself a card.
Once you’ve filled out your poll questions and answers, click on the blue “Create card” button at the bottom right.
Now you’ve got yourself a card.
 Then, when a viewer clicks on your card, they’ll see both the poll and the overall results.
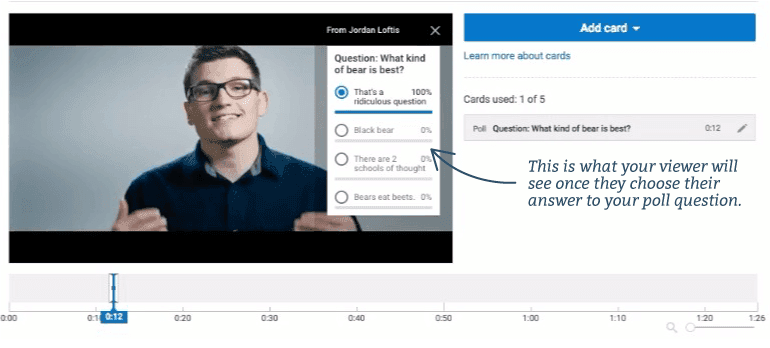 As a bonus, polls can give you additional insights by asking your audience more about their pain points and what they’d like to learn more about.
#YouTube marketing tip: Drive more engagement using YouTube cards
Click To Tweet4) Use YouTube End Screens to Drive Contextual Traffic
End Screens are a great way to drive contextual traffic to your related content. They’re the part of a video that shows up at the last 5–20 seconds and can include one to four clickable elements. These elements can send people to other videos, your channel, your *approved* websites, or invite them to subscribe. They also have a touch of interactivity. On desktop, they can show additional info upon hover. And on mobile, they do so upon tap. Pretty nifty.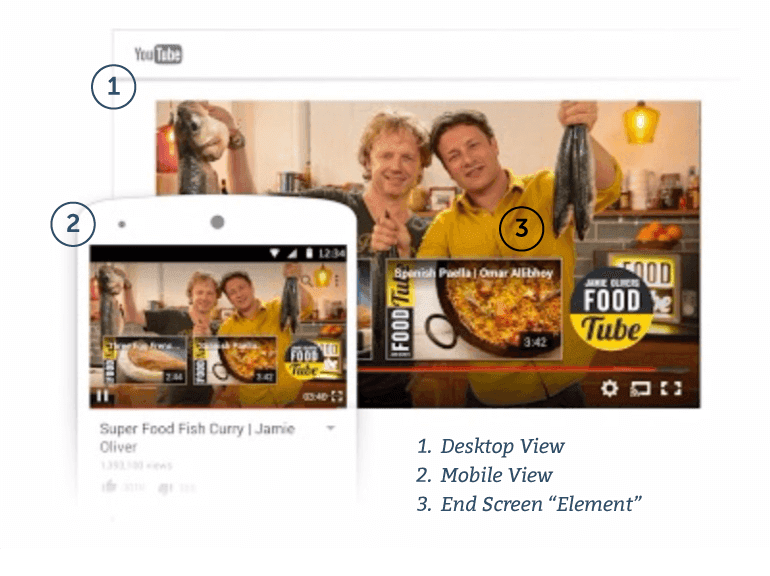 Original photo: YouTube
Here’s how you get started.
First, if you’re working with a video currently using annotations, you’ll have to give them the axe. But don’t worry, the system knows all. So it’ll ask you to unpublish them automatically.
When you’re ready to start, here are the exact steps to take (source):
Original photo: YouTube
Here’s how you get started.
First, if you’re working with a video currently using annotations, you’ll have to give them the axe. But don’t worry, the system knows all. So it’ll ask you to unpublish them automatically.
When you’re ready to start, here are the exact steps to take (source):
- “Sign in to the your YouTube account.
- In the top right, click your account icon > Creator Studio.
- In the left menu, select Video Manager > Videos.
- For the video you want to add the end screen to, click Edit.
- In the top tab bar, click End screen.
- If the selected video contains annotations, follow the instructions to unpublish them. You can re-publish them at any time.
- You’ll see your video with the predefined grid and a timeline below that indicates the available part for the end screen. Click Add element. You can add up to four elements, and one of them must be a video or playlist.
- Choose how to build your end screen:
- Add element: You can add up to four elements to a video. At least one element must be a video or playlist. Select each element and fill in the required information, then click Create element.
- Copy from video: You can copy an end screen from another one of your videos and edit the elements.
- YouTube template: You can choose from predefined formats that show combinations of elements. You'll need to define the content for the elements in the end screen, such as add the channel to be featured.
- Adjust the placement and size of each element on the grid. Adjust the time for the element to show in the timeline below.
- Click Save.”
#YouTube marketing tip: Drive more traffic with optimized end screens
Click To Tweet5) Tag It Up!
If you’ve ever uploaded a video to YouTube before, it’s likely you know what tags are. However, if you’re new to the idea, no sweat. Tags are a way of adding descriptive pieces of text to your video so YouTube understands what your video is about. YouTube expert Derral Eaves breaks tags down further into four categories in this video (and he also shows step-by-step how to add them): https://www.youtube.com/embed/YGZOm_dCgMg- Specific Tags (1:37): One word descriptions of the content.
- Compound Tags (2:12): Several words that form a single tag. (Much like a long-tail keywords for you SEO peeps.)
- Generic Tags (3:07): A higher-level descriptor of the type of content you’re offering.
- Misspellings (4:03): Very clever way to compensate for human error.
 When you watch YouTube videos, one thing you’ll notice is that while the YouTube algorithm seems to know a what a video is tagged with, they’re not visible to the viewers.
Unless you get all Sherlock Holmes and do some sleuthing, that is.
As you know, we at CoSchedule are all about research—the skyscraper technique in particular.
To apply this technique to your video marketing, you’re going to need to look underneath the hood. So, find a top-performing YouTube video in your niche and then use the following steps to snoop out the tags they’re using to get some ideas.
Here’s how to do it in Google Chrome in under 5 seconds:
First, simply prepend your competitor’s video URL with “view-source:” in Chrome.
When you watch YouTube videos, one thing you’ll notice is that while the YouTube algorithm seems to know a what a video is tagged with, they’re not visible to the viewers.
Unless you get all Sherlock Holmes and do some sleuthing, that is.
As you know, we at CoSchedule are all about research—the skyscraper technique in particular.
To apply this technique to your video marketing, you’re going to need to look underneath the hood. So, find a top-performing YouTube video in your niche and then use the following steps to snoop out the tags they’re using to get some ideas.
Here’s how to do it in Google Chrome in under 5 seconds:
First, simply prepend your competitor’s video URL with “view-source:” in Chrome.
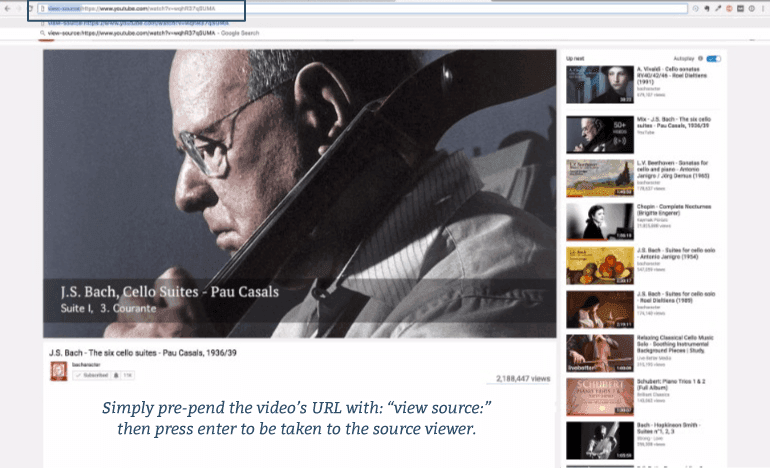 Next, you’ll notice you get taken to a screen that looks like a robot’s love letter. If you’re not a developer (like me), you’re first instinct may be to run away.
 However, you don’t need to worry about all the technical stuff. Our quarry is summoned with a simple search command.
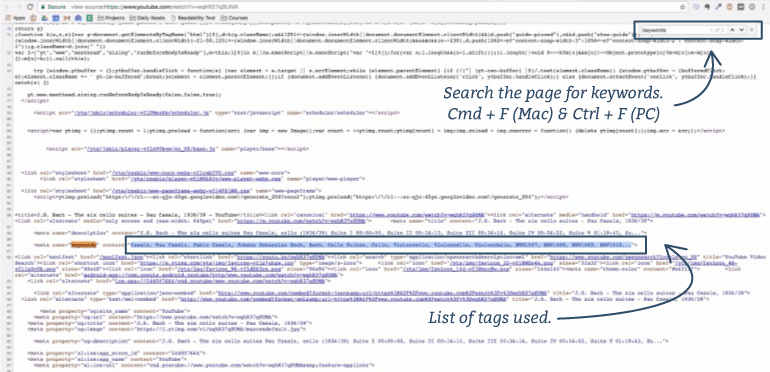 Use the find keystroke (cmd + F on Mac; cntrl + F on PC) and type in “keywords” in the search box.
Then, you’ll find a list of all the keywords a given video is using.
Pretty stealthy, eh?
Congrats, you’re now ready to use tags to your advantage.
Use the find keystroke (cmd + F on Mac; cntrl + F on PC) and type in “keywords” in the search box.
Then, you’ll find a list of all the keywords a given video is using.
Pretty stealthy, eh?
Congrats, you’re now ready to use tags to your advantage.
#YouTube marketing tip: Use tags to your advantage
Click To Tweet6) Translate Tags into Foreign Languages (if aligned with business objectives)
Now that you know how to better use tags, here’s another five-second hack. If you have an existing audience in multilingual markets—OR you’re trying to break into a foreign market—use Google Translate to tag your videos in the appropriate language(s). Let’s tackle a quick example. To begin, visit the Google Translate page. You will see two boxes. On the left you will type your origin language words and phrases. And on the right, you will see the translated outputs. In this example, I translated English → Spanish. However, you can choose any available language using the arrow drop-down selections.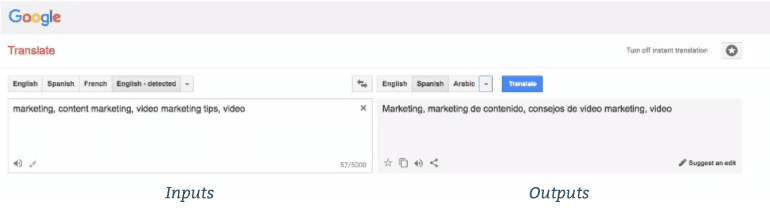 While Google Translate isn’t always 100 percent accurate, you’re pretty safe using it to translate simple words and phrases to use as tags for your video content.
¡Muy bien!
While Google Translate isn’t always 100 percent accurate, you’re pretty safe using it to translate simple words and phrases to use as tags for your video content.
¡Muy bien!
#YouTube marketing tip: Translate your tags into foreign languages to break into foreign markets
Click To Tweet7) Use YouTube to Improve SEO
Everyone wants better search engine optimization, right? Well, video is another opportunity to excel in this all-important marketing strategy. And for those in the know, YouTube has huge SEO potential. Not convinced? Just take a look at the screenshot below. Google loves YouTube and frequently gives it some prime real estate in search results.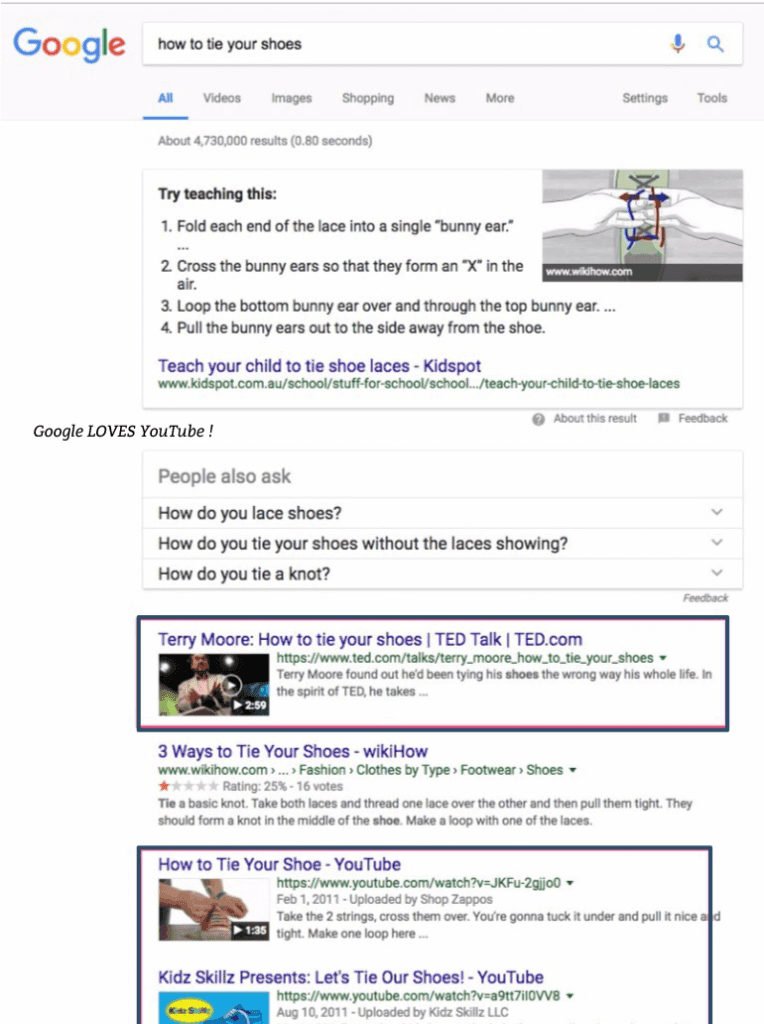 So, if you’re going to maximize on YouTube’s reach, a small but mighty tip is to optimize your video’s description.
The Anatomy of a Winning YouTube Description
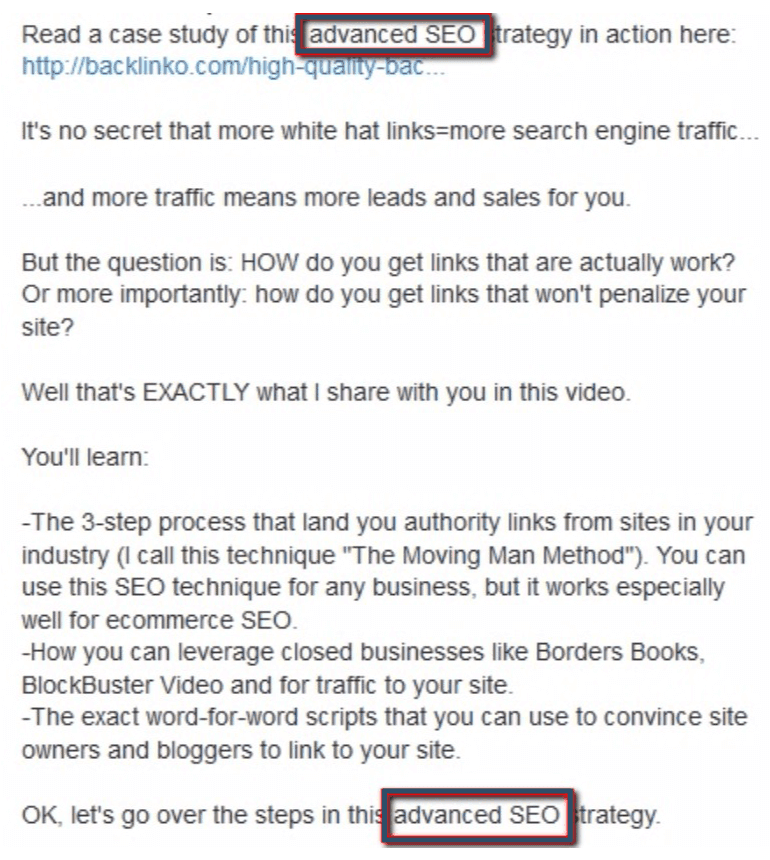
To see it in action, here’s a great example of an optimized YouTube video description from genius SEO Brian Dean.
So, if you’re going to maximize on YouTube’s reach, a small but mighty tip is to optimize your video’s description.
The Anatomy of a Winning YouTube Description
To see it in action, here’s a great example of an optimized YouTube video description from genius SEO Brian Dean.
 Original image credit: Backlinko
In his ultimate guide, Brian explains that the most effective video descriptions have these four things in common:
Original image credit: Backlinko
In his ultimate guide, Brian explains that the most effective video descriptions have these four things in common:
- The link you want to send traffic to at the top of your description to increase click-through-rates (CTRs).
- Your target keyword appears within the first twenty-five words of the description.
- Your video’s description is at least 250 words long.
- Your keyword is included three to four times in the description.
- What keyword you’re targeting via smart research.
- Know where you want to send traffic + why your audience would logically visit the link as a next-step from your video.
- Exactly what value your video adds to your viewers. This way you can write copy that marries the promise you’re making with how you’re going to deliver on it.
#YouTube marketing tip: Pay attention to YouTube #SEO!
Click To TweetFacebook Video Marketing Tips
According to research by Animoto, Facebook is the most impactful social channel for video content, outperforming all other channels 8.4x. With the huge potential payoff of Facebook video marketing for driving engagement and traffic, let’s jump into some of our best tips.8) Hack the Process With CoSchedule Best Time Scheduling + Social Video
One of the most common questions we’ve encountered at CoSchedule is a simple one: “What are the best times to post on social media for the most traction?” That’s a great question. And it’s answer is all about the numbers. Fortunately, we’ve got your back. We took a deep dive and analyzed 20 studies to determine the exact answer—and for every major platform. The result was our best time scheduling tool that’s built right in to CoSchedule. It’s fueled by all the latest data so there is zero guesswork about when to post on any given social channel. Essentially, it’s the best way to harness the power of analytics + automation to increase your video marketing reach. Here’s a quick video about how it works: Best Time Scheduling
Where this tool really goes to work for your video marketing efforts is when combined with one of my other fave marketing weapons: social video.
With social video, you can share and manage ALL of your social media videos in one place.
Best Time Scheduling
Where this tool really goes to work for your video marketing efforts is when combined with one of my other fave marketing weapons: social video.
With social video, you can share and manage ALL of your social media videos in one place.
 Introducing Social Video From CoSchedule - CoSchedule Blog
When used together, you simply need to upload your video(s) and select the networks you’d like them posted to using best time scheduling. And you’re done.
Simple as that.
Both features are part of CoSchedule.
However, if you prefer a method with a bit more elbow grease involved, you can use the Time to Post Kit that came in your free Video Marketing Kit (download it now if you haven’t already!).
As you dig in, you’ll notice some seriously interesting finds that bear huge implications for posting times.
For instance, did you know that 80 percent of the U.S. population is located in the Central and Eastern time zones?
From there, you’ll see an infographic breakdown of:
Introducing Social Video From CoSchedule - CoSchedule Blog
When used together, you simply need to upload your video(s) and select the networks you’d like them posted to using best time scheduling. And you’re done.
Simple as that.
Both features are part of CoSchedule.
However, if you prefer a method with a bit more elbow grease involved, you can use the Time to Post Kit that came in your free Video Marketing Kit (download it now if you haven’t already!).
As you dig in, you’ll notice some seriously interesting finds that bear huge implications for posting times.
For instance, did you know that 80 percent of the U.S. population is located in the Central and Eastern time zones?
From there, you’ll see an infographic breakdown of:
- What days to post on every major social channel,
- What times to post on those channels,
- And what percentage of engagement you can expect.
Best Time Scheduling + Social Video = Facebook video marketing automation bliss in @CoSchedule:
Click To Tweet9) How to Add Captions for Silent Viewing
Ready for a show-stopping stat? 85 percent of Facebook videos are watched with no sound. Wowzers. So let’s take a look at the easiest way to make your videos perform well even without sound. In this tip, you’re going to learn how to create captions for your Facebook videos. At first blush, the process seems pretty technical and tough. However, there’s an easy, and economical, way to get the job done. You can always use Facebook’s automatically generated captions feature. However, some folks have trouble with the system misunderstanding words or phrases and adding gibberish.
 So, if you want to be in charge of quality control and accuracy, here’s how it works.
First, understand that Facebook uses a special file called a SubRip that will have end with “.srt”. To use captions, you will need to create a SubRip file with your video’s transcription included.
There are many ways to create this kind of file. In this tip, I’ll give you two. One will cost a few bucks and the other is free—though it’ll cost you some time.
Use a Professional Transcription Service
The quickest way to create this kind of file is by using a professional transcription service.
You can use a service like Rev for quick turnaround with low costs, starting at a buck per minute.
This option makes a lot of sense if you’re working with a short video because you don’t have to spend the time transcribing.
You can simply upload a video or share a link to the published video if it’s on YouTube or Vimeo already.
Bam. Done.
Now, there is also a way to do this for free if you’re working on a super tight budget. So I’ll touch on that, too. Then, we’ll cover how to upload your SubRip file to Facebook.
Use a YouTube Hack to Auto-Transcribe
The next way to create this kind of file is by using YouTube to hack the process.
You’ll need a YouTube channel to implement this tip, so if you don’t have one, make sure to create one.
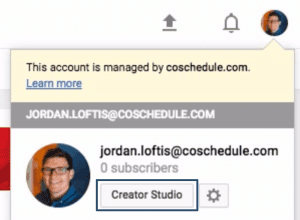
To start, login to Creator Studio by clicking on your profile pic in the upper right-hand corner of the screen.
So, if you want to be in charge of quality control and accuracy, here’s how it works.
First, understand that Facebook uses a special file called a SubRip that will have end with “.srt”. To use captions, you will need to create a SubRip file with your video’s transcription included.
There are many ways to create this kind of file. In this tip, I’ll give you two. One will cost a few bucks and the other is free—though it’ll cost you some time.
Use a Professional Transcription Service
The quickest way to create this kind of file is by using a professional transcription service.
You can use a service like Rev for quick turnaround with low costs, starting at a buck per minute.
This option makes a lot of sense if you’re working with a short video because you don’t have to spend the time transcribing.
You can simply upload a video or share a link to the published video if it’s on YouTube or Vimeo already.
Bam. Done.
Now, there is also a way to do this for free if you’re working on a super tight budget. So I’ll touch on that, too. Then, we’ll cover how to upload your SubRip file to Facebook.
Use a YouTube Hack to Auto-Transcribe
The next way to create this kind of file is by using YouTube to hack the process.
You’ll need a YouTube channel to implement this tip, so if you don’t have one, make sure to create one.
To start, login to Creator Studio by clicking on your profile pic in the upper right-hand corner of the screen.
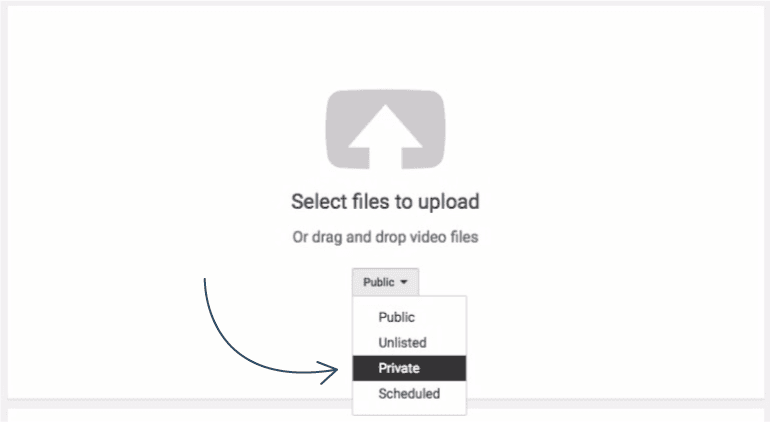
 Next, if you’ve already uploaded the video, go ahead and select it. And if it’s a video you don’t ultimately want public on your YouTube channel, you can choose to upload it via the Video Manager with a “Private” listing.
That way you won’t notify your subscribers about a video that won’t be sticking around!
Next, if you’ve already uploaded the video, go ahead and select it. And if it’s a video you don’t ultimately want public on your YouTube channel, you can choose to upload it via the Video Manager with a “Private” listing.
That way you won’t notify your subscribers about a video that won’t be sticking around!
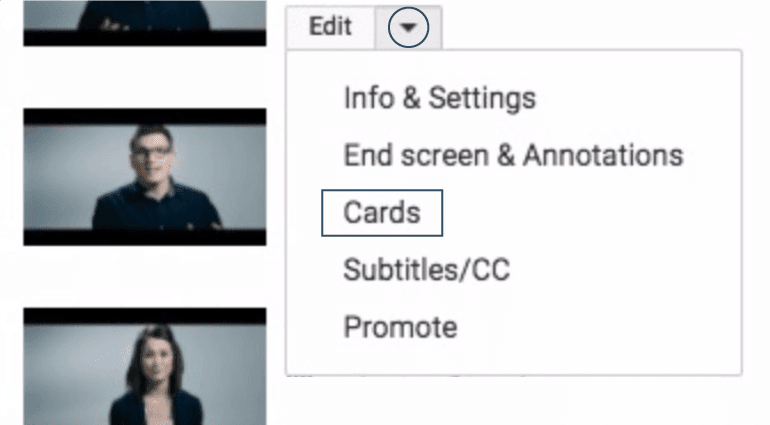
 Next, navigate to your video manager and find the video you’re creating captions for. Click on the drop-down arrow next to the “edit” button and select “Subtitles/CC” from the list.
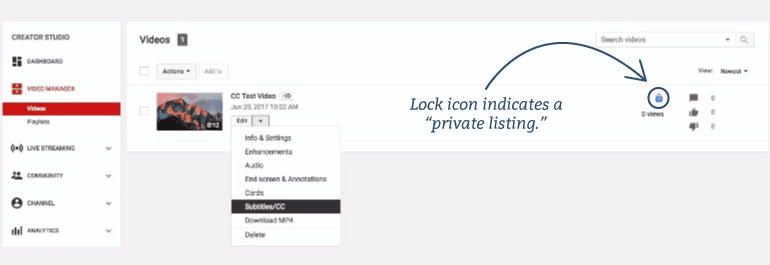 (If it’s your first time you’ll be prompted to select the language your video is in.)
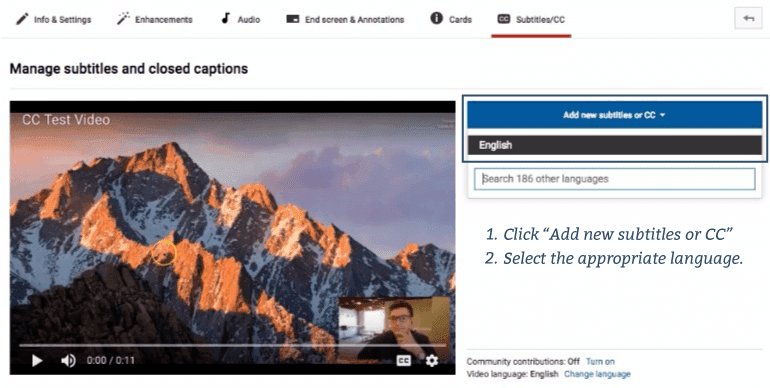
Next, you’ll click on the blue “Add new subtitles or CC” button, then choose the appropriate language.
(If it’s your first time you’ll be prompted to select the language your video is in.)
Next, you’ll click on the blue “Add new subtitles or CC” button, then choose the appropriate language.
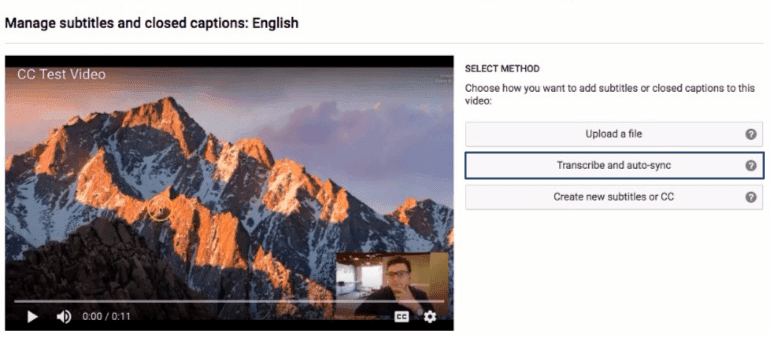
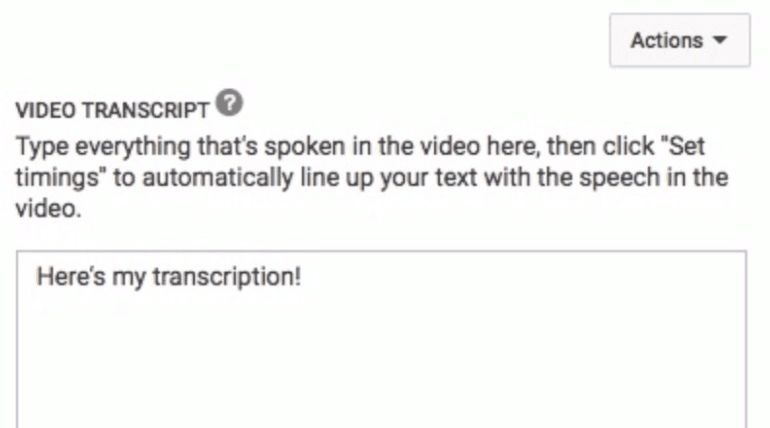
 You’ll then choose “Transcribe and auto-sync” to manually type your transcription and then auto-sync the newly-written caption with the spoken words in the video.
 Once you’ve done this, a transcription box will appear and you can start typing away.
By default, there’s a nice setting that pauses the video while you’re typing so you can keep up.
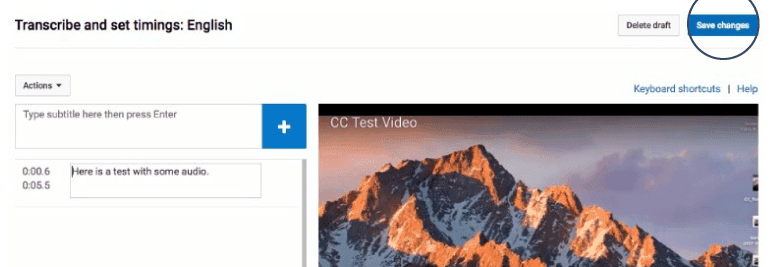
Then, once completed, click the blue “Set timings” button. YouTube will then put it’s smarty-pants brain to work syncing your transcription up with your video content’s audio.
Once you’ve done this, a transcription box will appear and you can start typing away.
By default, there’s a nice setting that pauses the video while you’re typing so you can keep up.
Then, once completed, click the blue “Set timings” button. YouTube will then put it’s smarty-pants brain to work syncing your transcription up with your video content’s audio.
 Now you’re on the final stretch of creating the .srt file. To bring it in for a landing, follow this sequence using the screenshots below.
Click on the “Save changes” button.
Now you’re on the final stretch of creating the .srt file. To bring it in for a landing, follow this sequence using the screenshots below.
Click on the “Save changes” button.
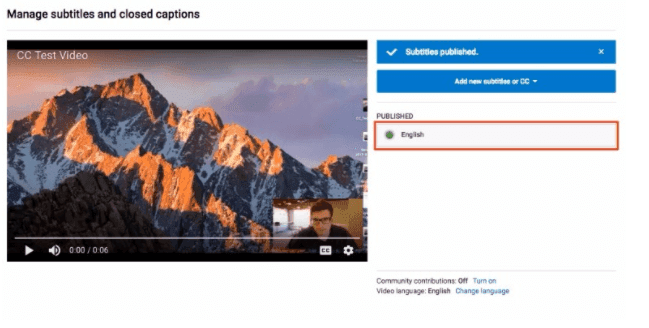
 Click on “English” (or whichever language your caption was created in).
 Finally, click on the “Actions” drop-down and select “.srt” to download the file.
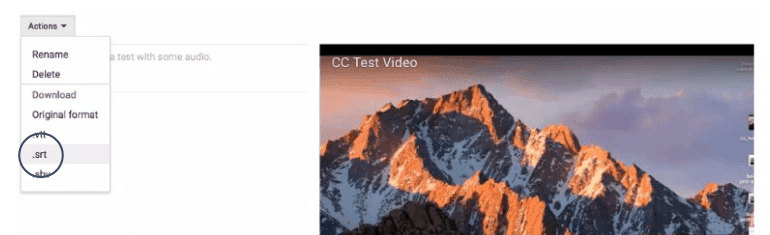
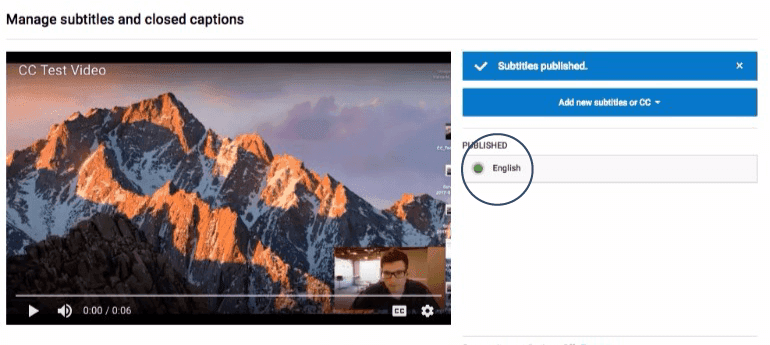 Well done, you. Now you’ve got a fresh .srt file that’s ready to enhance your Facebook video’s silent-viewing goodness.
How to Add Your .srt File to a Facebook Video
Now that you’ve either received your .srt file from a pro service or downloaded one you just created on your own, it’s time to finish the job.
For starters, make sure the file is named correctly using Facebook’s naming convention: filename.[language code]_[country code].srt
So, if you’re in the U.S., it would look like this: video_name.en_US.srt
(If you’re not in the U.S., hop over here to view all available country codes.)
Now that you’re file is in ship-shape, you can work through the step-by-step directions below that come straight from Big Blue itself:
Add Captions to Your Page's Video With a SubRip (.srt) File:
Make sure that your caption files are correctly named and formatted before you upload them.
Well done, you. Now you’ve got a fresh .srt file that’s ready to enhance your Facebook video’s silent-viewing goodness.
How to Add Your .srt File to a Facebook Video
Now that you’ve either received your .srt file from a pro service or downloaded one you just created on your own, it’s time to finish the job.
For starters, make sure the file is named correctly using Facebook’s naming convention: filename.[language code]_[country code].srt
So, if you’re in the U.S., it would look like this: video_name.en_US.srt
(If you’re not in the U.S., hop over here to view all available country codes.)
Now that you’re file is in ship-shape, you can work through the step-by-step directions below that come straight from Big Blue itself:
Add Captions to Your Page's Video With a SubRip (.srt) File:
Make sure that your caption files are correctly named and formatted before you upload them.
- Click Share a photo or video at the top of your Page's Timeline.
- Click Upload Photos/Video and select a video from your computer.
- Click Captions, then click Upload SRT File.
- Choose a .srt file from your computer.
- Select an optional Default Language. If you select a default language, captions will appear in this language when a viewer's preferred language isn't available.
- Finish adding details to your video and click Publish.
 in the top-right corner, select Edit Post and follow the steps above.
Note: People who watch your Page's video with sound turned off will automatically see captions. People who watch your video with sound turned on will need to turn on captions to see them. The language people see captions in is determined by their preferred language.
Finally, if you’re interested in taking a shot at Facebook’s automatic captions feature, here are the step-by-step instructions:
Automatically Generate Captions for Your Page's Video
in the top-right corner, select Edit Post and follow the steps above.
Note: People who watch your Page's video with sound turned off will automatically see captions. People who watch your video with sound turned on will need to turn on captions to see them. The language people see captions in is determined by their preferred language.
Finally, if you’re interested in taking a shot at Facebook’s automatic captions feature, here are the step-by-step instructions:
Automatically Generate Captions for Your Page's Video
- Click Share a photo or video at the top of your Page's Timeline
- Click Upload Photos/Video and select a video from your computer
- Click Publish
- Once your video has been published, click Generate from the banner at the top of your post
- Edit the captions and click Save to Video
#Facebook video marketing tip: Use captions (85% of video on platform watched w/o sound)
Click To Tweet10) How to Understand Facebook Video Metrics
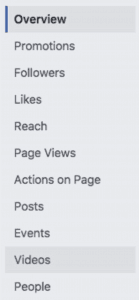
When it comes to social media metrics, there is data aplenty. But the real trick to data-driven video marketing is knowing what numbers to pay attention to. In this tip, I’m going to break down the essential in-app Facebook video metrics to help you discern what success looks like for you. Then, once you know what numbers tell your marketing story, you can optimize, optimize, optimize! Begin With the End in Mind As the quotable Dr. Stephen R. Covey said: “Begin with the end in mind.” The same is true when we’re talking data. To understand what stats matter, you must first decide the action(s) you’re trying to inspire with your video marketing. In this post, the focus has been on driving traffic to a specific place—whether a website, landing page, other video content, or any place else. For our aims, then, I’m not going to focus on views—as that’s often a vanity metric. After all, Facebook counts a view when someone watches at least 3 seconds or more (while YouTube counts a view after 30 seconds or so). If you ask me, it’s tough to make a case for basing content optimization decisions off of 3-second video “views.” Instead, let’s look at video retention, video engagement, and clicks on your video. To view the data for each of these, login to Facebook, then navigate to your page. From here, click on the “Insights” tab and then choose the “Videos” option on the left-hand column.
 Video Retention
Video retention is a key metric because it helps you understand just how many people are sticking around for your videos.
You can view these stats all the way down to individual posts. From there, you can filter the data into: auto-played vs. clicked-to-play or paid vs. organic.
In the image below, you can see that about 67 percent of this video’s viewers dropped off after only 5–6 seconds of view time.
While Facebook analytics would count that as a “view,” it’s really helpful to know that only 5–10 percent of viewers actually hung around to the end.
Video Retention
Video retention is a key metric because it helps you understand just how many people are sticking around for your videos.
You can view these stats all the way down to individual posts. From there, you can filter the data into: auto-played vs. clicked-to-play or paid vs. organic.
In the image below, you can see that about 67 percent of this video’s viewers dropped off after only 5–6 seconds of view time.
While Facebook analytics would count that as a “view,” it’s really helpful to know that only 5–10 percent of viewers actually hung around to the end.
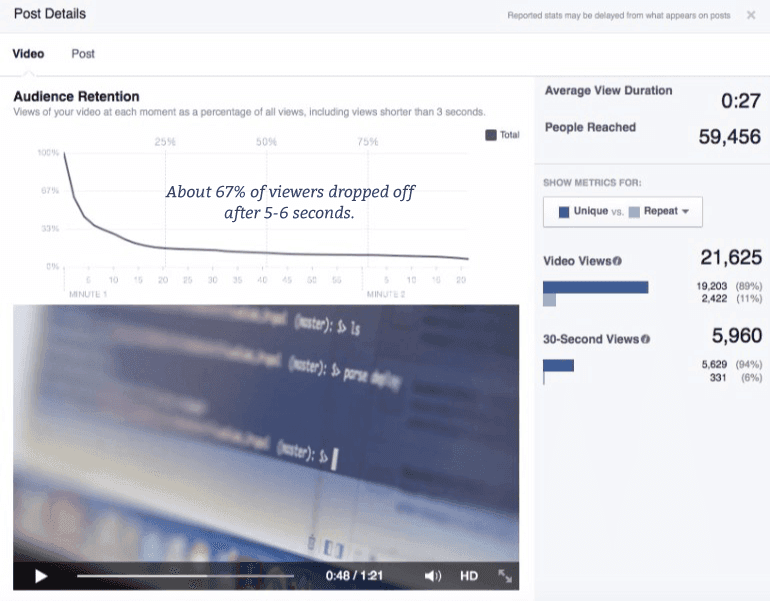 (Original image source: Facebook; Notes ours.)
Video Engagement
Video engagement measures all of the actions (likes, comments, shares, and clicks) your viewers took.
You’ll notice there are two really big numbers on the top of the screenshot below:
(Original image source: Facebook; Notes ours.)
Video Engagement
Video engagement measures all of the actions (likes, comments, shares, and clicks) your viewers took.
You’ll notice there are two really big numbers on the top of the screenshot below:
- 59,456 people reached,
- And 21,625 video views.
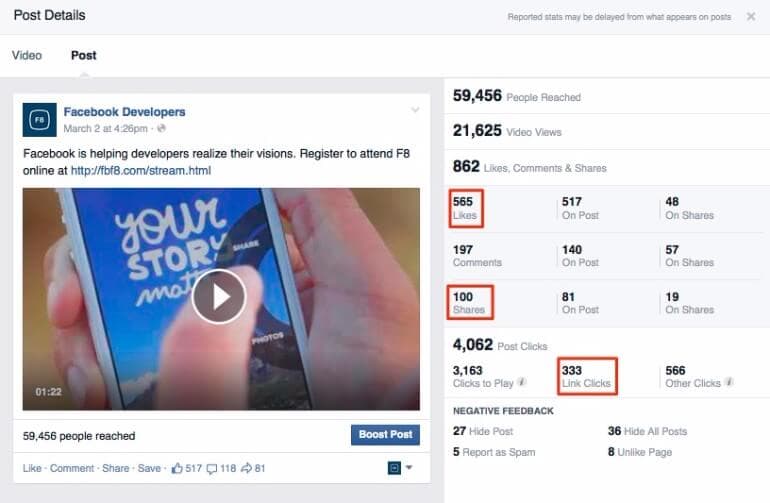 (Original image source: Facebook; Notes ours.)
Why Likes, Shares, and Clicks Matter
Often, “likes” get a bad rap as a vanity metric. However, an interesting study from the National Academy of Sciences conducted with 86,000 volunteers showed that their “likes” revealed their political leaning between with an astounding 85 percent accuracy.
So, as Steve Rayson wrote: “This would appear to indicate quite strongly that people ‘like’ content that resonates with them.”
Bottom line, you can at least trust likes to give you insight into whether or not your video content resonates with your audience or not. Though I’d never encourage you to build a social media strategy based on them.
Next, marketers often value shares more highly than likes because they cost people more in terms of social capital. Shares display specific user intent and reaction to your content.
In essence, shares signal that viewers explicitly thought their friends needed to see a given video (for good reasons or for bad!).
And lastly, link clicks are important to traffic because… Well, you have to get people to click on links to get to your stuff!
The Easiest Way to Get It Right
Those are only three of the many valuable analytics available on every social platform.
If you’re looking for a painless way to see how every video and social post is doing across a variety of channels, our social analytics tool is a frictionless way to do so.
(Original image source: Facebook; Notes ours.)
Why Likes, Shares, and Clicks Matter
Often, “likes” get a bad rap as a vanity metric. However, an interesting study from the National Academy of Sciences conducted with 86,000 volunteers showed that their “likes” revealed their political leaning between with an astounding 85 percent accuracy.
So, as Steve Rayson wrote: “This would appear to indicate quite strongly that people ‘like’ content that resonates with them.”
Bottom line, you can at least trust likes to give you insight into whether or not your video content resonates with your audience or not. Though I’d never encourage you to build a social media strategy based on them.
Next, marketers often value shares more highly than likes because they cost people more in terms of social capital. Shares display specific user intent and reaction to your content.
In essence, shares signal that viewers explicitly thought their friends needed to see a given video (for good reasons or for bad!).
And lastly, link clicks are important to traffic because… Well, you have to get people to click on links to get to your stuff!
The Easiest Way to Get It Right
Those are only three of the many valuable analytics available on every social platform.
If you’re looking for a painless way to see how every video and social post is doing across a variety of channels, our social analytics tool is a frictionless way to do so.
 Social Analytics from CoSchedule: Prove the ROI of the work you do!
#Facebook video marketing tip: analyze video post performance with Social Analytics in @CoSchedule:
Click To TweetTwitter and Instagram Video Marketing Tips
Great news. On Twitter, videos are six times more likely to be retweeted than photos. And Instagram users share over 95 million photos and videos per day. So, let’s take a look at how you can make the most of those tasty stats.11) Use Video Replies in Addition to Tweets
Okay, technically this isn’t a tip to market your videos, per se. But it is a sweet, low-effort-high-reward way to use video on Twitter. It’s all about spending a few extra seconds on your replies. When people tweet @ you, they’re doing so because they care about both you and your content. So, when is there a better time to deepen a social media interaction than when they’re talking to you? The concept is simple: When someone replies, retweets, or mentions you on Twitter, hit them back with a video response instead of text. If you want some inspiration on how to execute this tip, spend a few minutes watching @garyveeshow us how it’s done.
#Twitter video marketing tip: Interact with your audience using video replies
Click To Tweet12) Go Beyond the “Link in Bio” Tactic With This Nifty Tool
As you know, Instagram is a bully when it comes to links in posts. Because they don’t allow them, most Instagramers use the “fresh link in bio” trick. That’s where you change the one link you’re allowed to have in your bio with each relevant post.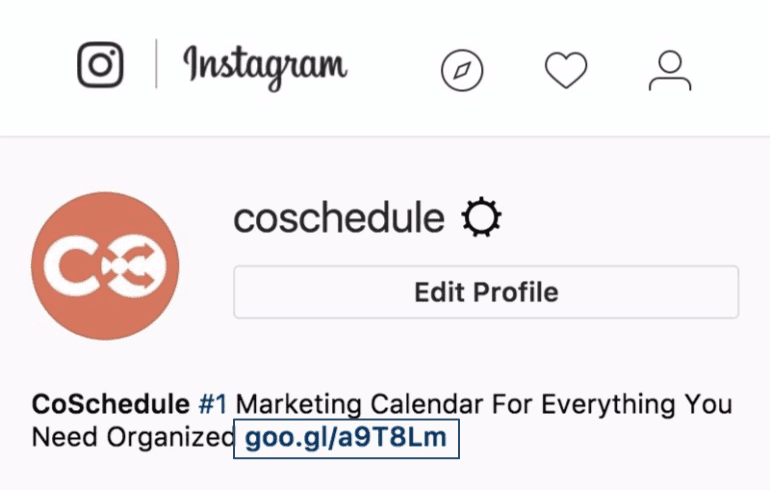 However, there’s a nifty service called elink.io that’s built a better mousetrap—or at least a better way to use your solitary Instagram link.
In essence, it allows you to create a sort of Inception of links (links within links).
However, there’s a nifty service called elink.io that’s built a better mousetrap—or at least a better way to use your solitary Instagram link.
In essence, it allows you to create a sort of Inception of links (links within links).
 When you create such a link, elink.io launches a unique page with curated links. This means that not only can you update it with fresh content, but you can add a host of related links with ease.
Here’s how it works.
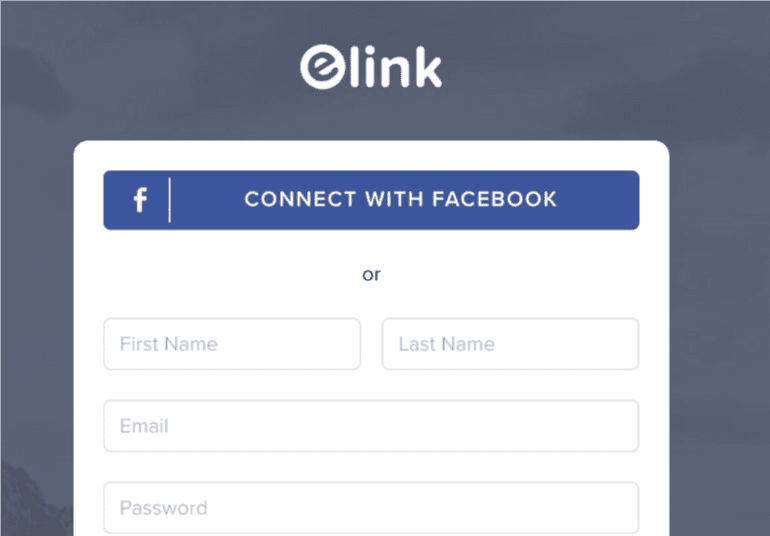
To start, signup for an account (they have free option to get started).
When you create such a link, elink.io launches a unique page with curated links. This means that not only can you update it with fresh content, but you can add a host of related links with ease.
Here’s how it works.
To start, signup for an account (they have free option to get started).
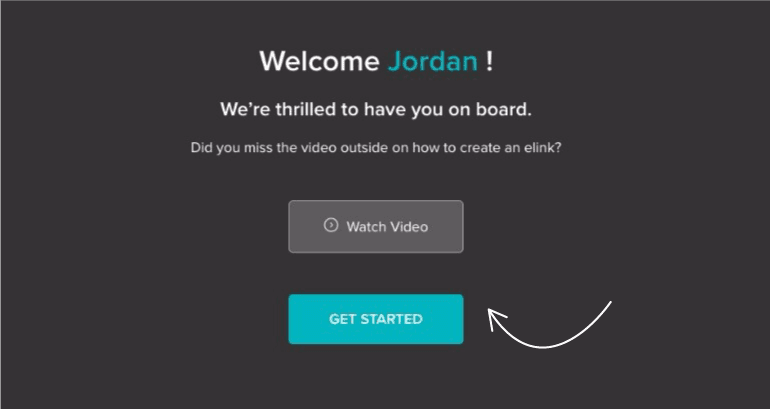
 Then, you can choose to watch their quick tutorial or jump straight in and get your hands dirty. We’ll throw caution to the wind and get started right away.
Edgy, I know.
Then, you can choose to watch their quick tutorial or jump straight in and get your hands dirty. We’ll throw caution to the wind and get started right away.
Edgy, I know.
 Once you’re in, it’s time to create your first link. Simply click on “Create New” on the left.
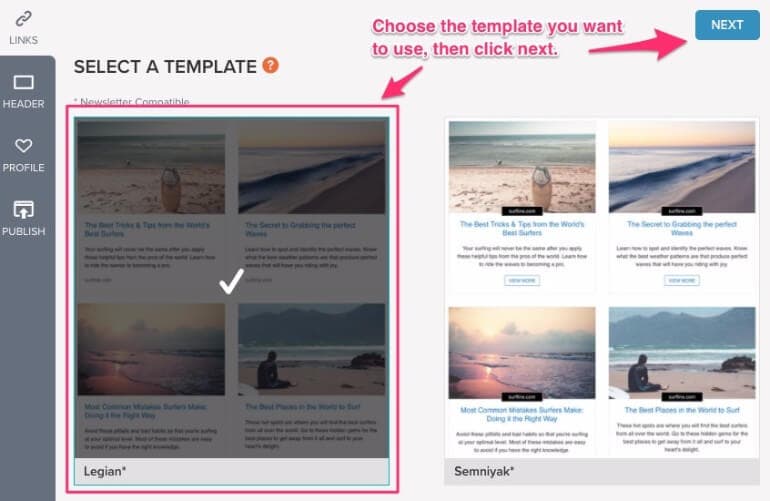
 From here, you have some customization options. But it’s easiest to start with a template. We’ll use the one named “Legian.”
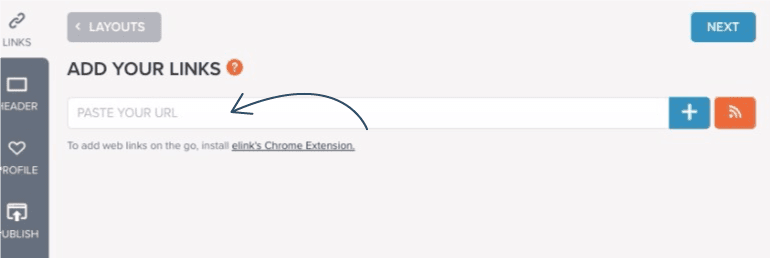
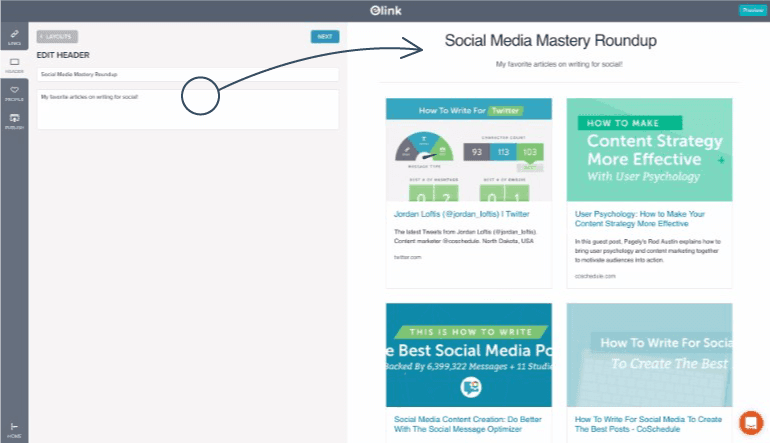
 Next, it’s time to paste in the bevy of links you’d like to include. I’m going to use a roundup to some of my favorite CoSchedule articles and my Twitter profile.
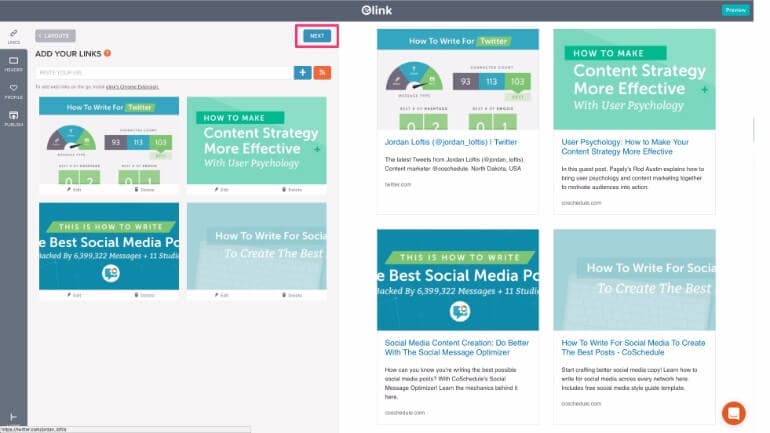
 As you add links, your template will fill out with each one. The interface gives you a nice preview on the right half of the screen, as well.
Once you’re happy, click the blue “Next” button to press on.
As you add links, your template will fill out with each one. The interface gives you a nice preview on the right half of the screen, as well.
Once you’re happy, click the blue “Next” button to press on.
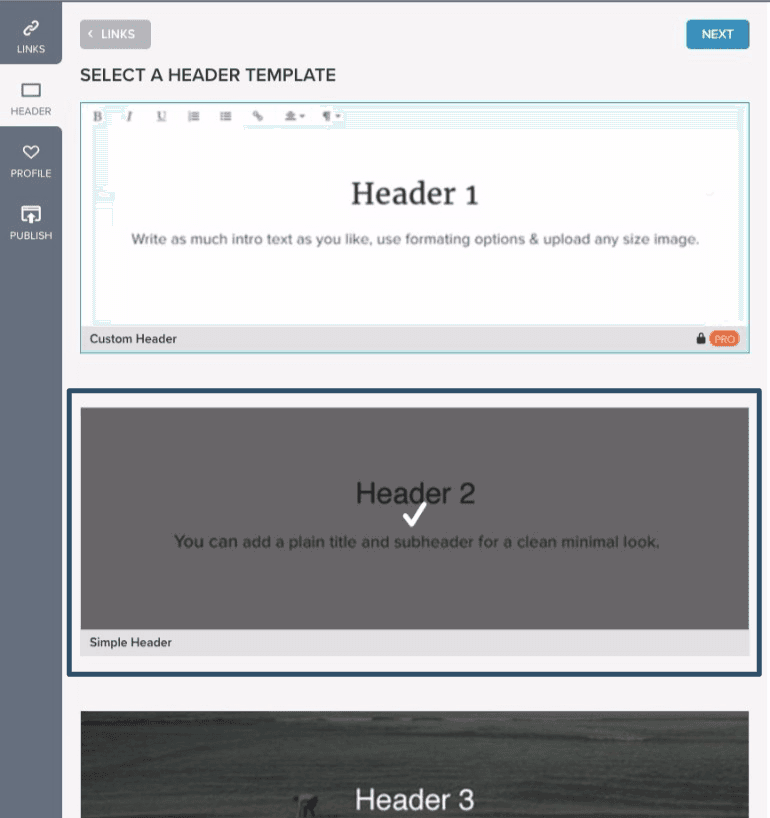
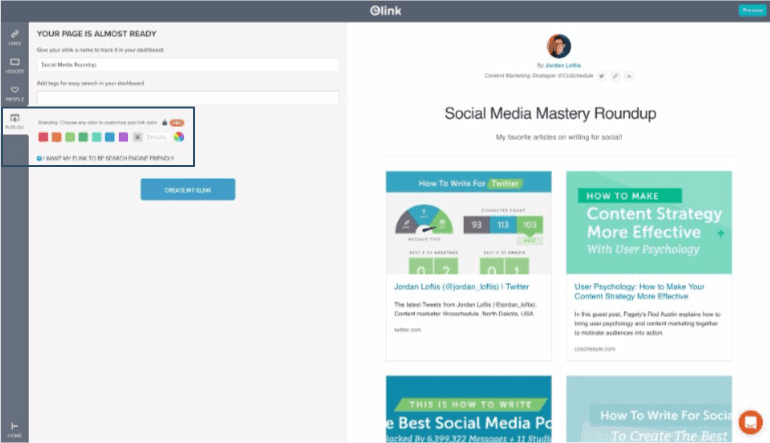
 After you’ve added your links there are just a few steps left. You’ll select a header, enter in a title and description, and then smash the “Create Link” button to go live!
Select a Header
After you’ve added your links there are just a few steps left. You’ll select a header, enter in a title and description, and then smash the “Create Link” button to go live!
Select a Header
 Enter a Title + Description
 Create Your Custom Link (and add profile info if you’d like!)
 Obviously this tool has more applications than Instagram only. But it’s certainly a way to up your Instagram video marketing game!
#Instagram video marketing tip: Use this tip with @elink_io to make the most of your bio link
Click To Tweet13) Automatically-Schedule Promo Posts Using CoSchedule
One of social media marketing’s perpetual woes is Instagram’s closed API. This shuts down almost every third-party app from posting to the social platform on your behalf. That is...except for CoSchedule ? We already have some detailed posts on exactly how to use CoSchedule to do this. So in this tip I’ll describe the highlights… Or, you can watch this quick video: Schedule Instagram Posts Along With Everything Else - CoSchedule
Schedule all your Twitter and Instagram posts (and more) with @CoSchedule
Click To TweetTips to Use Video For Blogging + Email
Of course your video content will make many an appearance on your blog. Plus, if you’ve gone through the work of creating videos, you’ll want to cash in on the fact that using video in emails leads to a 200–300 percent increase in click-through-rate. In this section of tips, we’ll cover some overlooked insights on doing both well.14) Embed Videos Wisely
Have you ever wondered what the difference between adding a link to a video and embedding it? Wonder no more! In a nutshell, embedding a video means a viewer doesn’t have to leave his or her current web page to watch the video. Whereas linking to a video means the same viewer will be redirected to the destination URL. Basically, embedding videos keeps people in their seats while links send them somewhere else. Both have their advantages. But embedding videos rather than linking to them from your website or blog is a great way to keep them on your site for longer. And it’s an absolutely essential tactic to use for landing pages that convert. Alright, let’s use YouTube as an example of how to use this nifty spell of internet magic. YouTube: Linking vs. EmbeddingHere’s the video we’ll be working with: As an example, here’s how you would grab the code to embed a YouTube video on your blog.
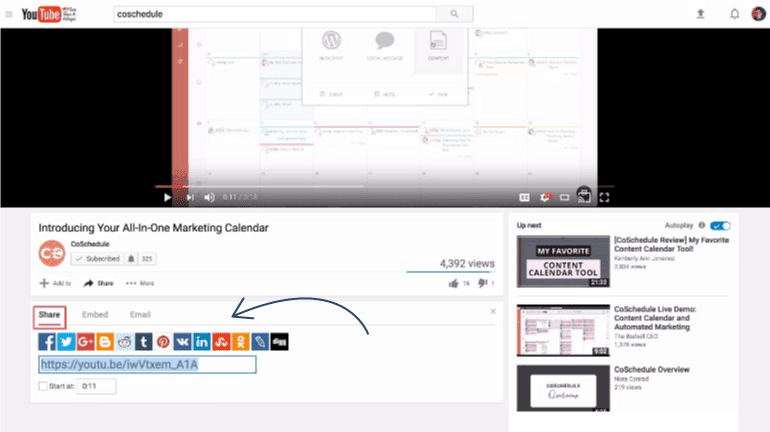 Instead of clicking on the “Share” tab, like in the image above, click on the “Embed” tab, like in the image below.
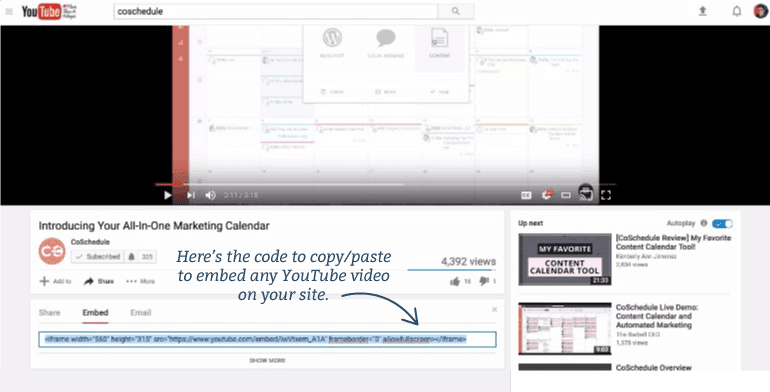 Once you click on this tab, you can copy the necessary embed code and paste it directly onto your site.
This way, viewers can watch the video without ever leaving your site. This, as said above, gives you much greater ownership and control of their experience.
However, there is one concern to keep in mind when it comes to embedding videos: page load speed’s impact on SEO.
Said Mark Robertson, founder of ReelSEO (now Tubular Insights):
Once you click on this tab, you can copy the necessary embed code and paste it directly onto your site.
This way, viewers can watch the video without ever leaving your site. This, as said above, gives you much greater ownership and control of their experience.
However, there is one concern to keep in mind when it comes to embedding videos: page load speed’s impact on SEO.
Said Mark Robertson, founder of ReelSEO (now Tubular Insights):
“Aside from making sure that video adds value and fits into the context of your message, there are a few video publishing best practices to keep in mind that, if done improperly, can potentially harm SEO efforts. The most important of these, is to follow best practices for mobile friendliness (e.g. HTML5) and page speed considerations. “As an example, adding multiple video embeds to a single page, if not done correctly, can greatly increase page load times. We know that page speed is a ranking factor, but even worse would be if potential visitors abandon your page altogether—negating any user benefits and sending additional negative signals to the algorithms.”The moral of the story is to make the most of video embedding by balancing viewer-experience control with page-load-speed considerations. If you simply must embed a legion of YouTube videos on a single post or page, however, you may want to consider this clever method for doing so without increasing page load speeds.
15) Know How Video Content Fits Into Your Overall Strategy
We’re not advocates of #strategy as a #buzzword. Our goal is never to heap extra work, planning, tasks, follow ups, and more onto your marketing plate. To us, strategy should be pretty dang simple and straightforward: Video content is no different. So, how can you make your video content work best for driving traffic to your other content? One tip is understanding what problem your video solves, and how that problem relates to other content you’ve created. How to drive traffic using the PSP Framework Think about it in the problem-solution-problem (PSP) framework (which I learned through a free workshop via Jeff Walker). You’ve likely heard of the problem-solution framework, as that’s a pretty popular method of writing essays in school. Simply put, this strategy introduces a problem, then offers a solution. With the PSP structure, however, you tag on an additional problem at the end that sets your audience up to crave more. Here are the bones of the strategy. If your current video content solves a problem, you can introduce a logically related problem to compel the viewer to click further down your content funnel. For instance, let’s say you created a video about how to train your dog to catch a ball. (Which, incredibly, is actually possible.) Now your viewers know the ins and outs of teaching their dogs an awesome new trick. However, let’s take a step back and ask an important question, “What other content have I created that solves a related problem?”
For instance, maybe you’ve written the ultimate guide to teaching your dog how to catch 1,000 balls.
(^ I like to keep my examples pretty true to life.)
Now your viewers know the ins and outs of teaching their dogs an awesome new trick. However, let’s take a step back and ask an important question, “What other content have I created that solves a related problem?”
For instance, maybe you’ve written the ultimate guide to teaching your dog how to catch 1,000 balls.
(^ I like to keep my examples pretty true to life.)
 In this far-fetched example, you can add some copy, a YouTube card or end screen, or even a quick “pro-tip” that helps your viewers see that not only have you solved their current problem, but you’ve already solved their next one as well.
This is a great way to go beyond the standard “related posts” fare and drive traffic.
In this far-fetched example, you can add some copy, a YouTube card or end screen, or even a quick “pro-tip” that helps your viewers see that not only have you solved their current problem, but you’ve already solved their next one as well.
This is a great way to go beyond the standard “related posts” fare and drive traffic.
#Video marketing tip: Make sure you understand how video is integrated into the rest of your strategy
Click To Tweet16) Use GIFS for Using Video in Email Marketing
Good news… There’s a better way to promote your video content There’s a slight problem with video marketing and email—most email clients won’t display embedded video content. This means your videos will get stripped from your emails. That’s where the beloved GIF enters the picture. Which is great, because everyone loves GIFs. Not only can they be hilarious: But they can also serve an excellent video marketing purpose. Namely, as video previews in email marketing.
Let’s take a look at how to create GIFs for use in email.
The most painless way I’ve found is using the popular GIF site called GIPHY. They have a function that allows you to create your own using already published videos or uploading your own files.
In this example, we’ll use a video from CoSchedule’s YouTube channel
But they can also serve an excellent video marketing purpose. Namely, as video previews in email marketing.
Let’s take a look at how to create GIFs for use in email.
The most painless way I’ve found is using the popular GIF site called GIPHY. They have a function that allows you to create your own using already published videos or uploading your own files.
In this example, we’ll use a video from CoSchedule’s YouTube channel. Let’s say we’re promoting this video that’s about what it’s like to work here. (^ It’s a blast, btw.) To create our GIF, start by copying the video’s URL. Then, visit GIPHY’s
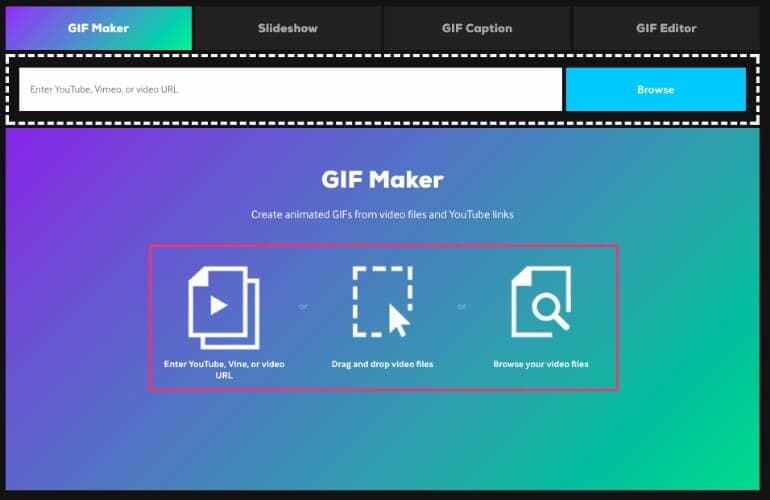 You’ll land on this page ^^^ and select one of three ways to create your GIF.
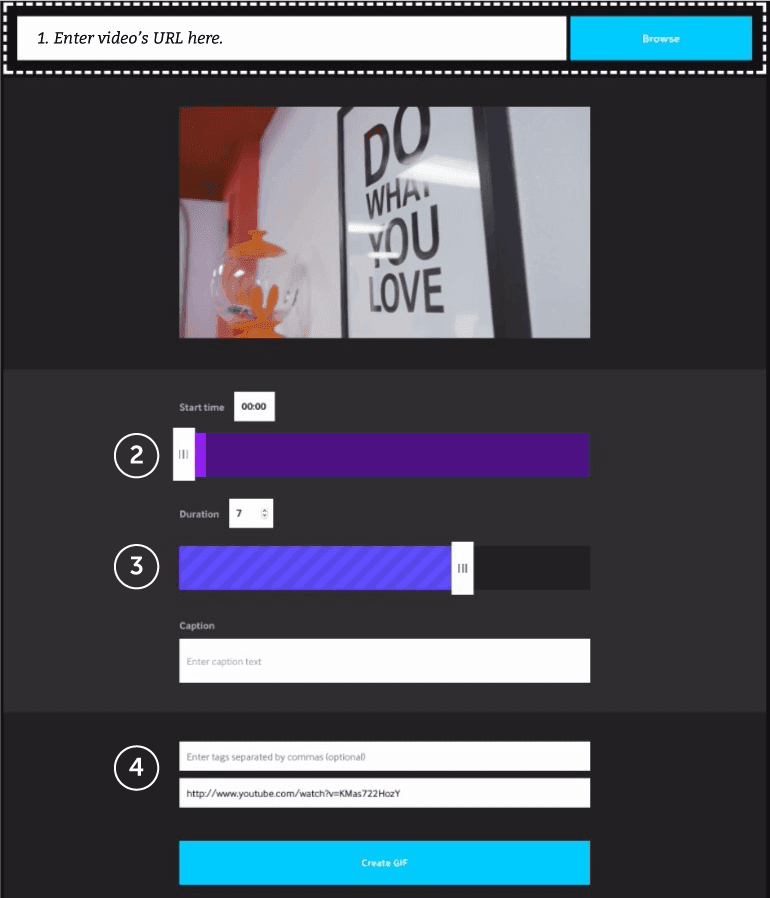
After pasting your link or uploading your files, it’s time to get creative. Making the GIF has a few steps:
You’ll land on this page ^^^ and select one of three ways to create your GIF.
After pasting your link or uploading your files, it’s time to get creative. Making the GIF has a few steps:
- Make sure you have the right URL pasted.
- Choose when your GIF starts.
- Select the overall duration of your GIF. (Optionally, you can also add a caption or tags.)
- Click create!
 Then, after it crunches the GIF into existence, you can copy the link, share it on social media, embed it on a website, or download it as a file!
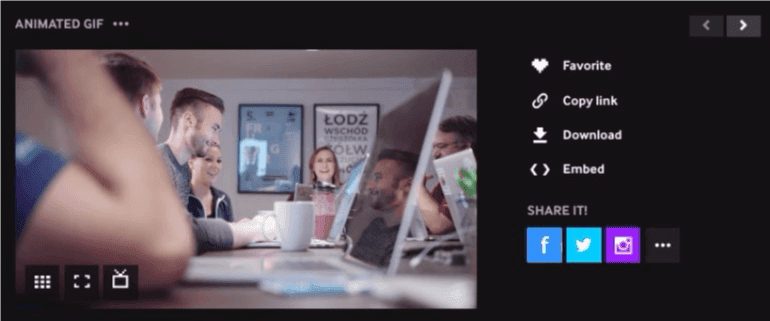 Here’s what my preview GIF looks like:
 Now, there are some email clients that don’t display GIFs well, like Outlook. However, in that case, you can still use your GIF as a static image. Just make sure the opening image makes sense and looks good!
Here’s a list of some popular email marketing platforms that offer GIF support along with links on how to get it done:
Now, there are some email clients that don’t display GIFs well, like Outlook. However, in that case, you can still use your GIF as a static image. Just make sure the opening image makes sense and looks good!
Here’s a list of some popular email marketing platforms that offer GIF support along with links on how to get it done:
#Video marketing tip: Liven up blog posts with GIFs
Click To Tweet


