Create Custom Fields
Custom Fields let you create points for specific data using drop downs, dates, text fields, and more. Add custom fields to Projects to get additional information or Request Forms to get further context from submitted requests. Custom Fields can also be used for filters in your calendar, Ideas Board, and Project Reports.
 When you create a new project, any Custom Fields will appear in a Custom Fields section.
Back To Top
 Please note that Request Forms are an add-on for Marketing Suite plans. Please talk to your Customer Success Manager if you would like to add this feature to your account.
Back To Top
Note: Custom Fields are only available in Content Calendar and Marketing Suite.
Create a Custom Field
To create a new custom field, go to Settings, then select Custom Fields from the left-hand sidebar. From there, you can select +New Custom Field. Choose your desired field type and configure the options as desired. You can choose from the following types of Custom Fields:Text Field
Allow users to enter a short amount of text. Select the Placeholder Text checkbox to add placeholder text that will be pre-filled in the text field. Select the Field Description checkbox to include a short description of the text field.Multi-line Text
Allow users to enter multiple lines of text. Select the Placeholder Text checkbox to add placeholder text that will be pre-filled in the text field. Select the Field Description checkbox to include a short description of the text field.Date/Time
Allow users to select a date. To also allow users to select a specific time, select the Allow Time Selection checkbox. Select the Field Description checkbox to include a short description of the field.Dropdown
Allow users to select one item from a dropdown list. Click Add option to create a new option for the dropdown list. Once created, drag the dropdown options to re-order them as desired. Select the Field Description checkbox to include a short description of the field.Multi-select Dropdown
Allow users to select multiple items from a dropdown list. Click Add option to create a new option for the dropdown list. Once created, drag the dropdown options to re-order them as desired. Select the Field Description checkbox to include a short description of the field.Checkboxes
Allow users to select items using checkboxes. Click Add option to create a new option for the list. Once created, drag the options to re-order them as desired. Select the Field Description checkbox to include a short description of the field.Multiple Choice
Allow users to select multiple items from a list. Click Add option to create a new option for the list. Once created, drag the options to re-order them as desired. Select the Field Description checkbox to include a short description of the field.URL
Allow users to enter a URL that will be clickable inside projects. Click Add option to create a new option for the list. Once created, drag the options to re-order them as desired. Select the Field Description checkbox to include a short description of the field.Number
Allow users to enter a number. This field accepts only numbers as a value and will allow a decimal value with a period, but not a comma. Click Add option to create a new option for the list. Once created, drag the options to re-order them as desired. Select the Field Description checkbox to include a short description of the field. Back To TopAdd Custom Fields to a Project Type
Once you have created a Custom Field, you can add it to a Project Type. This allows you to pre-assign useful Custom Fields that will be automatically included whenever you create a new project of that type. Custom Fields will appear in a Custom Field section at the top of the project. To add a Custom Field to a Project Type, select the desired Project Type and click Add Custom Field. When you create a new project, any Custom Fields will appear in a Custom Fields section.
Back To Top
Add Custom Fields to a Request Form
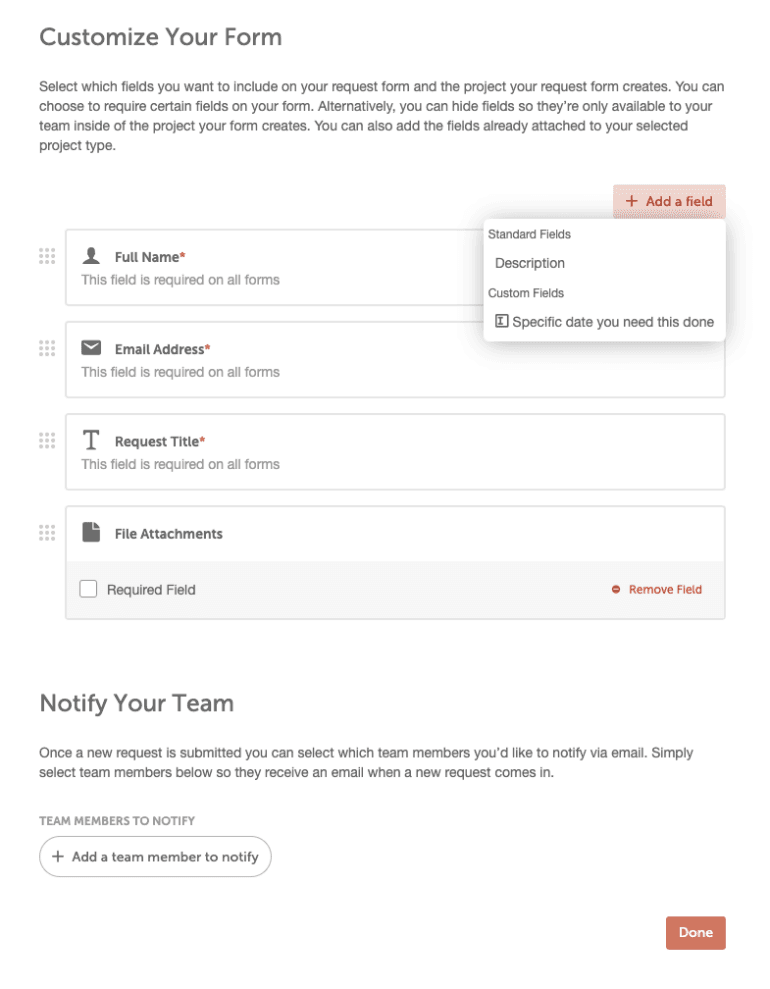
Use custom fields to make a fully-customized request form that includes all the options you need. To add custom fields, click Add a field, then select the desired custom field from the dropdown list. Once you have added the desired fields, you can drag them to re-order them. Please note that Request Forms are an add-on for Marketing Suite plans. Please talk to your Customer Success Manager if you would like to add this feature to your account.
Back To Top