How To Make An Awesome Ultimate Guide That Will Skyrocket Your Keyword Strategy

 As a marketer, you’ve probably heard about ultimate guides.
You’ve probably read a few (at least), too.
Maybe you’ve even created some yourself.
Whether you call them “ultimate guides” or something else (like one of Business Casual Copywriting’s ten better suggestions), the idea remains the same: build a multi-chapter guide covering an entire topic in deep detail.
Sure, they take time and effort to get right. But, when done well, they can rank for tons of keywords, establish you as a topical authority, and drive enormous amounts of traffic.
In this post, we’ll explain exactly how to create an awesome topical guide, supported by a strategic keyword strategy that will 10X your results. Some things we’ll cover include:
As a marketer, you’ve probably heard about ultimate guides.
You’ve probably read a few (at least), too.
Maybe you’ve even created some yourself.
Whether you call them “ultimate guides” or something else (like one of Business Casual Copywriting’s ten better suggestions), the idea remains the same: build a multi-chapter guide covering an entire topic in deep detail.
Sure, they take time and effort to get right. But, when done well, they can rank for tons of keywords, establish you as a topical authority, and drive enormous amounts of traffic.
In this post, we’ll explain exactly how to create an awesome topical guide, supported by a strategic keyword strategy that will 10X your results. Some things we’ll cover include:
- Choosing a topic for your guide.
- Planning the exact chapters you’ll create (and keywords to target on each one).
- Examples of excellent guides you can follow for inspiration.
How To Make An Awesome Ultimate Guide That Will Skyrocket Your Keyword Strategy
Click To TweetManage Your Ultimate Guide Development Process With These Templates
There are a lot of steps in the process we'll outline in this post. To make things easier, we recommend downloading your free template bundle below. It includes:- Content Marketing Calendar Template: Map out deadlines for each piece of your guide on one calendar. It'll serve as your team's single version of truth so everyone (writers, designers, developers, and project managers) is on the same page.
- Keyword Research Template: Store your keyword ideas for each page in your guide. Capturing search traffic is a big part of what this is all about, and nailing your keyword research is important.
- Web Page Content Writing Template: Make sure each page in your guide includes the right information for your developer to implement. That includes on-page content, title tags, meta descriptions, and more.
- Latent Semantic Indexing Infographic: Latent semantic indexing sounds more complicated than it is, but it's important to understand if you want to rank higher for more keywords. This infographic explains how the concept works, and how you can apply it to your guide.
What Is An “Ultimate” Guide?
So, as you may have guessed, we’re not big fans of the term “ultimate” guide. That’s mainly because it’s an overused term. However, it’s also the most popular and widely-used phrase for what we’re describing, so we’ll concede defeat and use the terminology folks know. With that aside, an ultimate guide typically features a couple things:- It covers a broad topic in detail. If you have a competitive keyword for a broad topic, it’s a good candidate for this type of guide.
- It features one main page and several smaller chapter pages. Generally, this means building out a main page with a well-designed table of contents linking to each chapter page. They may also use deep links embedded on a single page to break out chapters.
What Are The Benefits to Building Comprehensive Topical Guides?
If you’re going to put in the work, there needs to be a payoff. Here are some of the primary reasons to create guides.- Ranking for large numbers of competitive keywords. Building topic clusters around a central theme makes it easier to rank more pieces of content for more keywords. Interlinking several pieces of related content together sends a strong signal to search engines that you have a lot of good, authoritative content on a subject (and it makes it easier for readers to find everything they’re looking for).
- Attracting links. Big, in-depth resources make awesome targets for other sites to link to. One high quality guide can keep attracting links for months or years.
- Positioning yourself as the go-to authority on your topic. Building trust builds customers.
Five Examples of Killer Ultimate Guides
Before we show you how to build a guide of your own, it might help to show you some examples first. Here are some quality examples you can follow for inspiration.The Beginner’s Guide to SEO (Moz)
Ranking first for the term “SEO” is … insane. That’s exactly what this guide does, and has done, for years though. It’s the end-all, be-all guide that practically everyone in the business reads when they’re starting out (or looking for a reference). Check it out here: The Beginner’s Guide to SEO.
The Beginner’s Guide to Search Engine Optimization For Humans (Jeff Goins)
While this is similar to the Moz example above, what we like about Jeff Goins’ guide is its simplicity. If you don’t have ample resources for design and development, something like that Moz guide might be out of your reach. However, this one is a bit more simple in terms of aesthetic and structure, without sacrificing content quality or usefulness. Check it out here: The Beginner’s Guide to SEO (For Humans).
BookBub’s Ultimate Guide to Book Marketing (BookBub)
This one is a little different. Instead of unique pages for each chapter, it uses deep links (which add a # and a slug) for each chapter. Check it out here: The Ultimate Guide to Book Marketing.
TapClicks Content Marketing Guide (TapClicks)
This guide uses unique URLs for each chapter, and then uses deep links for each section within each chapter. It also keeps the design clean, relying on copy over images. Check it out here: TapClicks Content Marketing Guide.
The Ultimate Guide to Marketing Strategy (CoSchedule)
This is our own guide, written, designed, and developed from to finish by only three people. We set out with the aim to create the web’s best guide to marketing strategy (and we’ll let you decide if we achieved that goal). Check it out here: The Ultimate Guide to Create a Marketing Strategy That Will Skyrocket Your Results By 9,360%
Map Out Deadlines On Your Marketing Calendar
When we started our own guide project, we managed our workflows and team communication with CoSchedule. Considering the project’s complexity, we can’t imagine how it would be possible without using some sort of marketing management platform. First, consider how many people will be working on your guide. This might include:- Content writers. Everything here starts with the written word.
- Graphic designers. If your pages will have designed graphics, this role will be essential.
- Developers. Unless you’re going very barebones and creating everything yourself with plain WordPress pages, a developer will be required to bring the project to life.
- Project managers. Someone has to herd this whole team and make sure deadlines get met.
- Account managers. If you’re at an agency, your account manager (or other title for client liaison) will need to understand the progress of the project in order to communicate with your client.
- Time for kickoff and planning meetings.
- Writing 10-12 pages of web content.
- Designing on-page graphics.
- Coding and developing the entire guide.
- Creating social media promo content.
- Four hours of writing and research.
- Three hours of graphic design.
- Two hours of development (after the structure of your pages has been built).
 Give your project a name and an owner. Then, set the start and end dates for your project:
 Click Create Campaign. Next, you’ll see a color bar spanning the dates for your project on the calendar:
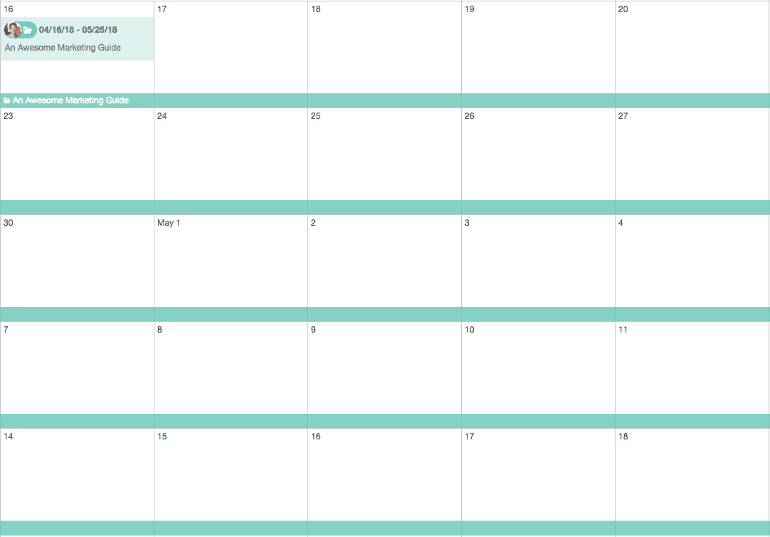 Then, using Custom Content Types, start adding all your required meetings and content projects onto the calendar (one for each page you’ll need to create):
 In the lower left on each piece of content on the calendar, you’ll see each one now belongs in this project:
 Keep adding pieces until every piece of the project is placed on the calendar. Then, once you actually start executing each piece, use Discussions to communicate between team members:
 And to make sure each piece gets completed the right way the first time, use Task Templates (these are simple reusable checklists):
 Now, you’ll be all set up to execute your guide smoothly from start to finish.
Now, Do It Yourself: Determine Your Topic
Start by asking yourself this question: “What does our company most want to be known for?” Your answer is your starting point for selecting a topic. If you’re struggling, try following this exercise:- Talk to your head of marketing or sales. Ask them the same question you asked yourself.
- Refer to your company’s mission statement. You can likely spin off some ideas from there.
- Determine the number one problem your product solves. A guide that offers information around that problem would probably be helpful, too.
Next, Nail Your Keyword Research
Once you have a topic selected, it’s time to start your keyword research. This entails finding one primary keyword and tons of relevant secondary (or Latent Semantic Indexing) keywords. You’ll then map those keywords around your topic, forming what’s called a topic cluster. Here’s a simple illustration diagramming what a topic cluster looks like: Essentially, your primary topic is your main pillar content, which links down to multiple pieces of related content. Your pillar content should target your most broad and (most likely) highest-volume keyword, while your related content should target more narrowly focused terms.
Start With Your Favorite Keyword Tools
To begin, fire up your keyword research tools. Here are some of our favorite options:- Ahrefs Keywords Explorer. This is a premium tool included in Ahrefs growing SEO platform. It’s by far our favorite option for getting detailed keyword data.
- Moz Keyword Explorer. Similar to the Ahrefs tool, you’ll need to be a Moz customer to make use of this one.
- SERPs.com Free Keyword Research Tool. This freebie is useful for quickly checking keyword search volume in a pinch.
- Google Adwords Keyword Planner. It’s free and practically ubiquitous with keyword research. While it’s geared toward PPC, it still has value for organic SEO, too.
- LSI Graph. This free tool is incredibly useful for spinning off related keywords from one core topic.
- Ubersuggest. Enter a keyword and this tool returns actual Google autocomplete suggestions.
 Now, there are a few things to look for here (which are included in most other tools as well):
- Search volume. This is an estimate of how many times a keyword gets searched per month.
- Keyword difficulty. This measures how tough it’ll be to rank on a given keyword.
- Parent topic. This is something that’s unique to Ahrefs (and what makes it helpful for this kind of work); it tells you which top-level topic your chosen keyword is related to. This is extremely useful for narrowing down your topic and primary keyword for your pillar content.
Now, Narrow Down Your Keyword Options
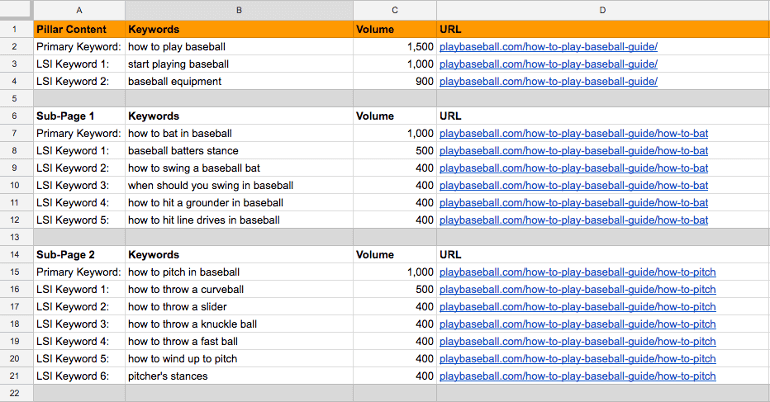
The next step is to sort your keywords. Assign one primary keyword per page you’ll create. Then, select secondary keywords to help round out each page in your guide. To do this, use the simple keyword research template included in this post (if you haven’t yet, be sure to grab that bundle). Here’s what it looks like: To use this template, add the following:
- The primary keyword for each page. This is the main keyword each page should focus on. It should be directly tied into the main topic for your pillar page and each sub-page.
- Your LSI keywords. These terms should be used on each page, supporting the main topic on each URL.
- Search volume. Make prioritizing keywords easier by recording the search volume for each one you’ll use here.
- URL. Determining your URL structure now will make it easier to figure out later. It should look something like this:
- yourdomain.com/guide-topic/ for your main page
- yourdomain.com/guide-topic/page-level-sub-topic for each chapter.
 There are several things to note here:
- Each page prioritizes the most broad, top-level keyword for its topic area.
- Each LSI keyword is a sub-point beneath that primary keyword.
- There isn’t a fixed number of keywords to target on each page. We’re just adding what’s relevant and makes sense in context for each page.
Dig Deep Into Topical Research
Once you know what you’ll write about, it’s time to dive into research. After all, if you’re going to position yourself as a topical expert, you need to actually be an expert (or do an extremely convincing job of sounding like one). If you need help getting started, we’d recommend beginning with our list of 30 content research tips. You’ll be sure to grab at least a few new ideas to help you nail your research.Start Writing Your Content
Now, it’s time to start writing all your content. For each page, you’ll need to write:- Title tags. These are the blue links that appear in search results. They tell search engines and users what your page is about.
- Meta descriptions. This is the block of text that appears beneath your title tag. They should encourage click-throughs in 156 characters or less.
- Headlines. Make ‘em stick with our Headline Analyzer Studio.
- Body content. Make each page in-depth (word counts aren’t important, but you’ll likely need at least 1,000 words per page).
- Calls to action. If you have a conversion step you want people to complete (like starting a trial or joining your email list), then include that CTA on each page.
Writing Strong Title Tags
Every title tag on each page should:- Include your primary keyword. This is the most important on-page element that search engines use to determine what your page is about. If it makes sense, consider moving your primary keyword as far to the left as possible (the first words that appear in a title tag are treated as the most important).
- Stay under 70 characters. This is Google’s limit before they get truncated.
- Be consistent with your page’s headline. The title tag and headline should communicate the same message (but they don’t necessarily need to be identical word-for-word).
Writing Strong Meta Descriptions
Like we said earlier, meta descriptions should be no longer than 156 characters (don’t make them too short though). While they don’t impact rankings, they do influence users to click. Think of them as small blocks of ad copy that sell readers on the idea of reading your content. A good meta description should:- Include your primary keyword. This helps show that your page is relevant to what the searcher is looking for.
- Tell people what they’ll find on your page. Summarize the main points of your content. Be sure to incorporate a clear benefit to your reader.
- Create some urgency. Make people want to click that link.
 It includes each of the elements listed above (primary keyword, summary and benefit, and a callout to free templates to further entice clicks).
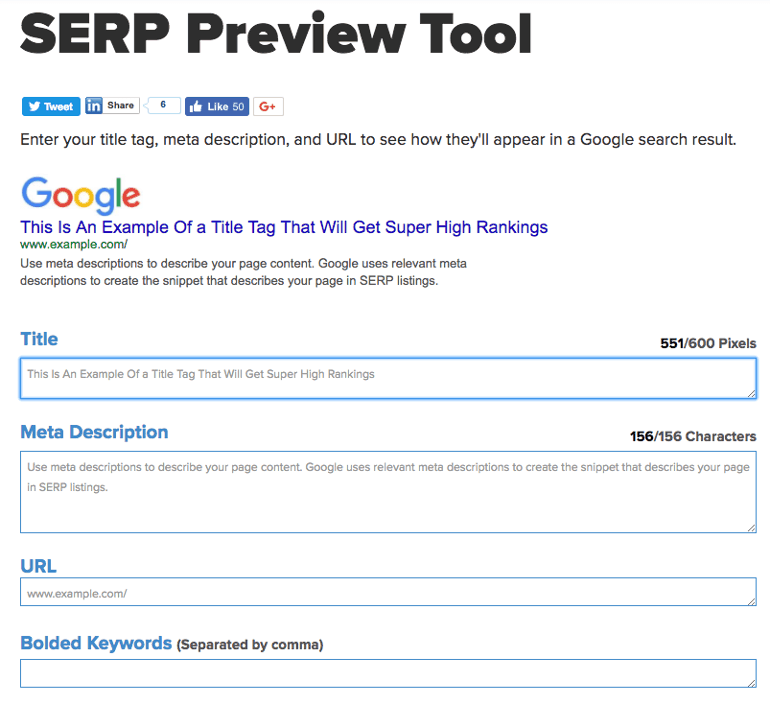
Use the SERP Preview Tool mentioned above to test your meta descriptions for each page.
It includes each of the elements listed above (primary keyword, summary and benefit, and a callout to free templates to further entice clicks).
Use the SERP Preview Tool mentioned above to test your meta descriptions for each page.
Writing Strong Headlines
Catchy headlines are key for selling readers on your guide. The easiest way to optimize your headlines is with our Headline Analyzer Studio. Visit the tool and enter a headline: Then, see your score:
 We recommend writing 20 to 25 headline options per page. Then, settle on your best work. Make sure each headline includes your primary keyword phrase on each page.
Writing Strong Body Content
Each page in your guide should deliver the following:- Clear formatting. Stick to H2 and H3 heading tags. Going smaller often results in messy looking pages.
- Strategic keyword placement. Remember your LSI keywords? Work those into your H2 and H3 subheadings as appropriate.
- Actionable how-to steps. You’re creating a guide to help people learn how to do something, right? So, actually show them how to get it done! Use a mix of step-by-step action items and videos to clearly demonstrate how to implement your advice.
- Comprehensiveness. Cover that entire topic in full. The more complete your content, the better. Use the Skyscraper Technique to make sure you create the most resourceful content available on the web.
 Here, you can see a few things:
- The subhead is in an H2 tag. It also includes a long-tail keyword.
- The body text is broken up with bullet points where appropriate. This makes the page easier to skim and read.
- Callout boxes are used to add visual interest. If you’re using WordPress, you can create a similar effect following this guide (warning: it’s very developer-centric) or using this plugin.

Recommended Reading: 40 Content Writing Tips to Make You a Better Marketer Now
Writing Strong Calls to Action
You’re probably doing all this work because you want more leads and customers. So, include a relevant call-to-action on each page. This generally entails writing:- A short and punchy line of copy. Keep it to five or six words at the most.
- Compelling button copy. Two or four words, including a strong verb.
- Download Now
- Sign Up Now
- Get Your Free Copy
Recommended Reading: How to Write a Call to Action In a Template With 6 Examples
Working With Designers And Developers
After all your content has been written, it’s up to your designers and developers turn your content docs into actual web pages and get everything launched. Don't cut corners here! To understand the importance of strong visual design, refer to this infographic from Neil Patel: If you’re a content writer or marketer involved in content planning and creation, there are some things you can do to make this easier. Here are some tips.Include Clear Image Direction In Your Content
If you have ideas for images you need designed, give your designers clear directives on what you’re thinking. Include the following two things:- A brief one or two sentence description of what the graphic should be about.
- The exact text you want included on each graphic.

Provide the Exact Formatting You’d Like
This means giving your development team the exact content and meta data you want included on every page. If you use the web content writing template included in this post, this should be simple. Text that you’d like placed within H2 and H3 subheadings should also be called out in your content docs. Having this information up front is necessary for your developers to work efficiently and ensure that everything is formatted correctly for readability and on-page SEO.Be Open to Feedback
If your designers or developers suggest making changes, or let you know that something will need to be adjusted or won’t work, keep an open mind. You’re working together as a team to make your guide great, and that might mean making changes from your initial vision.
Recommended Reading: How to Work With Designers With Authentic Advice From CoSchedule's Designer
Promoting Your Guide
Once your guide goes live, you’ll need to promote it like crazy. The more you can have planned up front, the easier it’ll be to execute your promotion strategy.Set Up Social Media Promotion
Create a comprehensive social media campaign to promote your guide. Follow these steps:- Choose your networks. Twitter, LinkedIn, and Facebook are some obvious choices.
- Write effective social media posts for each one. Avoid cross-posting.
- Schedule your social promotion for the long haul. You want to keep driving attention and traffic to your guide long-term. Using ReQueue (the only intelligent social media queue) is the best way to do this.
 For more assistance with social scheduling (that’s something we know a thing or two about), check out these posts:
Do Some Manual Email Outreach
Send your guide to industry friends and people you know. Use a simple template like this:Hi there,
We’ve created an in-depth guide to [INSERT TOPIC]. It’s titled [INSERT HEADLINE], and it’s something we’re really proud of.
Would you mind taking a look and letting us know what you think? If you’d like, feel free to share it with your social followers.
Thanks for your time!
Best,
[INSERT SIGNATURE]
Take some time to personalize this template and add more context around why your specific guide is valuable to their specific audience. Most of the time, people that you know will be glad to help. Just be sure to reach out to people you have an actual working relationship with.Recommended Reading: How to Write a Pitch Email That Will Get Your Guest Post Accepted
Measure Your Success
Here’s the moment of truth. Your guide is out in the wild. It should be ranking for tons of keywords and driving incredible traffic, right? Use Google Analytics and rank tracking software to find out. If you’re using Moz or Ahrefs (two SEO platforms we mentioned earlier), add all the primary keywords you’re trying to rank for on into your campaign. If you’re looking for a free option, SERPs Rank Checker tool is decently reliable. They also offer a complete premium SEO platform like Moz and Ahrefs you can consider, too. Beyond just looking at rankings though, here are some specific things to keep an eye on.- Total traffic. Track how much traffic is going to each page of your guide.
- Total number of ranking keywords. Ahrefs and Moz both make it possible to see which different keyword phrases are sending traffic to your pages.
- Conversions. How many of those visitors are taking your desired action? Learn how to track conversions in Google Analytics with this guide from AdStage.
Recommended Reading: How to Crush Google Analytics Spam in 2017
Now Go Build an Awesome Guide and Crush Those Keywords
You now have the game plan you need to build your guide and start ranking on those competitive keywords you always thought were out of reach. All you need now is time and the commitment to succeed. Do you have any experience developing quality guides to share? Leave us a comment and help start the conversation.


